Wi-Fi Site Surveys, Analysis, Troubleshooting runs on a MacBook (macOS 11+) or any laptop (Windows 7/8/10/11) with a standard 802.11be/ax/ac/n/g/a/b wireless network adapter. Read more about the 802.11be support here.
WiFi Audit: How to Actually Check Your Wireless Network
Need a WiFi audit but don’t know where to start? Learn what a WiFi audit is, when you need it, and how to run a step-by-step wireless network audit with NetSpot.
We usually only start thinking about our WiFi when it's acting up. The rest of the time, we simply assume that WiFi "works somehow", when in fact, it's a rather sensitive radio system.
Because WiFi is invisible, it's impossible to simply look at a cable and immediately see what's wrong. Interference, weak signal, overloaded access points, outdated security measures — all of these things are hidden until you start looking. That's what a WiFi audit is for: a structured check of your wireless network's health using reliable tools, not guesswork.
In this guide, we'll explain in detail what a Wi-Fi audit is and explore other related topics.
Jump to...
What Is a WiFi Audit?
In plain language, a WiFi audit is a full health check of your wireless network. It’s not just “run a speed test and hope for the best”. It’s a structured process where you look at how your network behaves in the real world and whether it’s configured and secured the way it should be.
A proper WiFi audit usually covers four big areas:
- Coverage: where the signal is solid, where it starts to fade, and where you end up with no WiFi at all.
- Performance: the actual download and upload speeds, how much delay you see, how stable the connection is, and what happens to the network when people are really using it.
- Configuration: which channels and channel widths you use, how much power the access points transmit with, how devices roam, which WiFi standards are running, and how all the APs share the air between them.
- Security: the type of encryption, how passwords are handled, how guest networks are set up, whether devices are isolated from each other, the presence of any rogue access points, and any obvious gaps in your WiFi security.
There’s also a basic inventory piece: which access points and routers you’re running, where they are, and what client devices connect to them.
The main difference between a WiFi audit and “checking the signal on your phone” is structure. A WiFi audit is a process, not a one-off test. You go in with a plan, gather data in a consistent way, think through what it means, and write down what needs to change.
On top of that, there are narrow WiFi security audits that focus almost entirely on security posture: weak encryption, bad segmentation, misconfigured guest access, easy attack paths, and so on. Those follow more formal security frameworks and are often used in regulated environments.
And finally, WiFi audits are not just for giant enterprises. Home networks can suffer from noisy neighbors, bad router placement, or weak passwords. Small offices, shops, schools, and warehouses all depend on stable WiFi too. From annoying dead spots in your living room to compliance requirements in a hospital, a WiFi audit gives you a clear picture of what needs fixing.
When You Actually Need a WiFi Audit
In theory, you could benefit from a WiFi audit any time. In practice, there are a few clear signals that it’s time to run a proper check.
- Persistent Performance Issues: If slow WiFi has become the norm for you — you're experiencing problems with video calls, page loading, apps freezing, and even losing signal entirely in some rooms — you've already passed the "router reboot" stage. A WiFi audit will help you determine whether the problem lies in coverage, interference, poor WiFi network design, or simply too many devices on too few access points.
- Security concerns: If you don’t really know who has your WiFi password, which SSIDs are still active, or what encryption you’re using, you need at least a basic WiFi security audit. Same story if you’ve never checked for rogue access points or open, forgotten guest networks.
- Growing load and new WiFi standards: Maybe you added VoIP phones, more laptops, tablets, scanners, or IoT gadgets. Maybe you’re planning a move to WiFi 6, WiFi 6E, or even WiFi 7. A WiFi audit gives you the baseline you need before you invest: how many access points you really need, where they should go, and whether your current design can handle the new load and new frequency bands.
- New sites, moves, and remodels: New office, expanded warehouse, changed floor plan, extra meeting rooms, new walls where there used to be open space — every significant physical change is a reason to revisit your wireless network design. Doing a WiFi audit during or right after those changes is much cheaper than constantly fighting complaints later.
If any of this sounds familiar, you’re past “maybe later” territory. That’s a good time to schedule a WiFi audit rather than applying more random tweaks in the router UI.
How to Prepare for a WiFi Audit
You’ll get much better results from a WiFi audit if you do a bit of prep work upfront. It doesn’t have to be complicated, but it saves a ton of time once you start walking around with a laptop or tablet.
First, be clear on your goals. Are you mostly worried about speed? About Wi-Fi calling quality? About guests mixing with internal traffic? About being ready for Wi-Fi 6E? Your goals will influence which measurements matter most and how deep you go into the WiFi audit.
Then collect a few basic inputs:
- Floor plans or sketches of your home, office, or warehouse (even a rough PDF or image is better than nothing).
- A list of network gear: routers, access points, controllers, switches that power the APs.
- Critical areas where WiFi absolutely must be stable: meeting rooms, cash registers, scanners in a warehouse, classrooms, etc.
- Key applications and requirements: voice calls, video conferences, barcode scanners, cloud apps, POS systems, and any SLAs you care about.
Once you have this, you’re ready to actually run through a structured WiFi audit rather than just wandering around trying random things.
Step-by-Step WiFi Audit Checklist
Now let’s look at the practical steps for running a WiFi audit. You don’t need a truck full of equipment. A good WiFi analyzer or survey app (for example, NetSpot or a similar network testing tool) installed on your laptop or tablet is usually enough to get started.
The goal is simple: first understand what’s happening in the air, then walk the space, then stress-test the network a bit, and finally look at security and fixes.
Get a Quick Snapshot of Your Wireless Environment
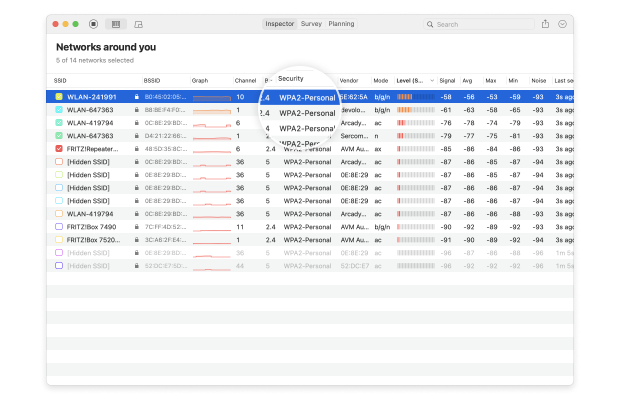
Before you start walking around, take a quick look at what’s already in the air. Open your WiFi analyzer and scan the networks around you. You want to see:
- Which SSIDs are active (yours and your neighbors)
- Which channels they use
- Approximate signal levels
- Basic security info (WPA2, WPA3, open, etc.)
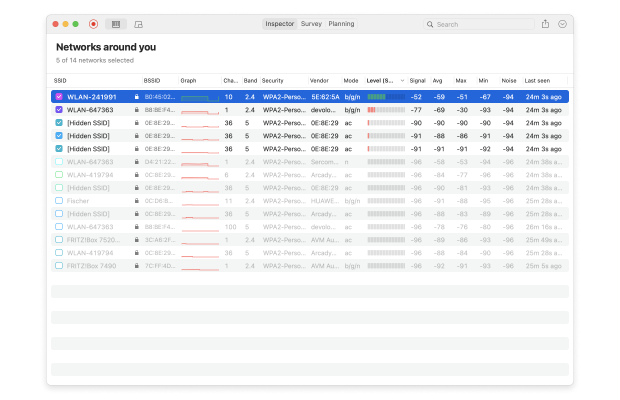
In a tool like NetSpot, this shows up as a live table: SSID, BSSID, channel, band, signal strength, security type and so on. That first snapshot tells you if you’re piled onto the same channel as your neighbors, stuck on 2.4 GHz, or using weak security. It’s a solid baseline of what’s in the air — and it sets up the next step: digging into which channels you should actually use and how wide they should be.
Check Your WiFi Channel and Channel Width
Next, zoom in on one of the most underrated parts of a WiFi audit: your WiFi channel and channel width. This is one of those changes that costs nothing but can have a big impact.
Look at your main SSID and note:
- Which exact WiFi channel it’s using.
- What channel width is configured (20/40/80/160/320 MHz).
- How many other networks sit on or near the same channel.
On 2.4 GHz, wide 40 MHz channels often hurt more than they help. In crowded environments, a narrow 20 MHz channel with a smart channel choice is usually the safer move. On 5 GHz you can often afford 40 or even 80 MHz channels, but only if your WiFi audit shows that the spectrum around you isn’t packed.
If you already use 6 GHz (Wi-Fi 6E or Wi-Fi 7), your channel and channel width choices matter even more, because you have more room — and more ways to accidentally overlap with yourself.
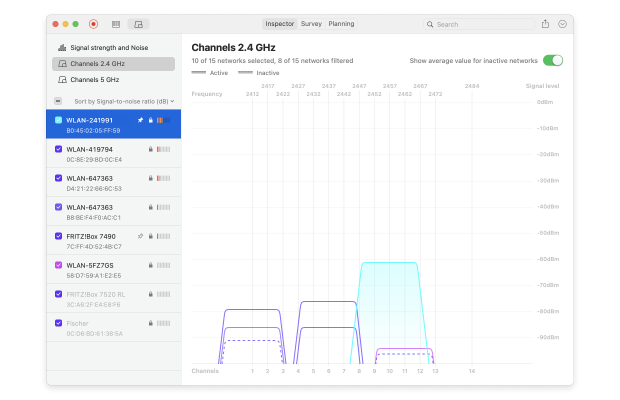
Most WiFi analytics software show channel, band, and width side by side. Spend a few minutes there before you touch anything else. Once you understand your WiFi channel and channel width situation, you’ll read the rest of the audit results with a lot more context.
Find WiFi Dead Zones and Coverage Gaps
The next step in a WiFi audit is to check coverage and identify actual dead zones.
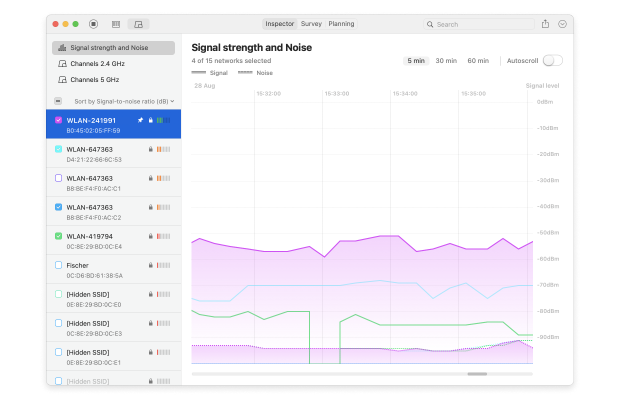
Open your WiFi analyzer or WiFi audit software and switch to a live view.
Watch how the signal behaves as you move. A healthy WiFi coverage pattern looks boringly stable: your signal stays in the “good” range and doesn’t jump up and down every few seconds. If you see big drops, sudden disconnects, or constant flapping between WiFi and cellular, you’ve probably found a WiFi dead zone or at least a serious coverage gap.
If your WiFi audit tool supports heatmaps, be sure to use this feature. Creating a WiFi heatmap is much more useful. Instead of taking scattered measurements at individual points, you get a holistic picture: it immediately shows how walls, doors, and furniture affect the signal, where users will experience slow speeds, and where the network simply doesn’t work.
This makes it easier to explain the problem to colleagues or clients and decide what exactly needs to be changed — the access point, its location, settings, or all three.
NetSpot implements this through Survey Mode. You upload a floor plan, walk a route with a laptop or tablet, and the app generates over twenty different heatmaps based on the results: from signal strength and signal-to-noise ratio to interference, download speed, and problem areas.
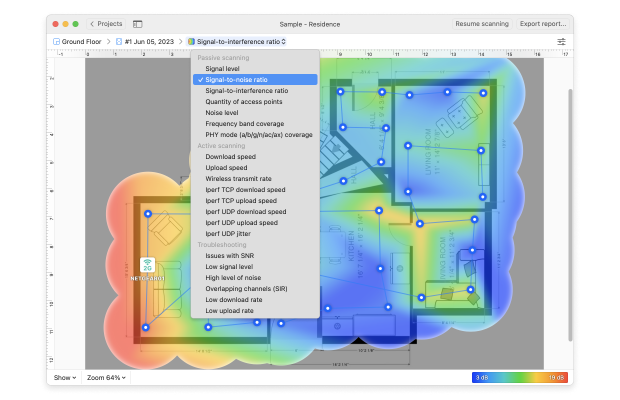
The end result is not just abstract numbers in a table, but a detailed and comprehensive picture of what’s really happening with your WiFi.
Check Real-World Performance
The next step is to see how your network performs in real life. Most people stop after running a quick online Internet speed test — like Ookla or Fast.com — and call it a day. But those single-point tests don’t tell the full story.
To get accurate results, you need a WiFi analyzer that measures how your network behaves under actual load. A tool like NetSpot goes beyond basic speed numbers. Its Active Scanning mode sends real traffic through your network, revealing true download and upload speeds, latency, and even jitter across different areas.
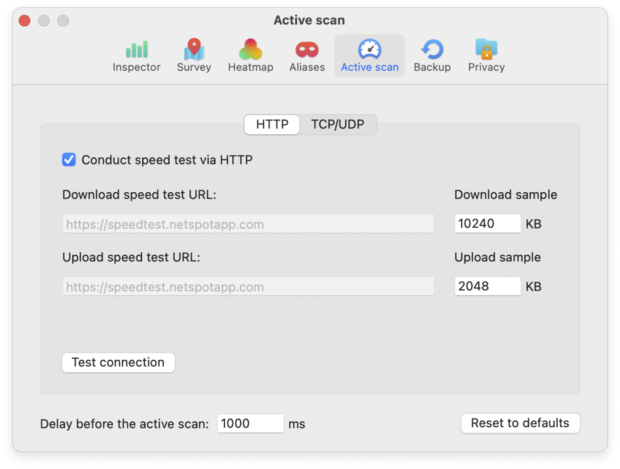
For deeper diagnostics, NetSpot can also integrate with iPerf, allowing you to test throughput between devices and visualize the results as a detailed performance heatmap. This gives you a much clearer picture of how your WiFi really performs when people are using it — not just what a single test shows.
Review Security
The last step in your WiFi audit is to look at how safe your wireless setup is and to turn everything you found into a simple action list.
Start with basic security checks:
- What encryption do you use — at least WPA2-PSK, and ideally WPA3 where devices support it?
- Do you still have any open or “temporary” SSIDs hanging around?
- Is your guest network truly isolated from internal resources?
- Is WPS turned off?
- Do you see any unknown or suspicious access points using your SSID or a similar name?
Most WiFi audit tools show security types, so it’s easy to see obvious problems. In an Inspector mode in NetSpot you can literally sort by security and immediately see which networks still use outdated protection.
At the same time, pull everything into a short action list. For each issue, note:
- what the problem is,
- whether it’s about coverage, performance, configuration, or security,
- how critical it is,
- what you plan to do about it.
Some fixes you can implement the same day: adjust channels and channel widths, reduce transmit power where it’s too high, disable WPS, enable a separate guest SSID, tighten passwords. Bigger moves — adding new APs, replacing an ancient router, redesigning for Wi-Fi 6E or Wi-Fi 7 — become part of your upgrade plan.
The goal of a good WiFi audit is not “one perfect report”. It’s a set of realistic next steps that will actually make the wireless experience better for the people using it every day.
WiFi Audit Tools and Software
You can’t run a serious WiFi audit with only browser speed tests. You need tools that can see the whole environment, not just one device at one moment.
Most WiFi audit setups mix a few categories of tools:
Coverage and performance analyzers / site survey software.
This is the core of a WiFi audit. A good WiFi audit app should be able to see hidden networks, understand modern Wi-Fi standards (Wi-Fi 5/6/6E and, ideally, Wi-Fi 7), work in the 6 GHz band, and recognize up-to-date security modes like WPA3. It’s also a big plus when one tool combines several roles at once.
Apps like NetSpot sit squarely in this category: they combine WiFi scanning, survey workflows, and wireless planning features so you can run most of your WiFi audit in one place.
Security-focused WiFi audit tools.
These dig into encryption, authentication, segmentation, and potential attack vectors. They’re more specialized and usually show up in corporate or regulated environments.
Controller dashboards from WiFi vendors.
Platforms like the UniFi Network application give you a live view of your managed access points: client counts, signal levels, channel usage, basic health, and alerts. They’re great for day-to-day monitoring and a very useful secondary data source during a WiFi audit.
Dedicated survey and spectrum hardware (optional).
There are also professional hardware devices designed specifically for WiFi auditing and spectrum analysis — portable units that combine multiple radios and sensors into one box. They shine in large, complex deployments (campuses, hospitals, warehouses), but for a home or small business WiFi audit, they’re usually overkill.
As you can see, a WiFi audit isn’t nearly as complicated as it sounds. With one good WiFi analyzer and a bit of time walking your space, you can run the whole process yourself and actually see what your network is doing.
Conclusion
A WiFi audit is not a complex, enterprise-only procedure. For a home network or a small office, doing it yourself is totally realistic. A tool like NetSpot — or a similar WiFi analyzer and survey app — makes the whole process visual and straightforward, even if “networking” is not your day job.
In bigger, high-stakes environments — warehouses full of scanners, hotels, hospitals, large campuses, or places with strict compliance rules — professional WiFi audits and dedicated hardware still have their place. But that doesn’t change the core idea: you can learn a lot, and fix a lot, just by running your own WiFi audit first.
Start with one DIY audit, turn it into a simple routine, and your WiFi will stop being a daily mystery and go back to being something you don’t have to think about.
SO, WE RECOMMEND

NetSpot
FAQ: Common Questions About WiFi Audit
Is a WiFi audit the same as a site survey?
They overlap, but they’re not identical. A site survey focuses mostly on coverage and performance measurements. A WiFi audit includes that survey plus configuration review, a WiFi security audit, and an action plan for fixes and upgrades.
How long does a WiFi audit take?
For a home or small office, you can usually complete a basic WiFi audit in a few hours: prepare the plan, walk the space, analyze results, and outline fixes. Larger sites with multiple floors or buildings can take days, especially if you’re combining performance and security audits.
Do I need to turn Wi-Fi off during a WiFi audit?
No. For most checks you want the network up and running so you can see how it behaves under real usage. You might briefly adjust settings or reboot equipment as part of testing, but the WiFi audit itself is done with the network online.
How much does a professional WiFi audit cost?
It depends on size and complexity. A simple business WiFi audit for a small office might cost a few hundred dollars. Large or critical environments — like hospitals, campuses, or big warehouses — can easily run into the thousands once you factor in travel, time on-site, and detailed reporting.
Can I run a WiFi audit myself with software tools?
Yes. With accessible WiFi audit software, a bit of patience, and a checklist like this, most technically curious users can handle a basic home WiFi audit or small business wireless network audit on their own. It’s often a smart first step before spending money on outside services.
Get NetSpot for Free
Wi-Fi Site Surveys, Analysis, Troubleshooting runs on a MacBook (macOS 11+) or any laptop (Windows 7/8/10/11) with a standard 802.11be/ax/ac/n/g/a/b wireless network adapter. Read more about the 802.11be support here.