Wi-Fi Site Surveys, Analysis, Troubleshooting runs on a MacBook (macOS 11+) or any laptop (Windows 7/8/10/11) with a standard 802.11be/ax/ac/n/g/a/b wireless network adapter. Read more about the 802.11be support here.
Why is My WiFi Not Working
Confused about Why is My WiFi Not Working?
Discover quick fixes, expert troubleshooting tips, and proven solutions to restore your wireless connection fast!
Imagine life without Wi-Fi — hard to picture, right? Work, entertainment, and studying all depend on a stable internet connection. But what if your Wi-Fi stops working? Slow speeds, frequent disconnects, or even a total outage can turn into a major hassle.
In this article, we’ll break down the most common WiFi problems, starting with simple fixes and moving on to more complex issues. Whether it’s a router issue, WiFi interference, or a problem with your internet service provider (ISP), we’ll provide step-by-step solutions to help you boost your WiFi signal and get back online.
Jump to...
Why Do Wi-Fi Problems Occur?
Wi-Fi issues can pop up even when everything seems to be set up correctly. Sometimes the connection drops, speeds slow down, or devices just won’t stay online — and it’s not always obvious why.
The reason is that many things affect how a wireless network behaves. A signal that used to be strong can become unreliable, performance can fluctuate throughout the day, and certain devices might struggle more than others. Without a clear understanding of what’s going on, it’s easy to feel stuck.
That’s where the right approach to troubleshooting makes a difference. By looking at how your network is behaving and narrowing down the likely causes, you can solve problems faster and with less guesswork.
In the sections ahead, we’ll break down practical steps to diagnose common WiFi issues, helping you get back to a stable, smooth connection.
1. User Errors: Are You Making These Common Mistakes?
Is Wi-Fi Actually On?
What to Check First:
Before moving on to more complex steps, it's worth checking the most basic thing: whether Wi-Fi is turned on. This may sound trivial, but it's often the cause. Sometimes the wireless connection disconnects randomly — due to a button, power-saving mode, or after a system update that resets network settings.
Checking this point only takes a couple of seconds, and if this is indeed the issue, you'll resolve the problem immediately and without any extra effort.
What to do:
- Windows: Click the Wi-Fi icon on the taskbar and make sure the wireless network is turned on.
- macOS: Click on the WiFi icon in the upper-right corner of the screen and make sure the connection is active.

- Smartphones/Tablets: Open Settings > Wi-Fi and make sure the switch is turned on.
- Router: Restart the device and check if the wireless light is blinking. If not, the Wi-Fi module may be disabled in the router settings.
Are You Connected to the Right Network?
What to Check First:
Sometimes everything seems fine — there's a signal, Wi-Fi is turned on, but the internet connection is still unstable. In these cases, it's worth checking which network you're connected to. It's especially easy to accidentally select the wrong one if you have several similar networks in your home, such as MyHomeWiFi and MyHomeWiFi_EXT.
Also, after changing the password, devices may try to connect using the old password — and nothing works. As a result, you see the network, but the connection doesn't establish.
What to do:
Step 1
Make sure you’re connected to your network (SSID):
- Windows: Select the Wi-Fi symbol on the taskbar to view the network you’re currently using.
- macOS: Click the WiFi symbol in the top-right menu bar and verify the network name.
- Smartphones/Tablets: Go to Settings > WiFi and make sure you’re connected to the correct SSID.
Step 2
Remove the wrong network and reconnect.
If your device keeps jumping back to an old or incorrect network, removing it from the saved list usually solves the issue:
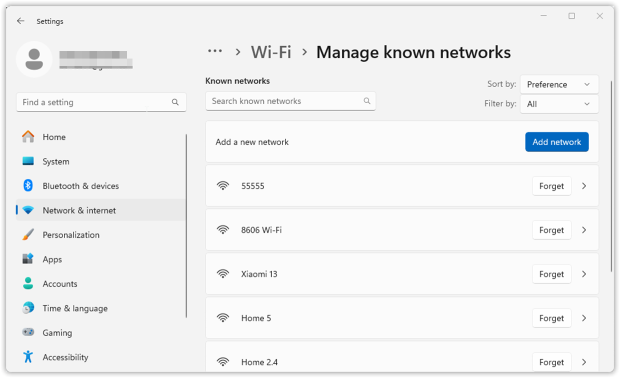
- Windows: go to Settings → Network & Internet → Wi-Fi → Manage known networks, select the unwanted network, choose Forget, then reconnect to the correct one using the current password.
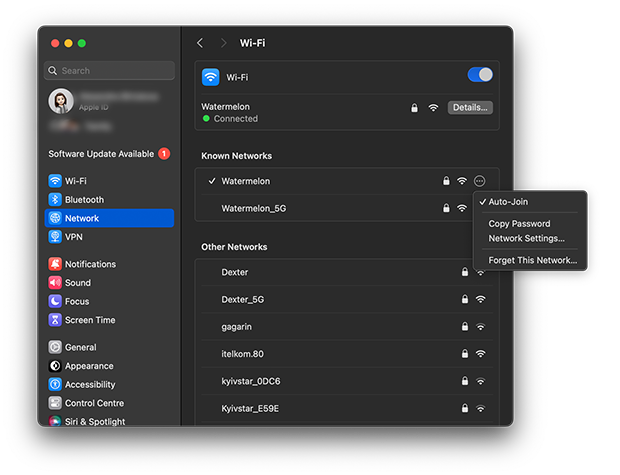
- macOS: Go to System Preferences > Network> WiFi. Select the wrong network and click
 and Forget This Network… to remove it. Reconnect manually.
- Smartphones/Tablets: Tap the WiFi network in Settings> WiFi, select Forget, then reconnect.
Step 3
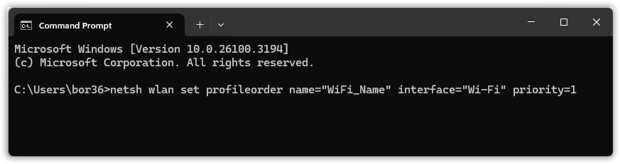
If your device has several saved Wi-Fi profiles, it may keep auto-joining the “wrong” one simply because it’s higher on the list. This is especially common if you’ve connected to a guest network, an extender SSID, or an older router name in the past.
- Windows: Newer versions of Windows don’t offer a simple built-in screen for changing Wi-Fi priority. If you want to force a specific network to the top, you can do it from Command Prompt (Run as Administrator) with this command: netsh wlan set profileorder name=”WiFi_Name” interface=”Wi-Fi” priority=1
- macOS: Go to System Preferences > Network > WiFi. Click Advanced… and drag networks to reorder priority.
Step 4
2.4 GHz vs. 5 GHz: Choose the Right Frequency.
- 5 GHz offers faster speeds but shorter range.
- 2.4 GHz has better range but slower speeds and more interference from other devices.
- Some routers combine both frequencies under the same SSID (band steering), causing unexpected switching. If you experience unstable connections, log into your router settings and consider separating the SSIDs (e.g., Home_WiFi for 2.4 GHz and Home_WiFi_5G for 5 GHz).
2. Device & Router Issues: Is the Problem on Your End?
Is the Issue with Your Device or the Network?
What to Check First:
If your Wi-Fi is acting up, verify whether the problem only affects one device or several. If just one of your devices (like a laptop, phone, or tablet) struggles to connect while everything else works fine, the issue almost certainly lies with that specific device.
On the other hand, if all devices in your home are experiencing slow speeds, dropped connections, or complete outages, the issue is more likely with your router, modem, or ISP (Internet Service Provider).
What to do:
Step 1
If it’s happening on just one device:
- Restart the device — A lot of “random” Wi-Fi issues come from small hiccups in the network adapter or background services. A simple reboot refreshes everything and often fixes it.
- Forget the network and reconnect — Saved Wi-Fi profiles can sometimes contain errors (incorrect settings, outdated data, minor corruption). Open Wi-Fi settings, select your network, then select “Forget,” then reconnect and enter the password.
- Temporarily turn off VPNs, security apps, or firewall tools — VPN clients, antivirus suites, and some firewall utilities can block or reroute traffic in a way that looks like Wi-Fi is broken. Disable them for a minute to see if the connection immediately stabilizes.
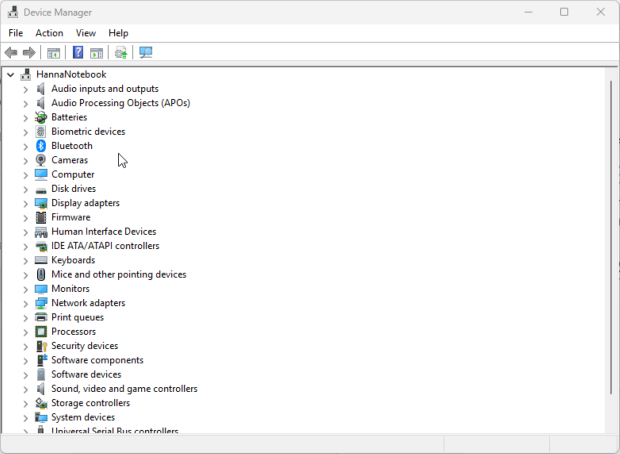
- Update the Wi-Fi adapter driver (Windows) — Old or buggy drivers cause disconnects more often than people expect.
- Press Win + X → Device Manager → expand Network adapters → right-click your Wi-Fi adapter → Update driver → Search automatically for drivers and install what Windows finds.
Step 2
If multiple devices are dropping or can’t connect:
- Reboot the modem and router the “proper” way — Unplug both devices, wait 30 seconds, then reconnect them, beginning with the modem. Once the modem is fully up, power on the router. This clears a lot of temporary lockups and WAN-side issues.
- Check the indicator lights on the router.
- Blinking red or orange: This is often a sign of problems with your ISP. Check for any outages or maintenance, and restart the modem again if necessary.
- The Wi-Fi indicator is blinking: The network may be clogged or experiencing interference. Try switching devices to the 5 GHz band or changing the Wi-Fi channel in the router settings.
- The indicators are off altogether: There’s something wrong with the power supply or the device itself. Make sure the power cable is securely plugged in, and try a different outlet. If there’s a power or reset button, press it and see if the router comes back on.
If WiFi problems persist even after basic troubleshooting, it’s time to inspect your router and home network setup.
Router and Equipment Problems
Problem:
Your router is basically the hub of your home Wi-Fi. And like any device that runs 24/7, it can start struggling over time — whether it’s simply too old for today’s loads, sitting in a bad spot, getting hit with interference, or running on messy settings. The result usually looks the same: random dropouts, unstable connections, and speeds that feel slower than they should.
Use NetSpot to identify dead zones and optimize your WiFi coverage
What to do:
Step 1
Reboot the router the right way
A lot of people never reboot their router, so small glitches and slowdowns just stack up over time.
To do a proper restart, pull the power plug, wait 30–60 seconds, then plug it back in. Give it a couple of minutes to come fully online (Wi-Fi can appear before the internet is actually stable).
Step 2
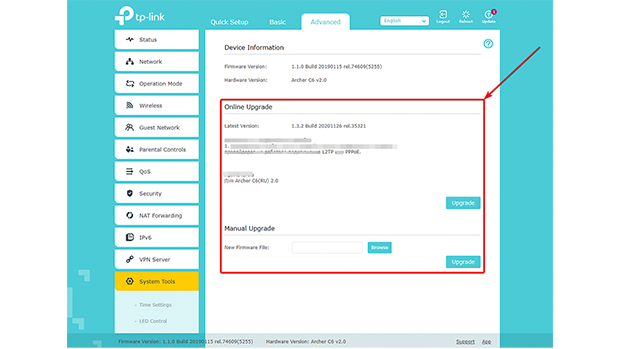
Check for firmware updates
Firmware updates aren’t just “nice to have.” They often patch security issues, fix weird stability bugs, and sometimes improve performance.
How to update it:
- Open a browser and go to your router’s address (commonly 192.168.1.1 or 192.168.0.1).
- Sign in with your admin login (if you never changed it, the default is often something like admin/admin — check the sticker/manual if needed).
- Look for a section like Firmware Update, Administration, or Advanced settings, then install any update you see.
- After the update, the router usually reboots on its own — don’t interrupt it.
Step 3
Decide if the router is simply past its prime
If your router is 5+ years old, it may be doing its best… but it’s playing in a different era. Older models often struggle with modern Wi-Fi loads and may not support newer standards like Wi-Fi 6 (802.11ax) (and definitely not Wi-Fi 7), which are built for better efficiency and lots of devices online at once.
Common signs it’s time to upgrade:
- You still get dropouts, buffering, or random slowdowns even after basic troubleshooting
- Coverage is uneven — one room is fine, another is basically a dead zone
- You pay for fast internet (for example, gigabit), but speeds over Wi-Fi never come close
If you’re shopping, Wi-Fi 6 is a solid baseline today, and Wi-Fi 7 makes sense if you’re building for the long haul or you have a house full of devices.
Step 4
Fix dead zones with Mesh (or use an extender if you must)
If parts of your home regularly lose signal, a mesh Wi-Fi system can be a cleaner solution than classic extenders. Mesh nodes work together as one network, so you get wider coverage without constantly jumping between different network names. Popular mesh lines include Eero, Google Nest WiFi, Netgear Orbi, and Luxul.
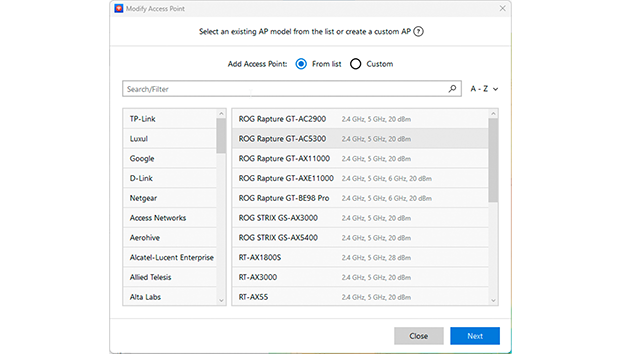
If you don’t want to go full mesh, a Wi-Fi extender can still help in one specific problem area — just keep in mind it’s usually more of a patch than a true fix. And before spending money, you can sanity-check your options in advance: NetSpot’s Planning mode lets you try a virtual equipment selection, test different models and characteristics, and see what placement should work best before you buy.
If you first figure out whether the issue hits one device or the whole network, and then work through router stability, updates, and coverage, you’ll usually land on the real cause pretty quickly — and avoid chasing random “maybe it’s this” fixes.
3. External Factors: Interference and Network Congestion
Problem:
Sometimes your Wi-Fi isn’t “broken” — it’s just competing for air time. Nearby networks, household electronics, and everyday wireless gadgets can step on the same frequencies and mess with stability and speed. The usual troublemakers are things like microwaves, cordless phones, baby monitors, and Bluetooth devices. They don’t have to knock your Wi-Fi out completely to be annoying; even small bursts of noise can translate into lag, buffering, and random slowdowns.
Crowded buildings make it worse. In apartments or dense neighborhoods, lots of routers end up sharing (or overlapping) the same channels. When too many networks pile onto the same slices of spectrum, the result is congestion: more waiting, more retries, and noticeably worse performance.
What to do:
Step 1
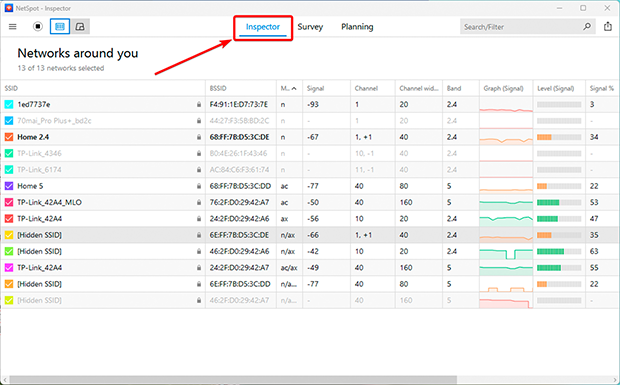
Check what’s happening in the air with WiFi analyzer app like NetSpot:
- Start with a quick scan so you’re not guessing.
- Open NetSpot in Inspector Mode and look at the surrounding networks.
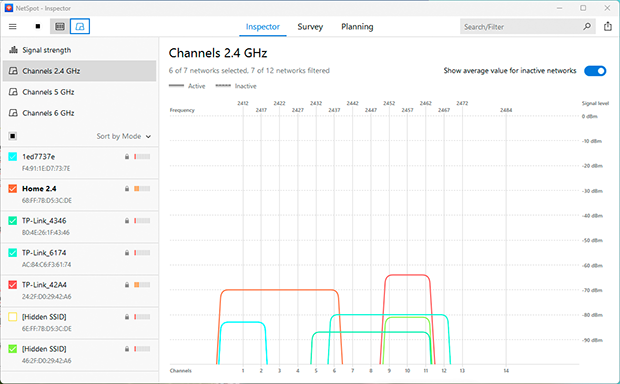
- Pay attention to which channels are packed and which ones are relatively quiet.
- The Channel Graph makes this easier because it shows overlap visually — you can immediately see when your signal is colliding with others.
Step 2
Pick a cleaner channel (or the “least bad” one)
Best case: you move to a channel with no overlap and the interference drops right away. If every channel is busy, don’t just pick randomly. Choose a channel with full overlap rather than partial overlap. Networks that fully overlap can usually “take turns” more predictably, while partial overlap tends to act like chaotic noise and creates messier interference.
Also consider switching bands if you can. 5 GHz and 6 GHz typically have more channel options and less crowding than 2.4 GHz. If your hardware supports WiFi 6E or WiFi 7, enabling 6 GHz can be a big upgrade in busy environments.
Step 3
Recheck once in a while
Wi-Fi isn’t static. Neighbors change routers, add mesh nodes, rearrange devices, or switch providers — and your “perfect” channel today can turn into a crowded one next month. Run a quick NetSpot scan periodically to confirm your channel choice still makes sense and adjust if the RF neighborhood has shifted.
4. ISP-Related Problems: When the Issue Isn’t in Your Home
Problem:
Sometimes, the issue isn’t on your end — your ISP might be experiencing outages or network congestion.
What to do:
- Check for outages — Visit your ISP’s website or search "[ISP name] outage map."
- Restart your modem and router — Power them off for 30 seconds and turn them back on.
- Contact your ISP — If problems persist, call your provider’s support line.
5. Reset Your Router to Factory Settings
Problem:
If none of the above helps, the problem may lie in your router's configuration. Settings can become confused over time, a failed update can leave behind glitches, or something may have been changed without you noticing. A factory reset clears everything and fixes such "software glitches", but it has the unfortunate side effect of erasing all your settings — your Wi-Fi network name (SSID), password, guest network, port forwarding, and any other changes.
What to do:
- Find the reset button. It’s usually a tiny recessed button on the back or bottom of the router, often labeled “Reset”. You’ll typically need a paperclip or SIM tool to reach it.
Press and hold until the lights react. Hold the button for about 10–30 seconds (the exact time depends on the model). Release it when you see the LEDs start blinking or the router clearly resets. Give it time to come back.
A reset isn’t instant. Let the router reboot fully — this can take a few minutes while it restores default settings. Set up Wi-Fi again.
Once it’s back online, log into the admin page (commonly 192.168.1.1 or 192.168.0.1) and recreate your basics: Wi-Fi name, password, and any other settings you actually need.
- Use a backup if you have one — but be smart about it. If your router supports exporting a settings backup, it’s worth making one before you reset. Restoring that file can save time. Just keep in mind: if the config itself was part of the problem, restoring an old backup can bring the same issues right back.
After you reset and reconfigure, test the connection again. If the Wi-Fi still drops or stays unstable even on clean default settings, it’s time to look higher up the chain — contact your ISP, or start considering a router replacement.
6. Advanced Fixes: Troubleshooting Tools
Problem:
If standard troubleshooting steps haven’t resolved your issue, it’s time to use advanced network diagnostic and troubleshooting tools to pinpoint the problem.
What to do:
Step 1
Use Traceroute to Detect Network Slowdowns
- Windows: Launch Command Prompt and enter: tracert 8.8.8.8
- macOS/Linux: Open Terminal and run: traceroute 8.8.8.8
This command traces the route your connection follows and identifies any points of high latency or failure along the way.
Step 2
Use ping to check for packet loss
Ping is the quickest way to see whether your connection is stable or quietly dropping packets.
- Windows: Open Command Prompt and enter ping google.com -n 20
- macOS/Linux: Open Terminal and enter ping -c 20 google.com
Watch for timeouts, “request timed out,” or big swings in response time. A little variation is normal; frequent loss or huge spikes usually means congestion, interference, or an ISP-side issue.
Step 3
Check for suspicious or excessive background traffic with netstat
If your connection feels “busy” even when you’re not doing anything, netstat can help you confirm whether there’s a lot of network activity happening in the background.
- Windows: Launch Command Prompt and enter: netstat -e
- macOS/Linux: Open Terminal and type: netstat -i
You’re looking for unusually high activity that doesn’t match what you’re doing — the kind of thing that can quietly eat bandwidth and make everything feel slower than it should.
Conclusion
Wi-Fi isn't static; it's constantly changing. The radio environment around you changes — your neighbor might change the channel, add a new router, or you might bring in devices that create interference. Sometimes, the network drops simply because an older router can't handle the amount of equipment or doesn't support modern standards like Wi-Fi 6/6E or Wi-Fi 7.
That's why it's helpful to have a tool that shows you what's really going on, instead of guessing. NetSpot lets you scan the airwaves, detect interference and congestion, select clearer channels, and identify weak spots before they become a daily problem.
SO, WE RECOMMEND

NetSpot
FAQ: Common WiFi Problems and Fixes
Wi-Fi connected, but no internet
Usually the Wi-Fi link is fine and the problem is on the modem/ISP side. Unplug the modem and router, wait half a minute, plug the modem back in first, then the router. If nothing changes, check your ISP for an outage.
How often should I check congestion
When something feels “off”, and as a routine check about once a month. Neighbor networks change all the time, so a quick scan in NetSpot helps you catch a crowded channel before it turns into slowdowns.
How often should I check for Wi-Fi congestion?
About once a month is enough. Do it sooner if your speed suddenly drops. Neighbor networks change all the time, and a channel that was “clean” last month might be crowded now. Tools like NetSpot make this easy to spot.
What if my router isn’t compatible with my ISP?
Some providers require specific modem or router models. It’s worth checking their supported hardware list or asking for support directly. Using an approved device often avoids a lot of strange connection problems.
Wi-Fi is connected, but the internet doesn’t work. Why?
In most cases, the Wi-Fi itself is fine — the problem is on the ISP side. Restart the modem and the router first. If nothing changes, check your provider’s status page or app. If there’s an outage, waiting is often the only fix.
Still stuck? You aren't alone. Join the community discussion on why Wi-Fi connects but the internet won’t load to share your experience and find advanced troubleshooting tips from other users.
Get NetSpot for Free
Wi-Fi Site Surveys, Analysis, Troubleshooting runs on a MacBook (macOS 11+) or any laptop (Windows 7/8/10/11) with a standard 802.11be/ax/ac/n/g/a/b wireless network adapter. Read more about the 802.11be support here.