Wi-Fi Site Surveys, Analysis, Troubleshooting runs on a MacBook (macOS 11+) or any laptop (Windows 7/8/10/11) with a standard 802.11be/ax/ac/n/g/a/b wireless network adapter. Read more about the 802.11be support here.
WiFi Dead Zone Guide: Find and Fix Weak Spots
A WiFi dead zone isn’t random — it’s physics. Learn why dead zones happen, how to map them with a NetSpot Wi-Fi analyzer and what fixes actually work.
You’re at home or in the office and everything feels fine… until you take three steps to the left. Suddenly the video call turns into a robot voice. Your phone shows “Wi-Fi” but nothing loads. You move back two feet and — magic — it works again. That “one cursed corner” isn’t cursed. It’s a WiFi dead zone, and it usually comes from very normal, very explainable reasons.
This article is about figuring out why that happens and what you can do to troubleshoot the madness.
Jump to...
What a WiFi dead zone is and why it happens
Let's break down what a Wi-Fi dead zone is. It's exactly what it sounds like: a spot where your wireless signal simply can't reach you. This can mean low signal strength, but it can also mean something more insidious: the signal is "present," but the connection is still terrible because interference and noise are overwhelming it.
Here are the most common causes of dead zones:
First is simple distance. Wi-Fi is just radio waves. The farther you move away from the router, the weaker the signal becomes. That’s normal behavior, and it gets worse fast when the signal has to fight its way through obstacles.
Then there are walls and materials that Wi-Fi really doesn’t like. Drywall is usually fine, but concrete, brick, tile, metal framing, mirrors, heated floors, aquariums, elevator shafts, and even bulky furniture can seriously weaken or bounce the signal around. On a floor plan the room may look close, but for Wi-Fi it can feel surprisingly far away.
Frequency band choice also matters. Higher bands can be faster, but they’re more fragile. A 5 GHz or 6 GHz signal can feel lightning-fast in the same room, then drop off sharply after a couple of walls or a corner. Meanwhile, 2.4 GHz keeps crawling along over longer distances, even if it never feels particularly fast.
Noise and interference are another common culprit. Neighboring networks, Bluetooth gadgets, baby monitors, microwaves, cordless phones, and even poorly shielded USB 3.0 devices can raise the noise level. Wi-Fi doesn’t just need signal strength — it needs a signal that clearly rises above all that background noise.
Sometimes the problem isn’t interference but congestion. The signal itself may be strong, but the channel is overloaded. In apartment buildings and offices, especially on 2.4 GHz, too many networks compete for the same air. Your device ends up waiting instead of transmitting, and speeds fall off a cliff.
Client devices can also create dead zones. Even if your router is powerful, a phone or tablet with a tiny antenna and aggressive power saving can struggle to respond. Wi-Fi works both ways. If the device can’t send data back reliably, the connection still feels broken.
Finally, placement and antenna patterns matter more than most people expect. Routers don’t spread signal evenly in all directions — many radiate more like a flattened donut. Hide one in a closet, tuck it under a desk, block it with a TV, or place it near metal, and you’ve handicapped the signal before it even leaves the room.
How to actually see a WiFi dead zone
Here's the problem: you can't just look around the room and "see" the radio waves. Walking around and watching the signal strength indicator is also unreliable — the signal is delayed, misleading, and doesn't explain the cause. Such actions are a terrible diagnostic tool.
If you only judge by “where the connection feels bad,” you end up chasing symptoms. A spot can feel dead for very different reasons. Sometimes the signal really is weak. Sometimes the signal is there, but it’s buried under noise. In other cases, your laptop simply clings to the wrong access point, or performance drops the moment a neighbor fires up a heavy stream.
That’s exactly why Wi-Fi analyzer and wireless survey tools exist. They turn invisible radio behavior into something you can measure: WiFi signal level, channel usage, noise, and (most importantly) signal quality metrics like SNR.
There are plenty of tools out there, and they range from simple scanners to full survey platforms. Our favorite is NetSpot, because it’s straightforward for first-timers but still gives you the kind of evidence you need to make a confident fix.

Step-by-step: find your WiFi dead zone with NetSpot
So, to “see” dead zones and analyze them accordingly, it’s worth using a specialized app. Let’s walk through this process using one of the most intuitive troubleshooting tools. You don’t need to be a network engineer — if you can hold a tablet or walk around with a laptop, you’ll be fine.
Step 1
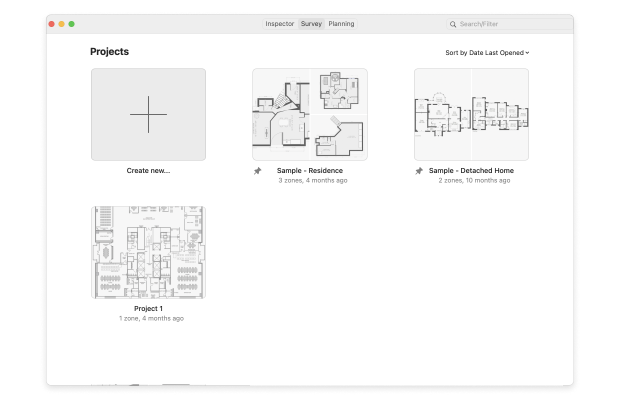
Create a new survey project
Start by creating a new project in the app’s Survey mode. This project will store all your measurements and visualizations for the selected space.
Step 2
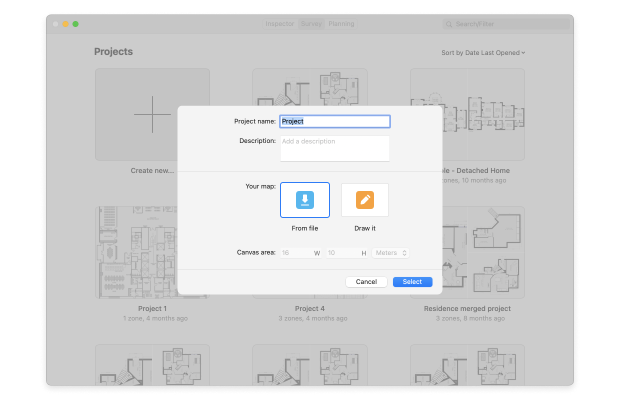

Load and calibrate the floor plan
Next, upload a floor plan image or draw a simple layout manually. Once the map is loaded, you’ll need to calibrate it so the measurements are accurate.
The app offers the option to calibrate by lines or areas. Simply mark a known distance on the map — for example, the length of a wall — and enter its actual value.
This step matters more than it seems. Without proper calibration, the heatmap may look nice but won’t reflect reality.
Step 3
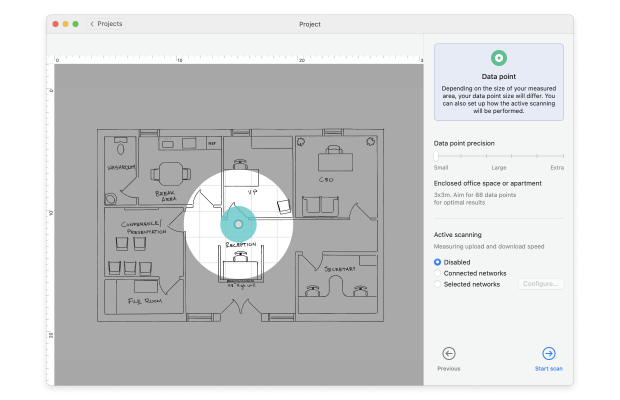
Set scan point density and configure scanning mode
To optimize the process, select the measurement point density before starting the scan. Higher density means greater detail, but also more time.
Now it’s time to choose how data will be collected. Passive scanning is usually enough to identify coverage gaps and interference, while active scanning can add speed and throughput data if needed.
Once configured, the app is ready to start recording real Wi-Fi behavior instead of guesses.
Step 4
Walk the area and collect data
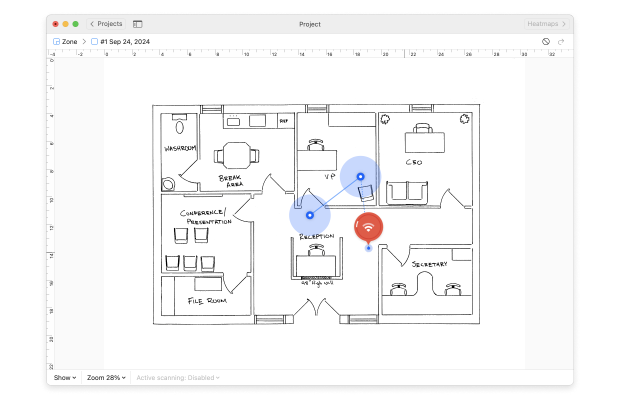
Walk the area and mark your location on the map at regular intervals.
Each dot records information about signal strength, noise, and surrounding networks. Over time, these dots build up a complete picture of Wi-Fi performance throughout the entire area.
Step 5
View the Wi-Fi heatmap
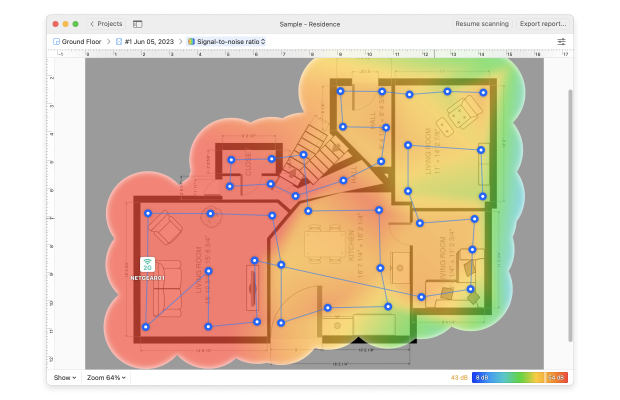
After collecting information, the app will create a visual heatmap of your network.
This is where Wi-Fi “dead zones” become apparent.
Red, orange, and yellow areas typically indicate a strong and usable signal level (approximately -30 dBm to -65 dBm).
Blue and purple areas represent a weak signal level (often below -75 dBm). These are classic Wi-Fi “dead zones” — places where connections drop, speeds plummet, or devices constantly reconnect.
Because everything is visual, you don’t need to interpret the numbers. Problem areas are immediately apparent.
Key Visualizations for Identifying WiFi Dead Zones
While signal strength heatmaps are the most obvious starting point, they’re not the only ones that matter. NetSpot offers more than 20 different heatmaps, each highlighting a specific aspect of network behavior.

For identifying WiFi dead zones, the most useful views usually include:
- Signal Level, which clearly shows where coverage drops off
- Signal-to-Noise Ratio (SNR), compares the strength of the Wi-Fi signal against background noise generated by everyday devices
- Signal-to-Interference Ratio (SIR), which reveal whether nearby networks are competing for the same airtime
Looking at these heatmaps together gives you a much clearer picture. Instead of just seeing where the WiFi dead zones are, you start to understand why they exist — whether it’s distance, obstacles, noise, or channel congestion.
How to Fix a WiFi Dead Zone Without Going Crazy
Once you’ve run a proper survey, you’re no longer guessing. A heatmap doesn’t just show where the WiFi dead zone is — it usually hints at why it exists. And that’s the key difference between “I moved the router three times and it still sucks” and “okay, now I know what to fix”.
Based on what you see on the map (Signal Level, SNR, SIR), you can usually connect the dots and choose the right fix instead of throwing random hardware at the problem.
The most common causes — and what they typically point to — look like this.
- Move the Router: Seriously, just try this first. Put it higher, away from thick walls and metal.
- Switch Channels: Your router might be overlapping with ten others. Use the analyzer to find a cleaner channel.
- Use the Right Band: 5 GHz is faster but doesn’t go through walls well. 2.4 GHz travels further but is slower. 6 GHz (if supported) is super fast but limited in range — perfect for open rooms.
- Add an Access Point or Mesh Node: If you’ve got a big house or office, one router probably isn’t enough.
If you want to learn more about how to fix Wi-Fi dead zones, check out the article Top 10 Ways to Boost Your Wi-Fi Signal.
Conclusion
A WiFi dead zone isn’t some mystical tech curse — it’s just physics, architecture, and sometimes bad luck. But the good news is, it’s fixable. With a proper WiFi analyzer, you don’t have to guess where the problem is or waste time moving furniture hoping for better signal. You’ll see exactly what’s going on and how to fix it. And once you’ve fixed it, You’ll wonder why you waited so long to deal with it.
SO, WE RECOMMEND

NetSpot
Get NetSpot for Free
Wi-Fi Site Surveys, Analysis, Troubleshooting runs on a MacBook (macOS 11+) or any laptop (Windows 7/8/10/11) with a standard 802.11be/ax/ac/n/g/a/b wireless network adapter. Read more about the 802.11be support here.