Wi-Fi Site Surveys, Analysis, Troubleshooting runs on a MacBook (macOS 11+) or any laptop (Windows 7/8/10/11) with a standard 802.11be/ax/ac/n/g/a/b wireless network adapter. Read more about the 802.11be support here.
How to Find the Best WiFi Channel
Finding the best WiFi channel is essential for unlocking the full potential of your internet connection, and a solution like the NetSpot WiFi channel scanner can make this task much easier to accomplish.
The good news is that learning how to find the best WiFi channel is easy and takes just a few minutes. As long as you equip yourself with a capable WiFi channel scanner, you should be able to find the best channel for 2.4 GHz and 5 GHz WiFi in no time.
The best channel for Wi-Fi
In public spaces, apartment buildings, offices, and other densely populated areas, it’s very common for multiple WiFi routers to broadcast simultaneously on a single non-overlapping channel. This leads to interference, reduced speeds, and connection instability.
To avoid blindly switching channels and causing more interference, it’s essential to use a reliable WiFi analyzer like NetSpot, which helps you identify the least crowded and most efficient non-overlapping WiFi channel.
Partial Overlap
Partial overlap occurs when nearby networks use channels that are close but not identical, such as channels 4 and 6. In these cases, overlapping signals create interference that devices perceive as noise, leading to slower speeds and reduced reliability.
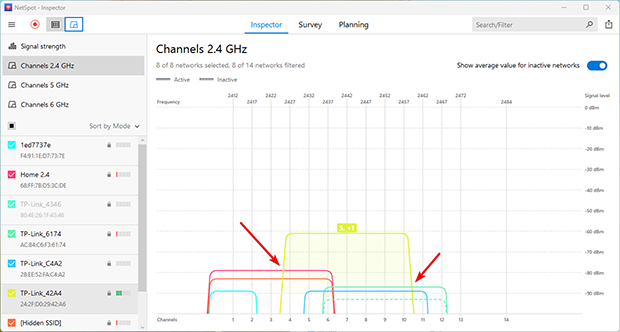
Solution: Use a WiFi analyzer like NetSpot to identify channels with partial overlap and switch to a fully non-overlapping channel. If your router supports it, consider switching to the 5 GHz or 6 GHz band, where there are more available channels and less congestion. If no other options are available, switching to a channel with full overlap (see below) might still be a better choice.
Full Overlap
Full overlap occurs when multiple networks broadcast on the same channel, such as two routers operating on channel 6. Surprisingly, this scenario is more manageable because networks can coordinate transmissions using protocols like CSMA/CA, which minimize interference and improve overall stability.
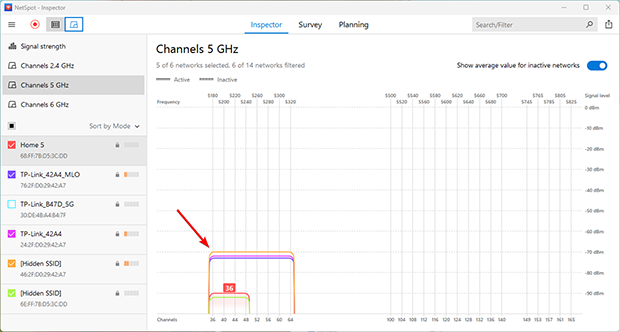
Solution: If no non-overlapping channels are available, choose a channel already heavily in use by nearby networks. This counterintuitive approach often leads to better performance than partial overlap, as devices can work together to manage traffic.
Non-Overlapping Channels
Sometimes, you may find completely free or minimally occupied channels. This situation offers the opportunity to switch your network to one of these channels, ensuring excellent performance with minimal interference.
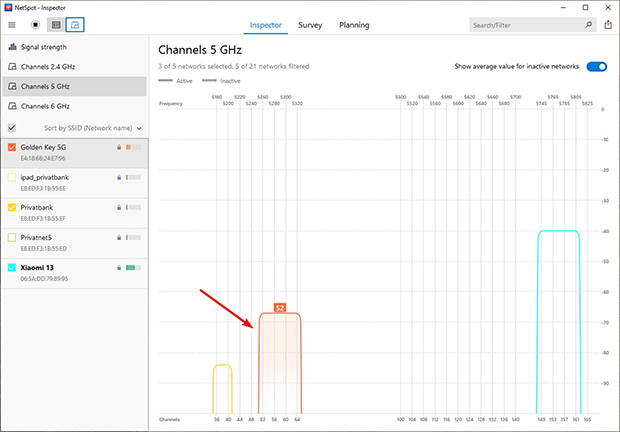
Solution: If free or low-usage channels are available, immediately reconfigure your network to use one of them. This not only eliminates interference from other networks but also maximizes signal strength and stability. It’s still essential to periodically monitor your environment, as other networks might begin using the same channel over time, requiring adjustments to maintain optimal performance.
By taking advantage of free channels and using tools like NetSpot for regular monitoring, you can stay ahead of potential interference and maintain a fast, reliable WiFi connection.
Find the Best Channel for WiFi on macOS, Windows, Android, iOS, and Linux
If you decide that the steps described below are a lot of work, you can skip to the next section, where we describe how to use a WiFi channel analyzer like NetSpot, which can calculate everything for you and instantly give you all the information you need to decide which WiFi channel is the best. Best of all, NetSpot runs on most major platforms, and it delivers reliable results with minimal effort.
How to Find the Best WiFi Channel on macOS
As a macOS user, you have two main options on how to find the best WiFi channel: the Wireless Diagnostics feature and NetSpot.
Wireless Diagnostics
Wireless Diagnostics is a feature of macOS that lets you see all networks in your area, along with basic information about them:
Click the WiFi icon in the menu bar.
Select the Open Wireless Diagnostics option.
I gnoring the window that appears, select Window from the menu bar and click Utilities.
Go to the Wi-Fi Scan tab and look at the “Best 2.4 GHz Channels” and “Best 5 GHz” Channels” fields.
NetSpot for macOS
NetSpot is a third-party WiFi channel scanner with lots of useful, easy-to-use features that make one of the best WiFi channel scanner apps for macOS. Here’s how it works:
Download, install, and launch NetSpot for macOS.
Make sure Inspector mode is selected.

You can sort the discovered networks by their channel.
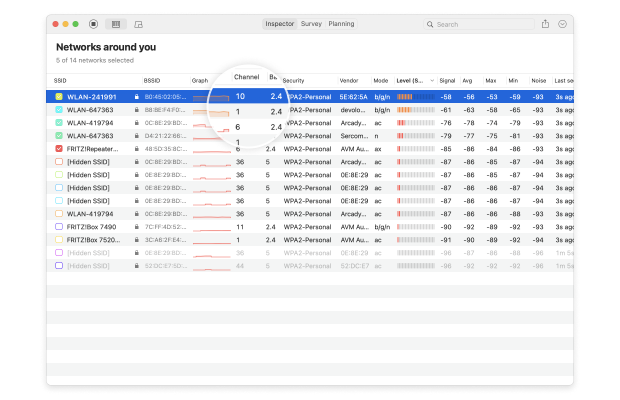
Determine which channels are used the least.
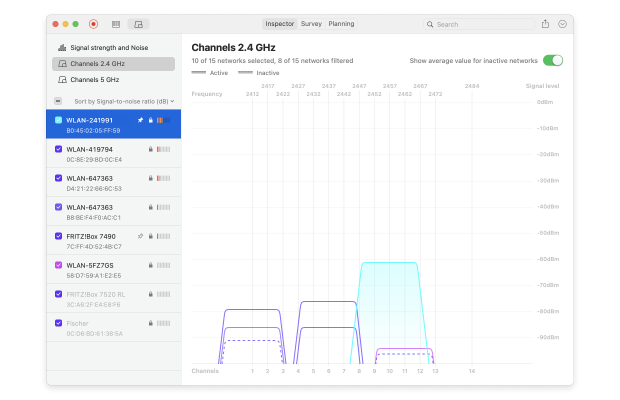
Change the Wi-Fi channel in your router settings based on the information provided by NetSpot.
How to Find the Best Channel for WiFi on Windows
Finding the best channel for WiFi on Windows without a third-party app can be a bit daunting because the tool provided by Microsoft doesn’t have a graphical user interface. Fortunately, third party WiFi channel scanners like NetSpot do.
Command Line
If you’re not afraid of the command line, then you can discover how often are different WiFi channels used by issuing the following command:
netsh wlan show all
NetSpot for Windows
Alternatively, you can use the Windows version of NetSpot, one of the best WiFi channel scanner apps for Windows.
Download, install, and launch NetSpot for Windows.
Make sure Inspector mode is selected.
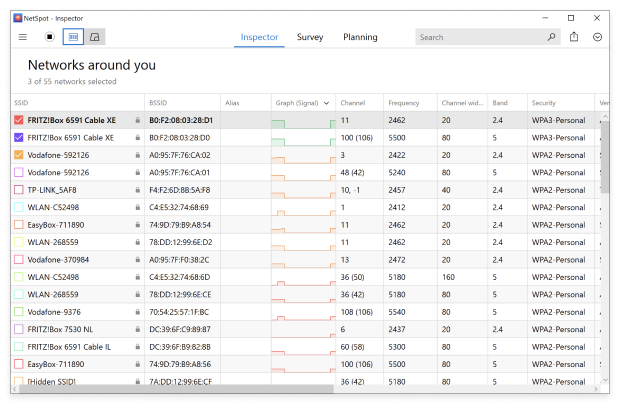
You can sort the discovered networks by their channel.
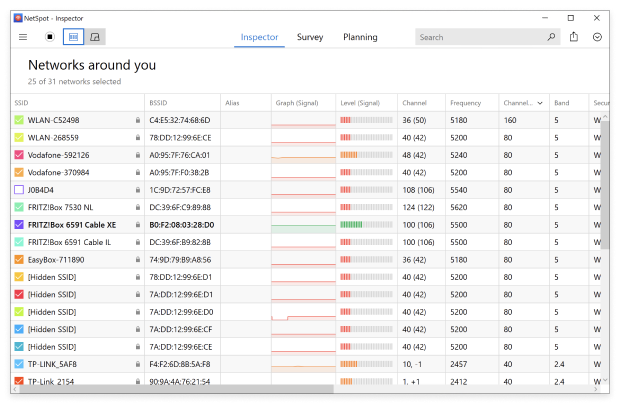
Determine which channels are used the least.
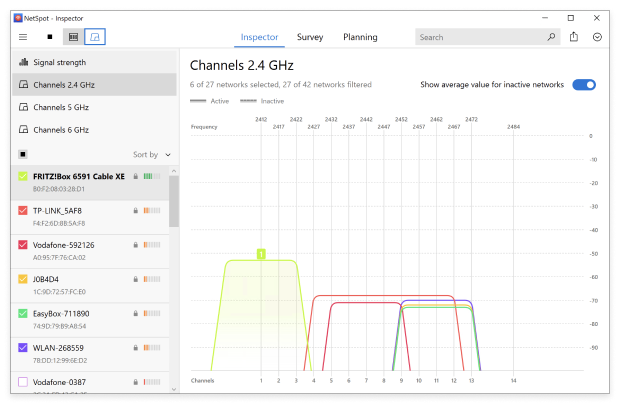
Change the Wi-Fi channel in your router settings based on the information provided by NetSpot.
How to Find the Best Wireless Channel on Linux
Gathering information about WiFi channel utilization on most Linux distributions, including Ubuntu and Linux Mint, is a matter of entering the following command in your favorite terminal emulator:
sudo iwlist wlan0 scan | grep \(Channel
Instead of displaying all kinds of unnecessary information about each network, the command displays only a list of channels.
How to Find the Best Channel on Android
The Android operating system doesn’t provide a native feature that would let you find the best WiFi channel scanner for Android. Fortunately, you can download NetSpot for Android directly from the Google Play Store and use it to find the best WiFi channel with a few taps:
Launch NetSpot for Android.
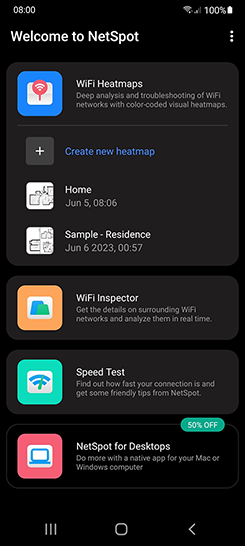
Tap Inspector.
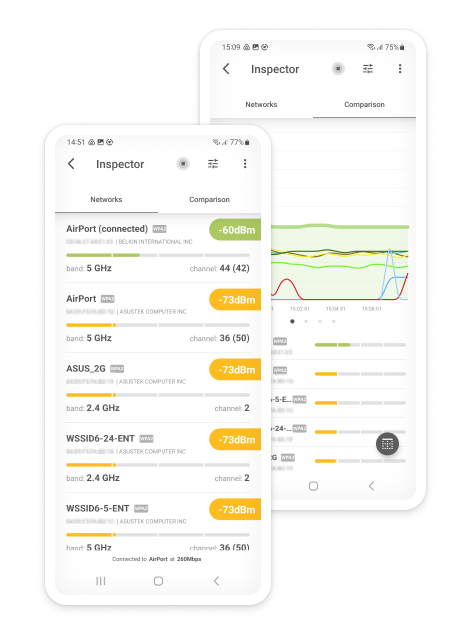
Analyze the scan results to determine which channels are used the least.
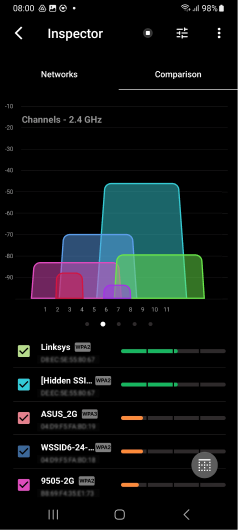
Inspect, compare, survey, and analyze WiFi networks with NetSpot. Optimize your WiFi network for maximum performance.
How to Find the Best Channel for WiFi on iOS
Apple provides its own utility, called AirPort Utility, and you can use it to discover the best WiFi channel available in your area.
Go to the App Store and download the AirPort Utility.
Tap the Settings app and go to the AirPort Utility Settings screen.
Turn on Wi-Fi Scanner at the bottom.
Launch AirPort Utility and tab the Wi-Fi Scan button.
Set the desired scan duration and tap Scan.
What Makes Channels 1, 6, and 11 Special?
While the 5 GHz band has 24 non-overlapping channels, the 2.4 GHz band has only three non-overlapping channels: 1, 6, and 11.

To make matters worse, not all WiFi routers and their users know that they should be using only non-overlapping WiFi channels because the use of any other WiFi channel is guaranteed to result in adjacent-channel interference.
Why does the use of other WiFi channels results in adjacent-channel interference? Because channels in the 2.4 GHz band have a WiFi channel width of 20 MHz, which would be fine if they were not spaced only 5 MHz apart. As a result, channel 3, for example, overlaps with both channels 1 and 6, and the same is true for channels 2, 4, and 5. Likewise, channels 7, 8, 9, and 10 overlap with channels 6 and 11.
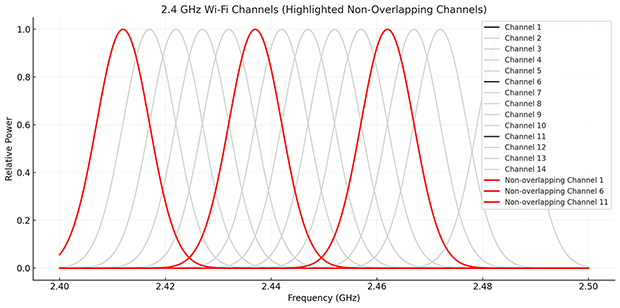
Users sometimes believe that the best WiFi channel is the one that’s used the least, which is why they end up picking an overlapping channel and cause more harm than good. To really find the best channel for WiFi, you need a WiFi channel analyzer or scanner and a little bit of know-how.
What About Non-Overlapping Channels in 5 GHz and 6 GHz?
The 5 GHz band offers a significant advantage with 24 non-overlapping channels, thanks to wider spacing and a larger spectrum allocation. This minimizes interference and provides more flexibility, especially in environments with dense WiFi usage.
The 6 GHz band takes this further, introducing up to 59 new non-overlapping channels in some regions. These channels are even wider (up to 160 MHz) and virtually interference-free, as the band is currently less crowded. This makes 6 GHz ideal for high-speed, low-latency applications.
Choosing non-overlapping channels in any band is critical for optimal performance, but the newer 5 GHz and 6 GHz bands give users far more options than the congested 2.4 GHz band.
Wi-Fi Channel best practices
Here are some basic WiFi channel planning best practices to help you avoid co-channel interference:
- Analyze WiFi channels at different times of the day: Some WiFi networks, such as those created by printers and wireless security cameras are active only during certain times of the day, so it pays off to analyze WiFi channels more than once.
- Consider the strength of each found network: The number of networks using a WiFi channel isn’t the only factor that matters. It’s sometimes better to use a channel that’s utilized by three other networks that are very far away than one network that’s very close.
- Upgrade to a dual-band or tri-band router: If you’re still using a single-band router, consider upgrading to a dual-band or tri-band model. These routers can broadcast on both the 2.4 GHz and 5 GHz bands (and even the 6 GHz band if they support WiFi 6E), reducing interference and congestion. Modern routers are relatively affordable, with excellent models available for under $100.
- Monitor changes in network activity: WiFi environments are dynamic, and new networks may appear over time. Regularly analyze your WiFi channels with NetSpot to maintain optimal performance.
By following these best practices, you can optimize your WiFi network to achieve faster download and upload speeds, reduce interference, and minimize latency issues.
Conclusion
Use NetSpot to verify that the router is broadcasting on the new channel. It’s useful to try more than one WiFi channel and compare the SNR of your WiFi connection.
In addition to helping you find the best WiFi channel, NetSpot can also perform a WiFi site survey, create a detailed WiFi coverage map, help you discover areas of signal weakness, highlight all sources of WiFi interference, and much more.
How to Find the Best WiFi Channel — FAQs
In most situations, the best WiFi channel is the one with the lowest number of users, assuming all users broadcast a roughly equally strong WiFi signal.
Generally, you want to focus your attention on channels 1, 6, and 11 because these are the only non-overlapping channels in the 2.4 GHz band. Using a WiFi channel scanner, discover how many users each of these three channels has and pick the one that’s used the least.
You should use the channel with the lowest number of users. If you discover multiple suitable channels, then we recommend you use the lowest one because lower-frequency channels penetrate solid obstacles, such as well, better than higher-frequency channels.
You can easily find the best WiFi channel for Windows 10 using a third-party WiFi channel scanner like NetSpot. Thanks to its graphical user interface, finding the best WiFi channel is something even complete beginners can do with no effort at all.
A dual-band router improves WiFi by offering two frequency options: 2.4 GHz for wide coverage and 5 GHz for faster speeds and less interference. This reduces congestion and enhances performance, especially for activities like streaming and gaming.
Absolutely. NetSpot identifies interference by analyzing signal strength, noise, and channel usage. Its visual tools, like heatmaps, help you optimize your network by selecting the best channels and addressing coverage issues quickly.

Find the Best Channel with a WiFi Channel Analyzer