Wi-Fi Site Surveys, Analysis, Troubleshooting runs on a MacBook (macOS 11+) or any laptop (Windows 7/8/10/11) with a standard 802.11be/ax/ac/n/g/a/b wireless network adapter. Read more about the 802.11be support here.
3 Powerful Ways to Extend Your WiFi Range
One of the most common WiFi troubleshooting goals is to extend the range of a WiFi network, and we explain several methods on how to do just that in this article.
Unlike a traditional wired network, a wireless network offers flexibility and convenience, allowing devices to stay connected without physical cables. However, this convenience comes with its own challenges, the most common being limited Wi-Fi range and weak signal strength in certain areas. Don’t rush to upgrade your gear — try the steps in this article first, then decide if new hardware is worth it.
Jump to...
If your Wi-Fi fails to cover every part of your home or office, or if you frequently experience unstable connections, it’s time to consider ways to extend Wi-Fi coverage and boost signal strength.
Fortunately, there are several effective solutions, ranging from simple adjustments to more advanced upgrades. In this article, we’ll explore the best ways to expand your Wi-Fi range, ensuring a stronger, more reliable connection wherever you need it.
How to Extend WiFi Range
If your Wi-Fi signal is weak or parts of your place feel like dead zones, don’t panic. In most cases, you can improve things with a few simple tweaks that don’t require any special skills or pricey tools. In this guide, we’ll look at the most common reasons for poor coverage and what you can do about them.
We’ll start with free, configuration-only changes and only then move on to hardware upgrades, so you can stop as soon as your coverage is good enough.
Method 1. Find a Better Place for Your Router
Even the best WiFi router available won’t be able to provide satisfactory coverage if it’s positioned poorly. As you may know, the WiFi signal is affected by all kinds of interference, including walls, furniture, electronic appliances, and other wireless devices. While it may seem convenient to hide the router inside a cabinet, the strength of your signal will suffer considerably. Different physical obstacles absorb the signal at varying degrees, leading to coverage issues.
How Physical Obstacles Affect WiFi Signal
| Obstacle | Signal Loss (dB) | Impact on WiFi |
| Drywall | 3–5 dB | Minimal impact |
| Wooden doors | 4-6 dB | Slight interference |
| Glass (plain) | 5-8 dB | Moderate signal loss |
| Brick walls | 10-15 dB | Significant interference |
| Concrete walls | 15-25 dB | Major signal degradation |
| Metal surfaces | 20-50 dB | Blocks most of the signal |
| Mirrors | 10-20 dB | Reflects and distorts signal |
As you can see, thick walls, metal surfaces, and even mirrors can severely weaken your WiFi signal. Simply finding a new location for your wireless router can have a dramatic impact on your WiFi signal for a variety of reasons.
💡 Pro Tips for Router Placement
- ✔ Position your router in a central spot to ensure consistent signal coverage throughout your space.
- ✔ Avoid placing it inside cabinets, drawers, or behind thick walls, as these can significantly weaken the signal.
- ✔ Keep the router elevated, such as on a shelf or mounted high on a wall, for better signal distribution.
- ✔ Minimize interference from electronic devices like microwaves, cordless phones, and Bluetooth gadgets.
- ✔ Use a WiFi analyzer to determine the best possible location based on actual signal strength.
Use NetSpot to Identify Dead Zones
You can easily find a better place for your router to extend your WiFi range using a WiFi analyzer and heat mapping tool like NetSpot.
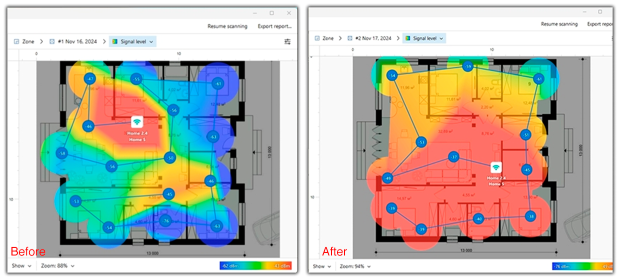
With its WiFi Heatmaps feature, you can visualize your network coverage, pinpoint weak spots, and identify “dead zones” where the signal is lost. This allows you to make data-driven decisions about router placement for optimal performance.
In many real-world projects, simply moving the router 1-2 meters and changing the antenna direction was enough to turn “dead” zones on the heat map into usable areas without additional equipment.
Method 2. Optimize Your WiFi Band and Channel
Another very common reason for weak or unstable Wi-Fi, even when the router sits in a decent spot, is a poor choice of channel, channel width, or band. The good news: you can usually fix this with a bit of tweaking in your router settings.
Sometimes Wi-Fi coverage issues arise not from improper router placement, but from its settings. Often, we don’t consider the router’s frequency and leave it at its default settings. A weak or unstable signal often occurs for two reasons: the router is operating on a congested channel, or the channel is too wide for a noisy environment. Older routers that only operate in the 2.4 GHz band are especially susceptible to this, as they share this band with all neighboring Wi-Fi networks and numerous household appliances.
That’s why it’s important to check what’s happening in the air. Use a WiFi Channel Scanner to clearly see which channels neighboring networks are using, how strong they are, and how much overlap there is.
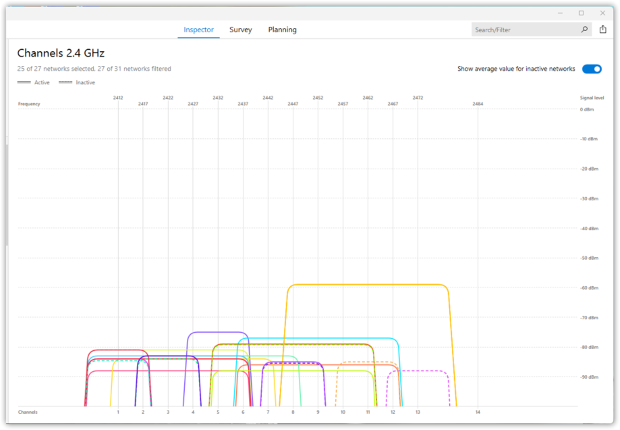
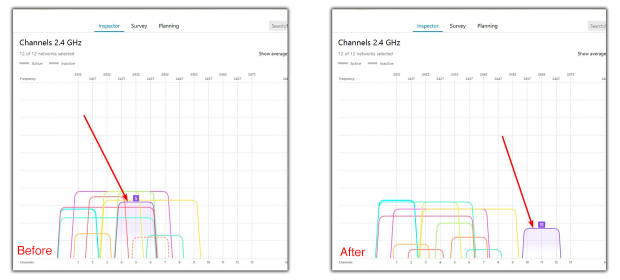
If you see that the whole 2.4 GHz band is packed and your router is stacked on top of several strong neighbors, or your network’s channel line is much wider than the others, that’s a good hint where the trouble comes from.
On older single-band routers your main tools are channel choice and a sensible channel width. If the analyzer shows that the air is overloaded, don’t just assume “wider is better.” A 40 MHz channel that cuts across several other networks can create overlap that you could avoid with a narrower 20 MHz channel on a cleaner frequency. The goal is simple: find the least busy channel you can, and then use the narrowest width that still gives you acceptable speed.
With newer dual-band and tri-band routers you have more options. They can broadcast on 2.4 GHz and one or two higher bands at the same time. 2.4 GHz reaches farther and goes through walls better, but it’s usually the most congested part of the spectrum. The 5 GHz band, and with Wi-Fi 6E/7 the 6 GHz band, don’t travel as far, but they are typically much cleaner and give you more room for wider channels without constant collisions.
💡 Pro tips for bands and channels
- ✔ If there are no truly free channels, it’s usually better to share one channel fully with a few strong networks than to sit between them on a partially overlapping one. Full overlap tends to behave more predictably than constant edge interference.
- ✔ Use a Wi-Fi analyzer or channel scanner that can see hidden networks as well, so you don’t pick a channel that only looks empty because the SSID isn’t being broadcast.
- ✔ Don’t automatically pick the widest channel. In busy environments a narrower but cleaner channel often gives higher usable speed and fewer drops.
- ✔ When the scan shows that 2.4 GHz is packed but 5/6 GHz is relatively empty, move as many modern devices as possible to those higher bands.
- ✔ The picture in the air changes over time: neighbors replace routers, add extenders, move equipment. Re-scan and review your channels and bands from time to time, especially if Wi-Fi suddenly starts acting up again.
Method 3. Enhance Your Equipment
If the previous steps didn’t fix the dead zones or unstable rooms, it’s time to think about your hardware. Upgrading your equipment — whether it’s a better antenna, a WiFi extender, a new router, a mesh network, or powerline adapters — can significantly boost your coverage and improve connectivity. In this section, we’ll help you choose the best option for your needs.
Get a Better Antenna
If you have a router with a replaceable external antenna, you can easily improve its performance by getting a better one. The gain of WiFi antennas is indicated in dBi (antenna gain in dB above an isotropic radiator). Many budget routers come with a small antenna with just 2 dBi, and replacing such antenna with a high-gain alternative is guaranteed to provide a significant boost in WiFi range.
To reinforce a particular area of signal weakness, you can point a directional antenna toward it, but you need to keep in mind that other directions may suffer. That said, most router antennas tend to be omnidirectional.
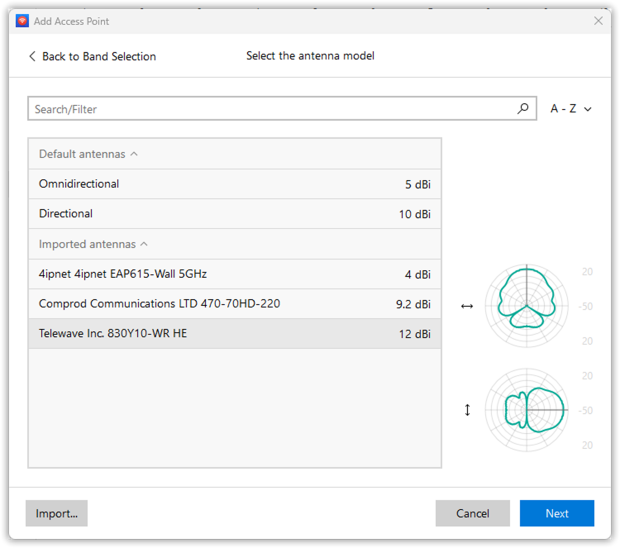
NetSpot’s Planning Mode allows you to virtually test different antenna configurations, helping you optimize your Wi-Fi setup before making physical changes.
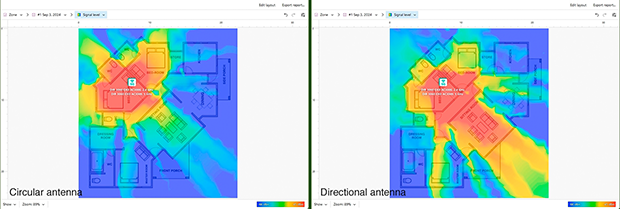
This is especially handy when you’re choosing between several antenna models or trying to understand which direction a directional antenna should face.
Using a WiFi extender
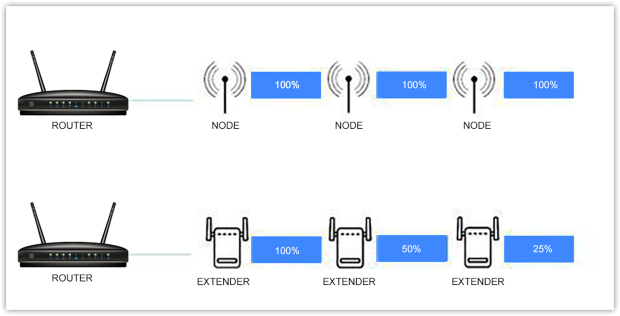
A WiFi extender or booster takes the original signal and repeats it to extend its reach. WiFi extenders are also available without any ingress protection for use indoors. Such WiFi extenders are usually considerably less expensive than their outdoor counterparts, and they’re just as easy to install.
They come in a variety of styles including extenders that simply plug into a nearby electrical wall outlet and can solve the problems of an inadequate WiFi range. Regardless of which type you select, make sure to use NetSpot to determine the optimal placement for your WiFi extender so that it extends your WiFi range as much as possible. Remember that each extender “hop” usually cuts real throughput and adds latency, so this is more of a quick fix for one dead zone than an ideal long-term network design.
Use a Second Router as an Access Point or Repeater
If you have a spare router, you can repurpose it instead of buying a dedicated extender. The most reliable option is to connect the second router to your main router with an Ethernet cable and configure it to work as an access point. This gives you strong, low-latency coverage in another part of the house.
When running cable isn’t realistic, some routers can work as wireless repeaters. In that mode, the second router rebroadcasts the main Wi-Fi signal. This is convenient but less efficient: throughput is often cut in half and latency increases. Use NetSpot to check how much performance you actually gain in problem rooms and decide whether a wired access point or mesh system would be a better long-term solution.
Upgrade Your Router
Most home routers don’t fail overnight — they just quietly get overloaded. Every new gadget you connect, every jump in streaming quality, and every extra cloud app pushes a little more traffic through the same old box. If your router is five or six years old and you don’t see any mention of Wi-Fi 6 in its web interface or on the sticker, there’s a good chance it’s holding your network back.
Older routers may not efficiently manage the bandwidth demands of today’s high-definition streaming, online gaming, and smart home devices. They often operate on overcrowded frequencies, leading to interference and reduced performance.
In contrast, newer routers can operate on multiple frequency bands (dual-band or tri-band), offering dedicated channels for different types of devices, reducing interference, and ensuring smoother connectivity.
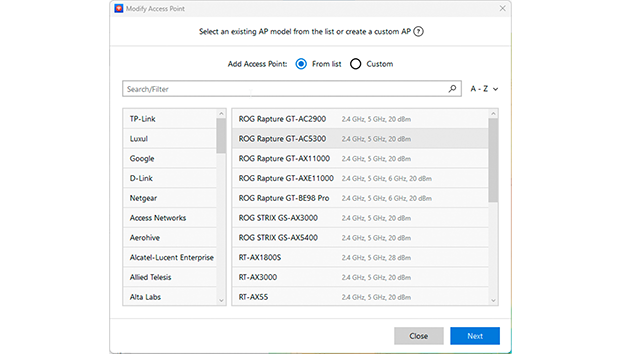
Virtually test different access point models using NetSpot’s Planning mode to optimize Wi-Fi coverage before deployment
Additionally, contemporary routers come with advanced features such as beamforming and MU-MIMO (Multi-User, Multiple Input, Multiple Output). MU-MIMO allows the router to simultaneously interact with several devices at once, significantly boosting network efficiency and capacity.
The physical design of newer routers often includes more or high-gain antennas, which can further extend the Wi-Fi coverage area. Furthermore, the latest routers come with enhanced security protocols, providing better protection against unauthorized access and cyber threats.
Investing in a new router can be a straightforward and effective way to extend your Wi-Fi range, especially if you’re experiencing connectivity issues, slow speeds, or have a growing number of Wi-Fi-enabled devices in your home. It represents a critical step towards building a more reliable and faster home network capable of handling today’s digital demands.
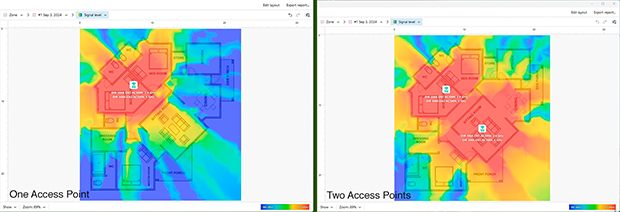
The nice part is that you don’t have to guess whether “one new router in the hallway” is enough or if you should plan for several access points. In NetSpot Planning Mode, you can sketch a simple floor plan, drop in different router or AP models, and see a predicted coverage map before you buy anything. That makes it much easier to decide whether a single upgraded router will do the job or you really need a small multi-AP or mesh setup.
Employing a mesh network
If your budget allows it, then we recommend you extend the WiFi in your house by replacing your existing router with a mesh system to create a so-called mesh network.
A mesh network is made up of two or more WiFi access points, typically called nodes, which together blanket a large area with seamless WiFi coverage. By setting up a mesh network in your house, you can gain the ability to roam with your devices from room to room uninterrupted by connection drops and slowdowns.
WiFi Extender or Mesh Network? 🤔
If you’re unsure which solution suits you best, consider your home’s size and network needs. WiFi extenders are best for fixing isolated dead zones, but they degrade signal strength with each hop. In contrast, mesh networks create a unified system where each node delivers full-speed WiFi without drops.
For small coverage issues, an extender might suffice. But if you want seamless connectivity across a large home, a mesh system is the superior choice. Setting up a mesh network is simple:
- Buy a mesh system that can cover your entire house.

- Connect the main mesh node to your existing router or modem using an Ethernet cable.
- Evenly place additional nodes around your and connect them to AC wall outlets.

- Use a companion smartphone app or a web interface to set up the mesh system.

- Use NetSpot to create a signal heat map and optimize the placement of individual nodes based on it.

That’s how easy it is to set up a mesh system!
Using Powerline Adapters
Powerline adapters use your home’s electrical wiring to extend network connectivity to distant rooms. They are particularly useful when running Ethernet cables is impractical, such as in multi-story homes, buildings with thick walls, or areas with poor Wi-Fi coverage.
Pros: More stable than Wi-Fi extenders, less interference, works well in homes with thick walls or multiple floors, and provides lower latency than wireless solutions.
Cons: Speed depends on the quality and age of the electrical wiring, may not function well in homes with separate electrical circuits or older wiring.
Some Powerline adapters come with built-in Wi-Fi access points, allowing them to create a secondary wireless network in areas with poor coverage. This can be particularly useful for garages, basements, and outdoor spaces where running an Ethernet cable would be impractical.
💡 Pro Tips for Enhancing Wi-Fi Equipment
- ✔ Choose antennas with higher dBi ratings (at least 5 dBi for better range, 9+ dBi for long-distance signals) and position them vertically for optimal performance.
- ✔ Position Wi-Fi extenders strategically — place them halfway between your router and the weak signal area for the best results.
- ✔ Upgrade to a dual-band or tri-band router to reduce congestion and provide faster speeds for multiple devices.
- ✔ Activate the QoS (Quality of Service) feature on your router to give priority to critical tasks such as video conferencing and gaming, ensuring they run smoothly even when background downloads are in progress.
- ✔ Use a wired backhaul for mesh networks when possible — connecting nodes via Ethernet greatly improves performance and reduces latency.
How to Extend Wi-Fi Range Outside?
Extending WiFi range outside is relatively easy, provided you have the right equipment for the job. Because a regular WiFi router wouldn’t be able to survive the exposure to the elements, you need a device that’s meant to be left outside regardless of whether its freezing or raining. We recommend an outdoor WiFi extender, sometimes called a WiFi repeater or access point.

Your outdoor WiFi extender of choice must have a sufficiently high ingress protection (IP) rating, and the temperature range it can withstand must cover even extreme temperatures in your area. When it comes to setting up an outdoor WiFi extender, you simply connect it to power and position it within the range of your indoor WiFi router. After installation, run a quick Wi-Fi survey with a signal analyzer or heatmap tool to make sure your yard, garage, or patio really has the coverage you expected.
SO, WE RECOMMEND

NetSpot
There is no reason that you need to suffer from the plague of a weak WiFi signal. One of the remedies we have covered should help you get that signal to each and every device in your home or office.
How To Extend WiFi Range — FAQs
How do I extend my WiFi range for free?
There are several ways how you can extend the range of your WiFi for free, including:
- Move your router to a more suitable place
- Take advantage of the 5 GHz and 6 GHz bands
- Optimize WiFi channel settings
If these steps don't help, it's worth considering a more advanced approach or changing equipment.
How can I increase the range of my WiFi router?
To increase the range of your WiFi router, you can download a wireless network analyzer like NetSpot and use it to determine the best location and settings possible.
Can I extend WiFi range with another router?
Yes, you can extend the range of your WiFi with another router, either by connecting the two routers together using an Ethernet cable or by setting up the new router to function as a wireless extender. A wired connection between routers almost always gives a more stable result than repeater mode, so use Ethernet if you can.
How do I extend my WiFi to my detached garage?
You can purchase a WiFi extender or replace your existing router with a mesh WiFi system to create a seamless wireless network extending from your home to your detached garage. In more difficult layouts, powerline adapters with Wi-Fi or an outdoor-rated access point often work better than trying to “stretch” a single indoor router through several walls.
If you have a unique configuration or a specific garage conversion challenge, join the forum discussion on how to extend Wi-Fi range in a detached garage for more tips and practical solutions.
What is the best way to extend the range of my WiFi?
That depends on which router you own, where it is installed, and how it is configured. Sometimes, the best way to extend your WiFi is to move your router somewhere else, but you may also need to replace it with a better model, and anything in between.
How can I extend WiFi to my basement or attic?
WiFi signals struggle to penetrate floors and ceilings. To improve connectivity in your basement or attic:
- Use a WiFi extender placed midway between the router and the basement/attic.
- Consider a powerline adapter, which can transmit the network signal through electrical wiring.
- Install a dedicated access point wired to your main router for the best performance.
Why does my WiFi drop at the same time every day?
If your WiFi connection weakens or drops at a specific time daily, it could be due to:
- Electronic interference: Devices such as microwaves, baby monitors, or Bluetooth speakers might be in use at the same time.
- ISP congestion: Some internet providers throttle bandwidth during peak hours.
- Router settings: Check if your router has scheduled tasks like automatic reboots or updates during that time.
Join the Conversation! If you're using a range booster and notice the signal vanishes when the sun goes down, you aren't alone. Check out this forum discussion on why WiFi extenders cut out at the same time every night to see how others have solved this exact mystery.
What should I do if my WiFi extender isn't working?
If your WiFi extender isn't improving signal strength:
- Ensure it’s placed correctly — midway between your router and the weak signal area.
- Check for firmware updates on your extender.
- Use NetSpot to analyze your signal and find a better placement.
- If interference is an issue, consider switching to a mesh WiFi system instead.
Still struggling to get those speeds up? You aren't alone. Many users find that extenders don't always live up to the hype out of the box.
Join the discussion on this forum about why WiFi extenders sometimes barely help to see how others solved similar issues and share your own experience!
Get NetSpot for Free
Wi-Fi Site Surveys, Analysis, Troubleshooting runs on a MacBook (macOS 11+) or any laptop (Windows 7/8/10/11) with a standard 802.11be/ax/ac/n/g/a/b wireless network adapter. Read more about the 802.11be support here.