Wi-Fi Site Surveys, Analysis, Troubleshooting runs on a MacBook (macOS 11+) or any laptop (Windows 7/8/10/11) with a standard 802.11be/ax/ac/n/g/a/b wireless network adapter. Read more about the 802.11be support here.
Why’s My WiFi Not Working: 2026 Troubleshooting Guide
Need help with WiFi troubleshooting? Discover how to diagnose and fix weak signals, slow internet, and noisy networks using NetSpot.
Wi-Fi always seems to give out when you need it most — right before a meeting, in the middle of a large download, or just as you’re settling in to watch something online. The good news? A lot of these problems are easier to fix than they seem. With a little time and the right approach, you can often sort things out on your own.
This guide breaks down the most common Wi-Fi issues and the steps you can take to sort them out. We’ll also look at how specialized apps, including tools like NetSpot, can help you get a clearer picture of what’s going on with your network.
Jump to...
Before You Start: A Quick WiFi Troubleshooting Checklist
Before jumping into complex troubleshooting, it’s smart to rule out a few common issues. Honestly, many WiFi problems come down to something surprisingly simple, so it’s worth taking a minute to check the basics first.
Here is what you should double-check right now:
- The power source: Make sure your router is actually plugged in and the lights are blinking.
- The network name: Double-check that you are on the right SSID and didn't accidentally connect to a neighbor's guest network.
- The software: Take a quick look at your router's app or admin panel to see if a firmware update is waiting.
- The scope: Figure out if the connection is dead on just one device or if it's lagging across your entire house.
Running through these quick checks first can save a lot of time and frustration. If everything looks fine here but you’re still seeing slow speeds or frequent disconnects, it might be time to look deeper into your network setup.
Common WiFi Problems and How to Fix Them
Before we get into any deep troubleshooting, start with the one thing that surprisingly fixes a huge number of WiFi issues. There’s a reason it’s the first thing most tech support reps ask you to try when you call in with a “my WiFi is broken” complaint.
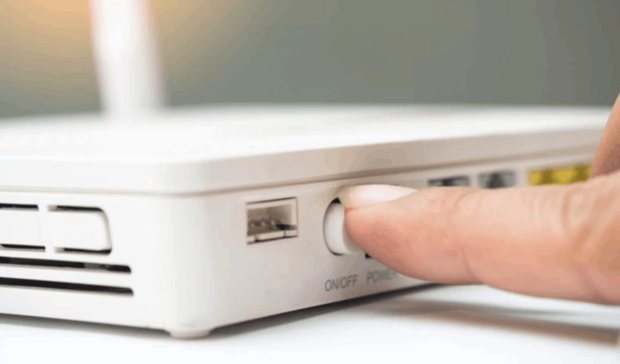
If your connection’s acting up for no clear reason, this 3-step reset might do the trick:
Step 1
Unplug your WiFi router from the power outlet.
Step 2
Wait about 30 seconds.
Step 3
Plug it back in and give it a minute or two to fully reboot.
Routers, like other electronics, have capacitors — small components that hold a bit of power even after you unplug the device. Waiting those 30 seconds lets everything truly power down. That hard reset clears out temporary glitches in the router’s memory or CPU and lets it start fresh. In practice, this “turn it off and on again” routine really does solve a surprising number of random WiFi problems.
It’s a small step, but if your WiFi is not working at all, this method is often enough to bring everything back online.
Still not fixed? No problem — let’s take a closer look at some of the most common WiFi issues and what you can do to handle them.
Why Your Wi-Fi Sucks in That One Room (And How to Fix It)
Problem:
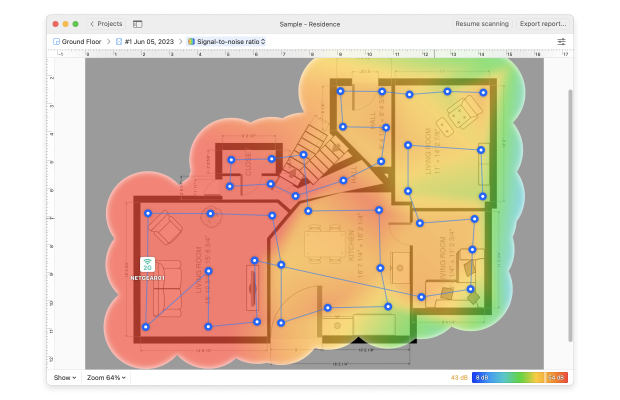
The internet works fine in one room, but as soon as you move a few steps away, the connection drops completely. This is usually due to basic physics. Wi-Fi signals don't travel well through thick concrete walls, heavy floors, and bulky metal furniture. Furthermore, the further you move from the router, the weaker the signal becomes. The house layout and improper router placement only make the situation worse.
A signal of approximately −30 to −60 dBm is generally strong, while values around −67 dBm are often suitable for common activities such as web browsing and video calls. Once the signal approaches −70 dBm, some devices may begin to experience slow speeds, unstable roaming, or intermittent connectivity. The exact requirement depends on the application, device, noise level, and network design.
Solution:
The solution is the most obvious: move your router. Don't keep it on the floor, in a closet, or hidden away. Place it higher and as close to the center of the house as possible. Keep it away from thick walls, mirrors, and other electronics that interfere with the signal. Sometimes, even a small move can make a significant difference.
If that still doesn't do the trick, your router is probably just hitting its physical limit. If you have a larger apartment, multiple floors, or a bunch of walls, look into a mesh Wi-Fi system or an extra access point. They spread the signal evenly so you get a smooth connection from room to room.
Expert Tip:
Don't rush to the store to buy expensive new equipment. First, simply install a Wi-Fi analysis app, such as NetSpot or VisiWave. Perform a survey, and the app will generate a heat map that will show you where the network is working perfectly and where there are dead zones. This way, you can clearly see whether it's time to simply move the router or invest in a mesh network.
Whenever possible, connect additional access points or mesh nodes through Ethernet. A wireless mesh node must use part of its available airtime to communicate with the main router, so placing it directly inside an existing dead zone may not help. It should sit where it can still receive a reliable connection while extending coverage into the weaker area.
Why Your Wi-Fi Slows to a Crawl
Problem:
If your internet is acting up — downloads take forever, videos keep buffering, and video calls freeze right when you're pitching an idea — it's enough to drive anyone crazy. If this mostly happens during peak hours, you're likely dealing with Wi-Fi channel congestion.
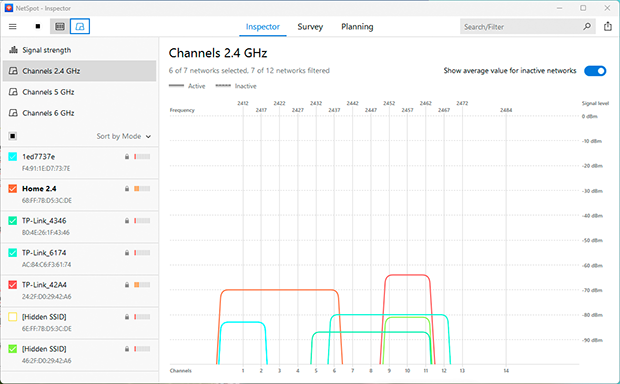
A typical situation in crowded apartment buildings is when dozens of routers constantly compete for the same frequencies. The 2.4 GHz band suffers the most because it's used by everyone, including household appliances and smart devices. It only has a few non-overlapping channels. When everyone is simultaneously connecting to the network, interference quickly accumulates, and speeds drop sharply.
However, congestion is only one possible cause. A slow internet plan, overloaded router, busy client device, background uploads, poor signal quality, high noise, or limitations of the destination server can produce similar symptoms. Compare a WiFi speed test with a wired test before assuming the wireless channel is responsible.
WiFi Keeps Disconnecting Randomly
Problem:
Sometimes users experience constant Wi-Fi disconnects for no apparent reason. This can be caused by a variety of factors — most commonly an overheating router, outdated firmware, or even unstable power supply to the device.
Solution:
Start by checking the physical condition and placement of your router. If it's tucked away in a tight, dusty cabinet or surrounded by other electronics, it may be overheating. Move it to a well-ventilated spot with some space around it. If the vents are dusty or blocked, gently clean them.
Next, check your router’s settings. An outdated firmware can cause random disconnects or slowdowns, especially if there have been security patches or performance updates released by the manufacturer. Log in to your router’s admin panel and check for any available firmware updates.
Also, consider the age of your equipment. If your router is more than 4–5 years old, it may simply be struggling to keep up with modern devices and network demands. Upgrading to a newer model with support for Wi-Fi 6 or Wi-Fi 6E can help eliminate these random dropouts, but age alone does not prove the router is faulty. Confirm the problem with testing before replacing otherwise functional equipment.
If disconnections affect only one device, update that device’s WiFi driver or operating system, forget and reconnect to the network, and disable aggressive power-saving options for its wireless adapter. If every device disconnects at the same time, focus on the router, modem, power source, or ISP connection.
Expert Tip:
Instead of constantly rebooting your router using a timer, find the cause of the problems. Remember when the internet connection goes down, which devices are disconnected, whether the router reboots itself, and whether the wired internet connection works at the same time. Such freezes often indicate hidden firmware issues, overheating, insufficient memory, or a faulty device.
Can’t Access Certain Websites
Problem:
We've all been there: you're online, your Wi-Fi is up, apps are working, and you can even stream videos without a hitch. But then, out of nowhere, a couple of websites just refuse to load. Instead, you're stuck staring at an endless loading wheel or a frustrating “DNS not found” error. While a corrupted DNS cache is usually the prime suspect here, it's not the only thing that can break your browsing.
Other possibilities include a problem with the website itself, browser extensions, parental controls, firewall rules, VPN configuration, IPv6 routing, or filtering by the network administrator or internet provider.
Solution:
The first step is to flush the DNS cache, which forces your device to request fresh address info from the network:
- On Windows, open Command Prompt and run:
ipconfig /flushdns - On macOS, open Terminal and type:
sudo dscacheutil -flushcache; sudo killall -HUP mDNSResponder
After that, do the classic move — restart your router. Turn it off, pause for half a minute, and power it back on. It sounds simple, but it’s one of the most effective ways to fix stubborn WiFi issues like this.
Before changing network-wide settings, try opening the same website in another browser or on another device. You can also temporarily disable a VPN or privacy extension. If the website fails on every device but other services work, check whether the destination itself is unavailable.
Expert Tip:
Try this: open your terminal or command prompt and type
ping 8.8.8.8
If you get a response, it means your internet connection is alive — the issue is most likely DNS-related, not a full outage.
Just keep in mind that some networks and servers are set up to block ping traffic entirely. So, if a ping fails, it doesn't automatically mean your internet is dead. Before you assume the worst, double-check it with a few other tests — like trying to open your router's admin page, typing in a web address to see if it resolves, or seeing if a second device can connect.
Download/Upload Speeds Are Too Low
Problem:
If your WiFi appears to be fine at first glance — the indicators are full, the connection is stable — but data takes a very long time to download and uploads are practically nonexistent, then the problem is usually not a lack of signal, but rather network congestion, poor router placement, or interference from other equipment.
This matches a recurring pattern in the reviewed troubleshooting cases: 24% produced acceptable signal readings but still performed poorly during active testing. In other words, a device can hear the router clearly while the channel remains busy, noisy, or unable to provide enough usable throughput.
Solution:
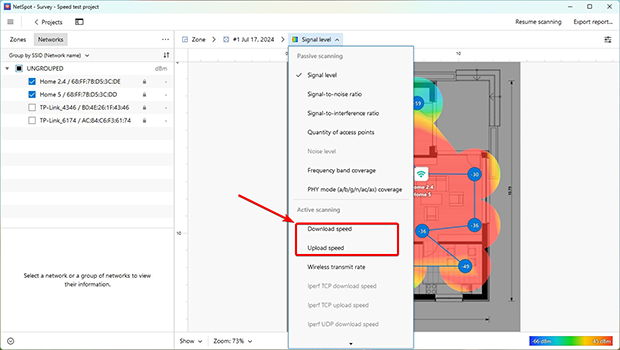
Measure what’s really going on. Start by running an Active Scan using a Wi-Fi analyzer like NetSpot. One of the most useful features here is the ability to generate download and upload speed WiFi heatmaps. These maps show where throughput actually falls off, even in spots that show “good” signal on your phone or laptop.
Run the same test more than once and, where possible, test at different times of day. A single measurement can be affected by a temporary download, server load, device activity, or short burst of interference. Repeated measurements make it easier to distinguish a persistent weak zone from a temporary slowdown.
Wireless Network Troubleshooter Tips with NetSpot’s Heatmaps
NetSpot goes beyond simple WiFi scanning — it's a full-fledged diagnostic toolkit available for Windows, macOS, Android, and iOS. Whether you’re dealing with weak signal, interference, or inconsistent speeds, the app helps you visualize what’s really going on across your network.
The exact modes and visualizations available depend on the operating system, hardware, and NetSpot edition. Desktop versions provide the most complete surveying and troubleshooting workflow, while mobile platform capabilities may differ because of operating-system restrictions.
With features like real-time signal analysis, download/upload speed testing, and most importantly, the ability to build detailed heatmaps, NetSpot gives you a clear view of problem areas — no guesswork needed.
If you’re on a PRO or Enterprise edition, NetSpot opens up a set of troubleshooting heatmaps that help you track down WiFi problems. They highlight exactly where your network falls short and what’s causing it. In the next sections, we’ll look at the main heatmap types and how to read them so you can fine-tune your wireless coverage.
Tip 1. Issues with SNR
The Signal-to-Noise Ratio (SNR) heatmap, which is available in the macOS version of the software only, will show you where your signal strength is not strong enough to overcome the existing environmental noise from other electronic devices.
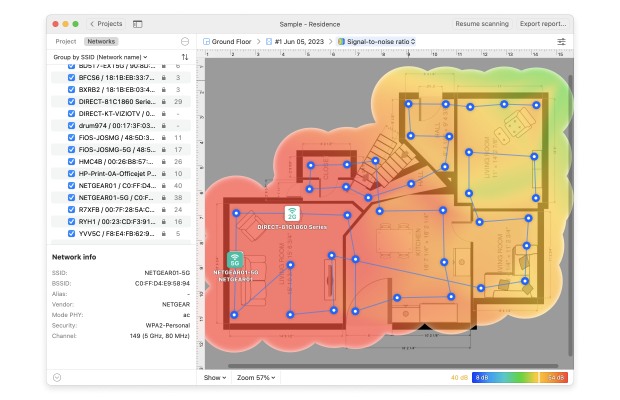
Areas of green are of concern and blue areas are critical. If your wireless network troubleshooting scan shows SNR issues, you will need to consider raising your signal strength or lowering the surrounding noise.
A weak SNR result does not automatically tell you which side of the equation is responsible. Compare the Signal Level and Noise Level heatmaps. If the signal is weak but noise remains low, coverage is the likely problem. If the signal is strong and noise is also high, look for interference or noisy equipment.
Tip 2. Low signal level
The Low Signal Level heatmap will show you where your signal strength is weak. Causes of weak signal strength include too much distance between the router and the device, or something physically blocking the signal between the router and device.
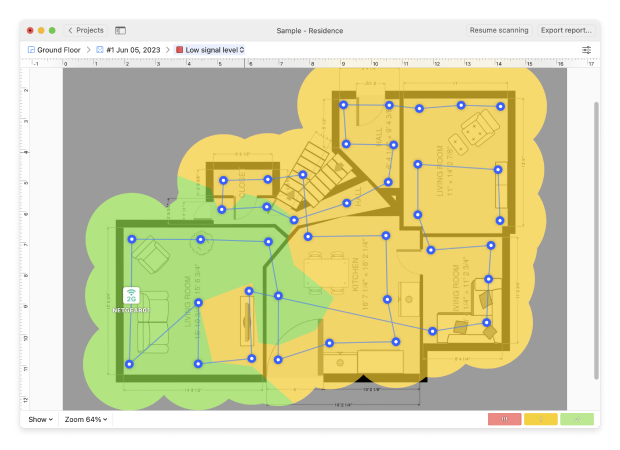
If your WLAN troubleshooting scan shows areas of red and yellow signal levels, you may need to explore ways to boost your signal level.
Treat approximately −70 dBm as an edge-of-coverage warning rather than an absolute universal cutoff. At this level, a basic connection may still work, but real-time calls, roaming, and higher data rates can become unreliable. For demanding applications, the required threshold may need to be closer to −67 or −65 dBm.
When the signal drops gradually with distance, the access point may simply be too far away. When it falls sharply after a wall, elevator shaft, metal rack, cabinet, or equipment room, building materials are more likely to be responsible.
Tip 3. High noise level
The High Noise Level heatmap will show you where the levels of noise are high. Noise can be caused by electronic devices such as microwave ovens, cordless phones, Bluetooth devices, and wireless video cameras.
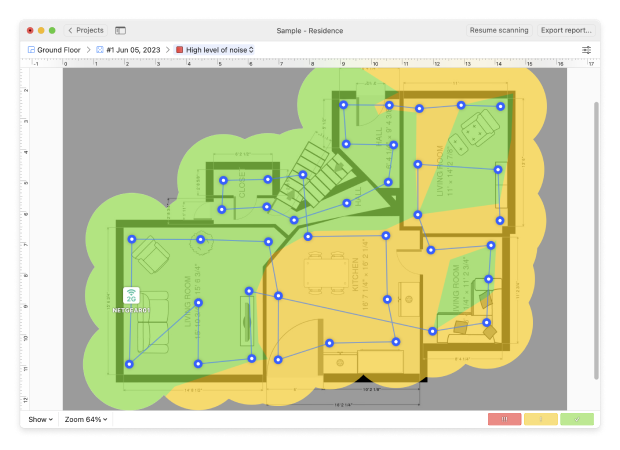
If your WiFi troubleshooting survey highlights large red or yellow patches on the Noise Level heatmap, it usually means the signal is fighting against a lot of background interference. In that case, it’s worth looking for noisy devices nearby and either moving them away from the access point or adding some physical separation between them and your WiFi gear.
Try switching suspected devices off one at a time and repeating the measurement from the same survey locations. Consistent before-and-after measurements are more useful than moving several devices at once because they make it possible to identify the actual source.
A standard WiFi adapter cannot identify every non-WiFi interferer by type. If unexplained noise remains high even after common sources have been ruled out, a spectrum analyzer may be required for a complete RF investigation.
Tip 4. Overlapping channels (SIR)
The Overlapping Channels WiFi heatmap shows how clean your signal is compared to interference from other transmitters around you. In most homes and offices, that interference comes from neighboring WiFi networks that sit on the same or partially overlapping channels.
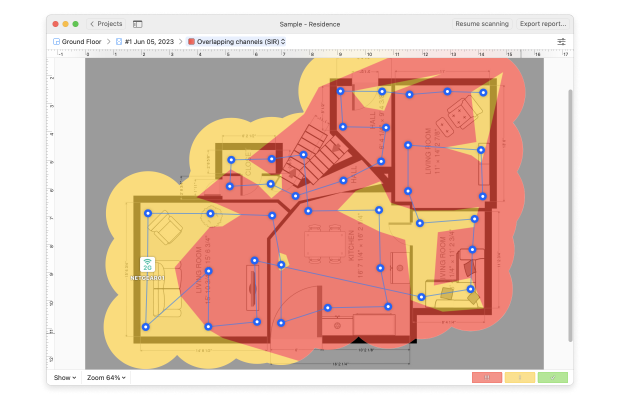
SIR and SNR describe different problems. SNR compares the desired signal with the overall noise floor, while SIR compares it with competing WiFi signals. A network can therefore have good signal strength but poor SIR when a nearby access point is using the same or an overlapping channel.
When this heatmap is covered in red and yellow, it’s a sign that your network is competing too hard for airtime. The easiest fix is to switch your WiFi to a less crowded channel and, if possible, a less congested band.
With NetSpot, you can see which channels are overloaded and pick one where nearby networks are weaker or fewer in number. Once you adjust the channel, run another quick scan to confirm that your SIR values look healthier.
Do not assume that any overlap is equally harmful. Networks using exactly the same channel can usually detect one another and take turns through WiFi’s contention mechanisms.
Partially overlapping 2.4 GHz channels may be more disruptive because transmissions can be interpreted as interference rather than coordinated channel activity. This is why channels 1, 6, and 11 are generally preferred over intermediate selections in a 20 MHz 2.4 GHz network.
Tip 5. Low download and upload rates
An active scan of your network gives you Low Download Rate and Low Upload Rate heatmaps, which show where users are most likely to hit slowdowns. Red and yellow areas on these maps point to spots where downloads, cloud backups, or video calls can feel sluggish.
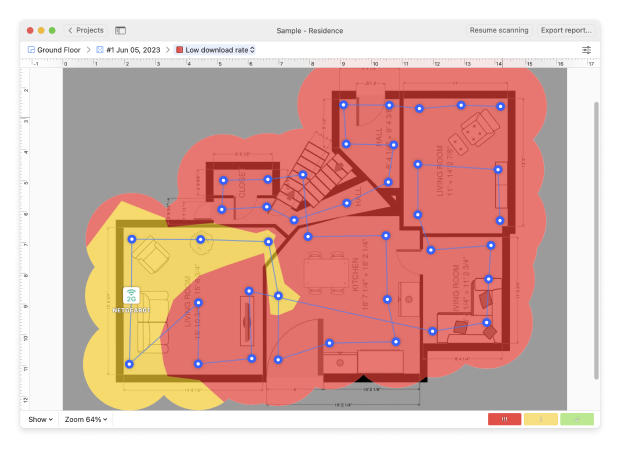
These visualizations measure actual performance rather than predicting it from signal strength. They are especially useful when a Signal Level heatmap looks healthy but users still report poor speeds.
If you see persistent “slow zones”, compare them with Signal Level, SNR, SIR, and Noise Level results before deciding what to change.
For example:
- Low speed plus weak signal usually points to a coverage problem.
- Low speed plus good signal and poor SIR suggests WiFi contention or channel interference.
- Low speed throughout the entire area, including near the router, may indicate an internet-plan, router, server, or configuration bottleneck.
- Low upload speed only may be caused by limited ISP upstream capacity or background cloud backups rather than WiFi coverage.
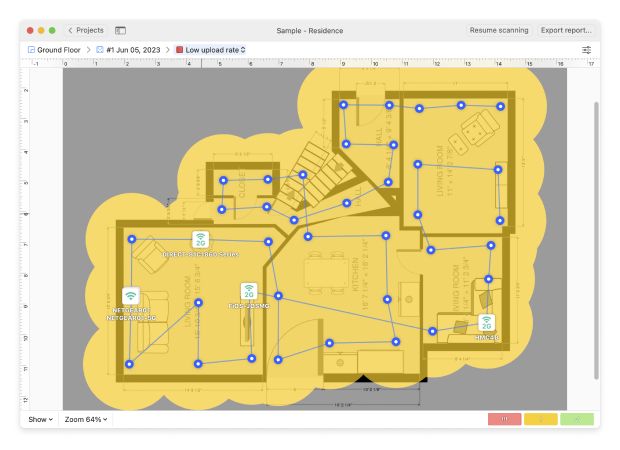
After each meaningful change, rerun the active scan from the same locations and under comparable conditions. If the problem zones shrink and measured rates improve consistently, the change is likely helping.
SO, WE RECOMMEND

NetSpot
NetSpot is a practical WiFi diagnostics and troubleshooting tool that visualizes signal strength and interference, making weak zones obvious at a glance.
Use it to test placement, select cleaner channels, and fine-tune configuration for consistent coverage and speed throughout your space — ideal for resolving drops, boosting throughput, and smoothing out everyday connectivity.
Its main advantage in troubleshooting is not simply producing a colorful map. It allows several measurements to be viewed in the context of the physical space, which helps separate coverage problems from interference and performance bottlenecks.
No WiFi analyzer can repair a network automatically or determine every cause from one measurement. The most reliable workflow is to measure the original condition, make one controlled change, and repeat the same test for comparison.
WiFi Troubleshooting — FAQs
There isn’t just one reason your WiFi can act up, which is why the best first step is to actually measure what’s going on. Run a detailed check of your network with a wireless analyzer like NetSpot to see where the real problem is coming from.
Why is my WiFi not working even though it shows full bars?
Signal bars only indicate connection to the router, not internet access. Check if your ISP is down, or flush your DNS cache. You can also use NetSpot to test signal quality and network stability.
For more detailed troubleshooting and to see how others have resolved this specific issue, join the forum discussion on full Wi-Fi bars with no connectivity.
There are several things you can do to fix your WiFi connection, and we recommend that you start by restarting your router. If that doesn’t help, then you need to follow the WiFi troubleshooting techniques described in this article to pinpoint the cause of the problem and resolve it.
My phone won’t connect to WiFi — what should I do?
First, restart both the phone and router. Forget the network and reconnect. If the problem persists, reset network settings or make sure MAC filtering isn’t blocking your device on the router.
Can you have WiFi but no internet?
Yes, it’s possible to have a working WiFi connection but no access to the internet. This usually happens when the internet service provider is experiencing technical issues or when there’s something wrong with the internet modem.
If you are dealing with this frustrating issue, you can join the conversation in our forum discussion on the topic “Why Wi-Fi works but the internet doesn’t load” and explore common troubleshooting steps and share your experience.
How to Perform a WLAN Troubleshooting Scan?
To troubleshoot any issues with your WiFi start with performing a WiFi site survey in the NetSpot app. New to NetSpot? Not a problem! Just read "How Do I Start My Survey?" and follow the comprehensive guide. First of all identify the area you are troubleshooting. Then you can either upload a map to NetSpot or draw it from scratch.
Once you have a map, you can start taking data samples of your area. When done, you will be able to see the heatmap NetSpot built based upon the measurements you've taken.
You also may check our top of the best apps for WiFi troubleshooting.
How to Troubleshoot Issues with SNR?
Thanks to the Signal-to-Noise Ratio (SNR) heatmap you can easily see where the signal doesn't have enough strength to overcome the noise created by other electronic devices in the area. Green and blue areas are those of concern, with blue (cold) being critical and needing to be taken care of in the first place.
How to Troubleshoot Low signal level?
Refer to the Low Signal Level heatmap to see the areas of weak signal. Weak signal strength might be caused by a router being too far from a device or by an obstacle between router and device physically blocking the signal. If you see green and blue areas on your heatmap, you might want to explore ways to strengthen the signal there.
How to Troubleshoot High noise level?
You'll easily determine the areas with high noise levels thanks to the High Noise Level heatmap. Even such appliances as microwave ovens can cause noise and lower the strength of WiFi signal. If you see green and blue areas on your heatmap — look for electronic devices that might be causing the issue and try moving them to another spot.
How to Troubleshoot Overlapping channels (SIR)?
Use the Overlapping Channels heatmap to see the areas that have a critical signal-to-interference ratio. The blue and green areas will show you where the interference is the highest. Try changing your network's WiFi channel to eliminate the issue.
How to Troubleshoot Low download and upload speed?
To see where your Internet connection speed is slow, perform an active scan of your network, and refer to the Low Download Rate and Low Upload Rate heatmaps. If you see red and yellow areas, you might need to change the protocols or bandwidth, or upgrade your hardware.
Why is my 5GHz WiFi not showing up?
Not all devices support 5 GHz. Also, some routers disable 5 GHz by default. Check your router settings and make sure the band is enabled.

Get NetSpot for Free
Wi-Fi Site Surveys, Analysis, Troubleshooting runs on a MacBook (macOS 11+) or any laptop (Windows 7/8/10/11) with a standard 802.11be/ax/ac/n/g/a/b wireless network adapter. Read more about the 802.11be support here.