How to Perform a Wireless Site Surveys
If you want to get the most out of your internet connection, you need to learn how to perform a wireless site surveys WITH NETSPOT so that you can evaluate how your WiFi network is performing and take the steps necessary to improve it.
A wireless site survey (also called a WLAN site survey) is the process of mapping RF coverage, interference, capacity needs, and roaming requirements before you deploy, upgrade, or troubleshoot a Wi-Fi network.
In practice, the survey surfaces different factors that influence the strength of a WiFi signal — wall density and materials, metal racks, glass, distance from each AP, overlapping channels, RF noise from microwaves or cordless phones, crowded 2.4/5/6 GHz bands, and simple client density.
By making those issues visible on a map, you can place access points (APs) where they’ll actually work, prove that coverage and performance meet requirements, and document everything so you don’t waste time and money later.
Jump to...
What Is a Site Survey
A site survey is a structured assessment of your WiFi network environment — signal coverage, interference, and capacity needs — to determine access point (AP) placement, configuration, and performance. During a wireless site survey, specialized tools collect real signal data across your floor plan and visualize it as heatmaps and metrics you can act on to build or fix the network.
Main Types of Wireless Site Surveys Explained
Most networking professionals identify the following three main types of site surveys:
- Predictive site surveys: You can think of this type as a weather forecast for WiFi network deployment and optimization. Its purpose is to estimate how a WiFi network would perform in a certain environment using complex mathematical models that take into consideration factors such as signal interference and building layout. Now that you know the answer to the question, "What is a predictive survey?" it's time for us to take a look at the two other main types of WiFi site surveys.
- Passive site surveys: When performing a passive site survey for wireless network deployment or optimization, you become a silent observer in a crowded room. What are you supposed to observe? Existing wireless signals in the surveyed area. In particular, you want to find out how many wireless routers are transmitting them and how they are configured and how strong the signals are.
- Active site surveys: This type of WiFi site survey is like when a teacher evaluates a student's performance by administering an oral exam. It involves active bi-directional communication with the tested network, and it can be used to reveal performance fluctuations and other hard-to-detect and troubleshoot issues.
As you can see, the answer to the question, "What is a site survey?" really depends on which survey type you're talking about. In the real world, the above-described types of WiFi site surveys are typically combined, so that's something to keep in mind when learning how to do a site survey for wireless network deployments and optimizations.
Why Wireless Site Surveys Matter in 2026
WiFi isn’t “set it and forget it” anymore. With WiFi 6E using the 6 GHz band and WiFi 7 introducing things like 320 MHz-wide channels and Multi-Link Operation, you can’t just drop an access point on the ceiling and hope for the best. You need real data from the environment.
A proper wireless site survey helps you:
- Keep roaming smooth in mesh and multi-AP setups. Devices should hand off between access points without dropping calls or freezing video.
- Put access points in the right spots, not just convenient ones. You confirm where APs should actually live for coverage and capacity.
- Control interference. You see where co-channel and adjacent-channel interference will cause problems before it actually does.
- Check signal quality, not just signal strength. You verify SNR and usable coverage for things like video meetings, VoIP, scanners, and other IoT devices that can’t afford jitter.
- Get real performance from the 6 GHz band. You make sure wide channels in 6 GHz deliver high throughput instead of stepping on each other.
Before You Begin: Pre-Survey Prep Checklist
Define your goals
Be clear about what “good WiFi” means for this space: smooth voice calls, 4K streaming, low-latency apps like POS scanners, security cameras, etc. Write down target values — for example, around –65 dBm RSSI and SNR of at least 25 dB in the main usage areas.
Prepare the floor plan
Find or create a scaled plan of the surveyed area. If you don’t have CAD drawings, many survey tools (including NetSpot) let you draw or import a rough floor plan and then calibrate distance by marking two known points. Mark all rooms, walls, windows, and doors.
If possible, document the building materials used — concrete, brick, drywall, glass, metal — as they have a big impact on signal propagation. Also include major signal-blockers like elevators, water pipes, and large appliances (e.g., microwaves).
List the client devices
Note the types of devices the network will support: their WiFi standards (Wi-Fi 6 / 6E / 7), frequency bands (2.4 / 5 / 6 GHz), advanced features (OFDMA, 160/320 MHz support), roaming behavior, and any quirks — like legacy IoT gadgets limited to 2.4 GHz.
Check the environment
In apartment buildings or busy office spaces, expect RF congestion. Identify nearby networks using a WiFi scanner. Plan for co-channel and adjacent-channel interference. Unless you find a clean spectrum, stick with 20 or 40 MHz channels to avoid overlaps.
Account for future growth and security
Estimate future device count. Decide if IoT devices need to be isolated. Also document any security or compliance needs — for example, encryption requirements or guest network separation.
Why this matters: Instead of just listing “things that affect WiFi”, this checklist turns them into work you do before the survey. You walk in already knowing what “good” looks like, what devices you’re designing for, how bad the RF noise is, and what happens when the network scales.
Once you’ve got this baseline info (requirements, floor plan, device mix, RF noise, growth plans), you’re ready to actually perform the wireless site survey.
How to Conduct a Wireless Site Survey
A wireless site survey ensures optimal network design and deployment through a structured, multi-step process. Let's take a look at the main steps you should always consider when learning how to do a wireless site survey, also referred to as an RF site survey:
Initial planning
At the start of each wireless site survey, it's a good idea to consider what exactly it is that you want to achieve. Do you want to install a new router in your home? Do you want to cover a large office space with a mesh network? Or perhaps you just want to improve your WiFi performance? Knowing your goals will help you plan your survey accordingly and accomplish your objectives quickly and painlessly.
Instead of guessing in the field, refer back to the information you documented during survey prep. The site survey should follow a clearly defined plan based on your target performance thresholds, the actual network requirements for this space.
Site inspection
Walk the space with the prepared floor plan from your checklist and verify it in the real world. Confirm wall locations, materials (drywall, brick, concrete, glass, metal), doors, elevators, pipes, server rooms, and any high-interference areas (microwaves, cordless phones, wireless cameras).
Note where access points (APs) can and cannot be mounted — ceiling height, power, cabling, safety/visibility concerns. This becomes your list of physically realistic AP locations.
Data collection
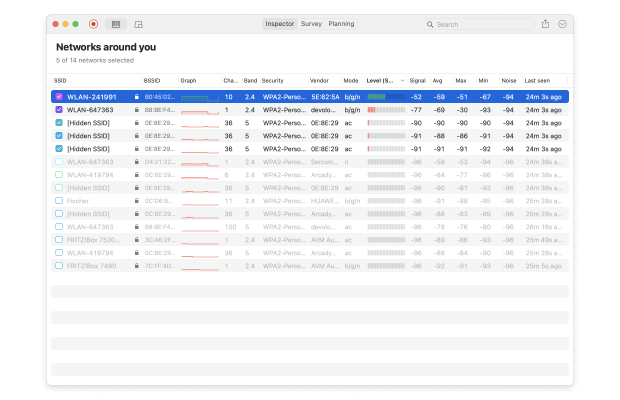
With all preparatory steps done, it's time to use wireless site survey for Mac, WiFi site survey for Windows, or WiFi site survey for Android software to collect the necessary data about the wireless network environment, including the number of existing WiFi networks within reach, their signal strength, the amount of interference caused by them, and so on.
Your wireless site survey software of choice should help you collect data from different parts of the surveyed area until you've covered it all. Begin the active survey by walking through the space with your wireless site survey tool in hand.
Be sure to perform measurements at multiple heights (desk level, ceiling-mounted AP level, etc.) if your deployment involves vertical coverage. If possible, repeat the walk-through at different times of day to detect temporal interference (e.g., microwave usage during lunch hours).
Data analysis
Now is the time for the fun part: visualizing the collected data by overlaying it on the map of the surveyed area. The best wireless site survey tools support many different visualizations, making it easy to see everything from places with high signal interferences to signal weak zones.
Pay special attention to heatmaps showing:
- Signal-to-noise ratio (SNR)
- Signal-to-interference ratio (SIR)
- Band coverage (2.4/5/6 GHz)
- PHY mode distribution (e.g., 802.11ac vs 802.11n)
This is where you answer concrete questions: Do we meet our –65 dBm / SNR ≥ 25 dB targets in user areas? Are there areas with excessive co-channel interference because multiple APs are sharing the same channel width? Are roaming devices forced to fall back to 2.4 GHz because 5/6 GHz isn’t reliable in certain rooms?
This step turns raw numbers into something you can act on, instead of guesswork. These insights help validate whether your target metrics are being met — and where improvements are needed.
Deployment and optimization
After the wireless site survey has been completed, it's time to put the insights revealed by it to good use by deploying a new network or optimizing an existing one.
Use the survey results to finalize AP placement and configuration. This can include moving or adding APs, adjusting transmit power, narrowing channel width in congested areas (e.g. from 80 MHz down to 20/40 MHz), separating IoT onto its own SSID/VLAN, and enabling modern features like OFDMA and band steering for 5/6 GHz-capable clients.
For greenfield installs, this is the stage where you lock in exact AP locations and mounting, cable runs, and channel plans before anything gets drilled into a ceiling.
Continuous monitoring
Once the wireless site survey is complete and the data has been analyzed, it's important to regularly monitor and reassess the network to maintain optimal performance. This can be done by using the same site survey software used to initially collect and analyze the data.
Regular monitoring can help identify any new sources of interference, changes in the physical environment, or increases in network usage that may be impacting the network.
How to Perform a Wireless Site Survey with NetSpot
NetSpot is a professional wireless site survey software application for macOS and Windows. It can be used to easily visualize signal coverage, manage nearby networks, troubleshoot various WiFi-related issues, audit WiFi, plan site survey projects, and deploy wireless networks.

Step 1
Download and Activate NetSpot
NetSpot meets the requirements of professional network administrators, and is available on macOS, Windows, and Android.
To get started, download the free edition of NetSpot and install it. To perform a WiFi Site survey you’ll need paid version of NetSpot to be activated (Home, PRO, or Enterprise). For more details about the licenses available, please check here.
Step 2
Launch NetSpot and Switch to the Survey Mode
Next, launch NetSpot and switch to the Survey mode using the prominent button at the top of the main window.
Step 3
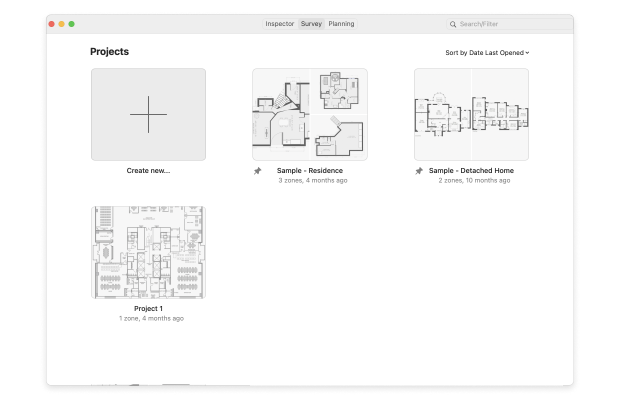
Start a New Survey
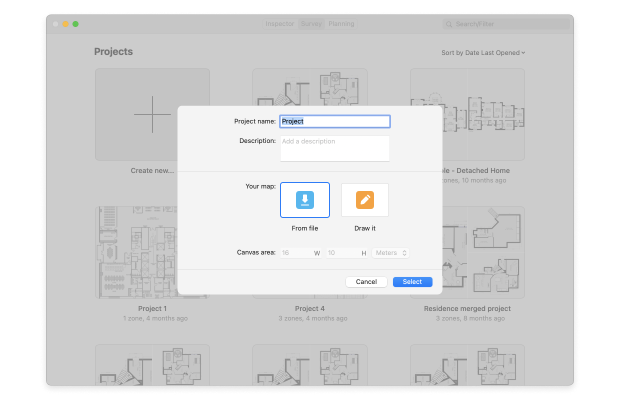
To start a new survey, you must first give your WiFi site survey project a name and import a map of the area you want to survey. If you don’t have any, you can draw one right in NetSpot. You will be asked to select two points on the map and input the actual distance between them.
Step 4
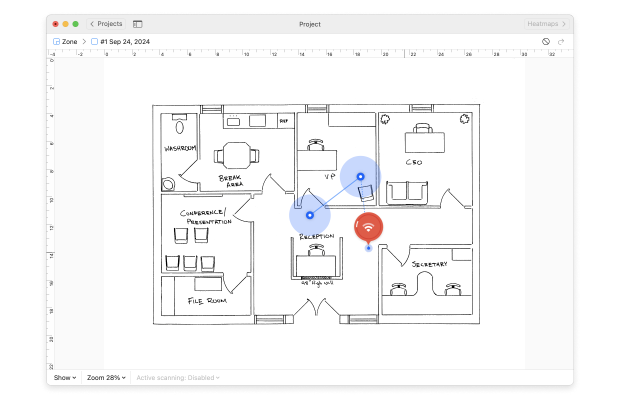
Scan the Surveyed Area
Now the fun part: move from one place to another until you cover the whole area and gather enough data for NetSpot to create a WiFi site survey report. Click the Stop Scan button located in the bottom-left corner when you’re done.
Step 5
Analyze the Results
Thanks to NetSpot’s user-friendly nature, you should immediately see any areas of signal weakness. It’s then up to you to take the necessary steps to get rid of them, which may be as simple as moving your WiFi router a few feet to one side.
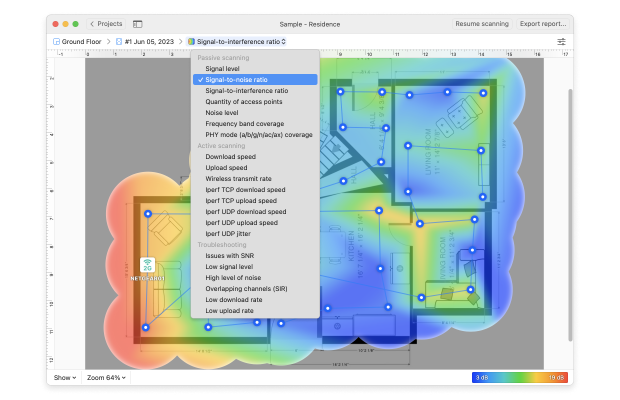
One of the reasons why NetSpot is one of the best WiFi survey software tools is that it lets you select many different types of heatmaps from the drop-down menu at the top to analyze a variety of parameters and the effect they have on your wireless network coverage.
For example, you can visualize signal-to-noise ratio, signal level, signal-to-interference ratio, secondary signal level, noise level, quantity of access points, frequency band coverage, PHY mode coverage, download speed, upload speed, wireless transmit rate, and more.
Conclusion
Wireless site surveys aren’t just for IT pros — they’re essential for anyone who wants reliable, fast WiFi. There’s no reason to live with a poor WiFi signal, frequent connection drops, slow download and upload speeds, and high latency. Thanks to wireless site survey software applications like NetSpot, anyone can learn how to perform a wireless site survey and quickly solve common WiFi problems.
As we’ve explained in this article, all it takes to get the most out of your internet connection is the right tool and 5 simple steps.
SO, WE RECOMMEND

NetSpot
Wi-Fi Site Surveys, Analysis, Troubleshooting runs on a MacBook (macOS 11+) or any laptop (Windows 7/8/10/11) with a standard 802.11be/ax/ac/n/g/a/b wireless network adapter. Read more about the 802.11be support here.
How to Perform a Wireless Site Surveys — FAQ
What is in a site survey?
A site survey includes a detailed analysis of signal strength, interference, channel and band settings, and other parameters. Such surveys are typically performed to determine the optimal location for a WiFi router or to troubleshoot WiFi-related issues.
How is a site survey conducted?
A WiFi site survey is conducted using a specialized WiFi site survey software application like NetSpot running on a laptop or mobile device.
What are the 3 types of surveying?
The three main types of WiFi surveying are predictive surveys, passive surveys, and active surveys, with each type serving a different purpose.
How is a wireless site survey done?
To do a wireless site survey, you need only a laptop, tablet, or smartphone with specialized wireless site survey software running on it. The software will then help you collect all necessary data and turn it into actionable insights.
What are the tools you will use when performing a site survey?
There are only two tools you need when performing a site survey:
- A computing device (laptop, tablet, or smartphone)
- WiFi site survey software (NetSpot is a good example)
Get NetSpot for Free
Wi-Fi Site Surveys, Analysis, Troubleshooting runs on a MacBook (macOS 11+) or any laptop (Windows 7/8/10/11) with a standard 802.11be/ax/ac/n/g/a/b wireless network adapter. Read more about the 802.11be support here.