Wi-Fi Site Surveys, Analysis, Troubleshooting runs on a MacBook (macOS 11+) or any laptop (Windows 7/8/10/11) with a standard 802.11be/ax/ac/n/g/a/b wireless network adapter. Read more about the 802.11be support here.
How to Improve Wi-Fi Signal — a practical guide
It’s time for you to learn how to improve WiFi connection without switching to a different internet provider or changing your WiFi password.
Struggling with slow internet or dead zones in your home? Let’s fix that. In this guide, we’ll show you exactly how to improve WiFi signal and how to increase WiFi signal strength room by room. Whether you’re dealing with weak WiFi upstairs, poor coverage in the garage, or overloaded channels in an apartment, you’ll learn actionable steps — and how to test your results using real data, not guesswork.
Jump to...
What Affects Your WiFi Signal?
WiFi travels via radio waves, just like FM radios. The problem? These waves are easily blocked or distorted. Here's why your signal might be struggling:
Distance is a major factor. Stand only a few feet away from a WiFi router, and you’re guaranteed to enjoy a strong signal and excellent speeds. But walk away from the router to a different room, and the signal will weaken.
It’s also important to remember that WiFi signal travels in straight lines. Laptop and smartphone users sometimes wonder why they have close to 100 percent signal in one part of a room and nearly no signal in another part of the same room. In the vast majority of cases, the reason is that the line of sight between the router and the device is partially obstructed by some obstacle and moving to another part of the room clears it.
The type of materials between your device and the router matters. Just how much weaker the signal will be depends not only on the distance itself, but also on the kind of obstacles between the router and the connected WiFi device. Generally, solid materials such as brick, stone, or concrete have a greater negative influence on WiFi signal strength than materials such as wood.
WiFi interference is the hidden culprit behind many slow connections. Overlapping WiFi networks from neighbors using the same frequency or channel can cause congestion, especially on the overcrowded 2.4 GHz band. That's why choosing the right WiFi channel is crucial for avoiding interference.
A practical example highlights how even small changes can significantly improve signal strength.
Six feet. That was all that it took to change the signal strength in the house I was visiting. It was a two story home, and the people struggled to connect devices in the upstairs bedrooms to the WiFi. When they could connect, the signal was so weak that watching a video was like seeing a slideshow roll by.
The issue turned out to be the router’s position — on the floor on the other side of a couch, possibly obstructed by a metal frame. Moving the router six feet to the other side of the couch onto the end table changed everything — we could see that the signal strength upstairs was strong at every point we wanted to connect. We didn’t need to buy a bunch of hardware or new devices. We just needed to know what the signal looked like as we moved things around.
Simple Steps: How to Improve WiFi
Every company today needs access to the Internet to connect with its customers and vendors. Every home uses the WiFi to access the Internet — and at some point, every place will start having problems. For people who are having issues with their WiFi signal, there are some things they need to do:
Step 1
Measure Your WiFi Signal
Before jumping into fixes, it’s smart to understand the current state of your network. In practice, all you need is a WiFi analytics and audit application such as NetSpot. This easy to use product for macOS and Windows computers has been designed for regular computer users but with the needs of professionals in mind.
Using NetSpot, we can measure one or several different WiFi signals and get a reading on their strength. Here’s a short description on how to do it:
- Download and install Netspot. Once it’s installed, launch it.
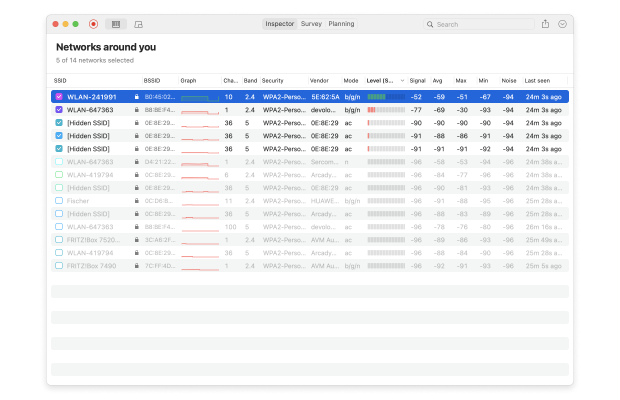
- Select Inspector mode. It will display a list of all of the WiFi networks:
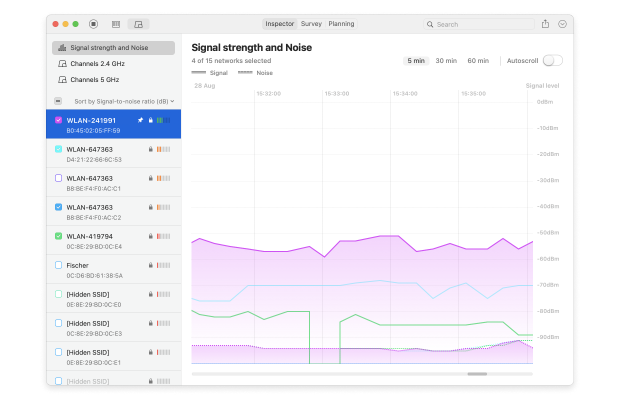
- Double click on the WiFi network we want to measure. Netspot will automatically scan and update the signal to noise ratio graph:
- Move to another location in your residence or business, and see how the signal changes. This lets our WiFi signal strength app show us how the signal changes depending on where we are.
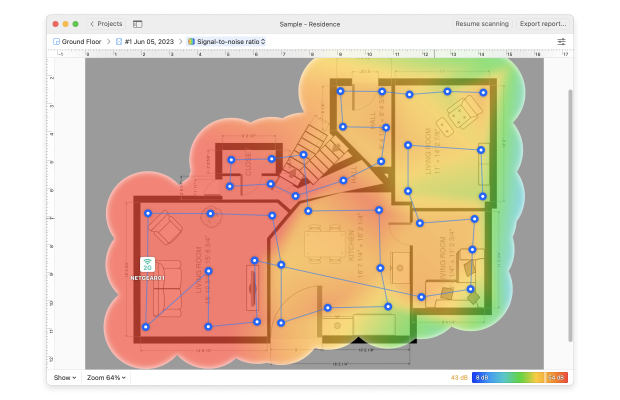
- For users of NetSpot Home/ PRO/ Enterprise, an even better tool is Survey Mode. With this, we can load up a map of the local network, and then move from location to location. This lets us use Netspot as a WiFi signal strength meter, tracking how the signal rises and falls based on where we are. NetSpot will build up data on how the network looks at each position, until it can display how it appears against the entirety of the map:
- Once we can see what sections are strong or weak through our WiFi strength app, then we can decide where to move our routers. If we see a region more blue (aka — weak signal), we can just move our router.
Step 2

Update Your Devices
Sometimes the signal isn’t the problem — outdated software is. To ensure you’re getting the best performance, update everything.
Updating Computers:
Updating computers is probably the easiest thing to do in this situation. In each case, make sure the device in question can connect to the Internet. Having the operating system update itself will typically update the operating system and drivers that it uses. Install the latest OS updates and drivers. Windows 10/11 users can go to Settings > Update > Check for Updates. macOS users should open the App Store and install all pending updates.
Updating Routers:
Updating routers can be a little more tricky. Every system has its own method, but most of the time we can log in through a browser. We’ll need to know the IP address of the router in question. For most home systems, this is going to be HTTP or HTTPS connection.
Log into your router via its IP address (usually https://192.168.0.1) and check for firmware updates. Each model is different, so refer to your router’s manual.
Updating Everything Else:
Whatever else we’re connecting through WiFi, usually there will be a way to update its firmware or other systems. Tablets like the iPad, game consoles like the Playstation or Nintendo Switch — all of them will have a process to update their systems. Check the manual or the company website to see how. Most of the time, it’ll alert you that it needs to be updated when the manufacturer releases new updates.
Up-to-date systems not only work better but also improve security and device compatibility with modern WiFi standards like Wi-Fi 6 and Wi-Fi 6E.
Step 3
Find the Best Spot for Your Router
Small moves can make huge differences, especially in wood-frame houses and multifamily apartments.
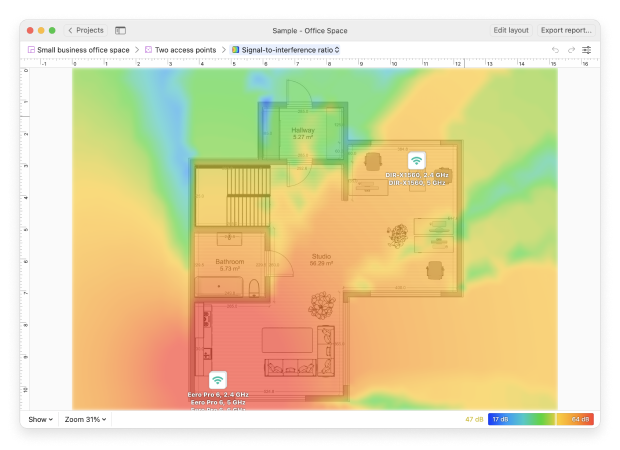
With NetSpot’s Survey Mode, you can create a signal heatmap to see where your WiFi signal is the strongest and where it is the weakest. Using this information, change the placement of your router so that it covers as much space as possible and as evenly as possible. You might need to place your router farther away from walls or other obstacles or even put it on a shelf.
For even more precise planning, NetSpot’s Planning Mode allows you to simulate router placement and coverage before physically moving anything — a powerful way to model layout changes and choose the optimal router or access point position based on real heatmap data.
Use NetSpot’s heatmap to test multiple locations and choose the best one based on real signal readings.
Step 4

Choose a Better WiFi Channel
The frequency on which WiFi routers broadcast is further divided into a multitude of individual channels. When multiple WiFi networks are being simultaneously broadcasted on the same channel, network congestions may occur and slow everyone’s WiFi down.
If you’re using the 2.4 GHz band and your neighbors are too, chances are you’re all clogging the same channels. This leads to interference and slowdowns.
To see which WiFi channels are used the most, use NetSpot’s WiFi channel analyzer. All you need to do is to check for WiFi channels overlapping.
If all channels are busy, try switching to 5 GHz or even 6 GHz if your equipment allows it and supports Wi-Fi 6E or Wi-Fi 7. These standards unlock cleaner spectrum and higher throughput, but compatibility depends on both your router and client devices.
Step 5
Still Weak Signal? Add Mesh or Access Points
No matter how good your router is, some homes are just too big — or too oddly shaped — to cover with a single device. After building a heatmap, you’ll see where signal drops and where extra help is needed.
Options:
- Mesh WiFi systems — ideal for large or multi-story homes
- Wired access points — great for high-performance zones like home offices
- Powerline adapters — quick fix if you don’t want to run Ethernet
In this situation, Planning Mode in NetSpot can again be helpful: it allows you to virtually test how additional routers or mesh nodes would change your coverage. Instead of guessing, you can compare different placement options and equipment models right on your floor plan and see which setup gives you the best WiFi signal strength before you invest in hardware.
Step 6
Optimize and Repeat
After making changes — whether updating software, moving your router, or changing channels — repeat your WiFi survey. It’s essential to verify improvements and avoid making assumptions.
And don’t forget to secure your WiFi network. Open networks not only put your data at risk but can also be hijacked by freeloaders, slowing down your connection. Start NetSpot’s Inspector Mode and check whether your WiFi is encrypted. If it isn’t, go to your router’s admin menu and change the necessary settings.
Using an unsecured WiFi is extremely dangerous in this day and age and could lead to the exposure of your private information to malicious hackers. That’s why it’s strongly recommended to secure your network with modern encryption standards such as WPA3, or at least WPA2-AES. They provide reliable protection for your data and prevent unauthorized access, unlike outdated protocols such as WEP or WPA-TKIP.
Conclusion
Now that we have the knowledge, finding out the best way to upgrade our WiFi signal strength will be a snap. As we move the router, we can redo our survey and then use NetSpot to perform another WiFi site survey to see in real time how it affects signal strength. Perhaps we need to use a WiFi booster or go to a mesh network to get a better connection. But instead of guessing — now we’ll know.
But whatever it takes, making sure our systems are up to date, and actually being able to see how the network looks across our location helps us increase the WiFi strength.
Knowledge is power. Use it, and the knowledge of the Internet will be at your hands.
SO, WE RECOMMEND

NetSpot
FAQ: How to Improve WiFi Signal
Place your router on the middle floor, as central as possible. If that doesn’t fully solve coverage, add a mesh system or access point where your heatmap shows weak spots.
Join the forum discussion on fixing dead zones in a new house for more specific tips and real-world troubleshooting. Share your setup and get tips on optimizing your home network!
Yes. In crowded apartments, switching to a less congested channel can instantly improve speeds and reduce drops. Use a WiFi analyzer app to choose the cleanest channel.
What’s better for speed: 2.4 GHz, 5 GHz, or 6 GHz?
- 2.4 GHz = best range, lower speed
- 5 GHz = higher speed, shorter range
- 6 GHz = fastest and cleanest, but only on WiFi 6E/7 gear
Do WiFi extenders reduce speed?
Single-radio extenders often halve throughput. For better results, use a mesh system with dedicated backhaul or run a wired access point.
What security settings are best for performance?
Use WPA3 (or WPA2-AES). Avoid WPA/WEP/TKIP. A secure network prevents freeloaders that can drag down speeds.
Get NetSpot for Free
Wi-Fi Site Surveys, Analysis, Troubleshooting runs on a MacBook (macOS 11+) or any laptop (Windows 7/8/10/11) with a standard 802.11be/ax/ac/n/g/a/b wireless network adapter. Read more about the 802.11be support here.