Powerful advanced tool for multiple Wi-Fi networks Surveys, Analysis and Troubleshooting.
How to Secure WiFi: Guide to Protecting Your Wireless Network
Learn how to secure WiFi and protect your network from unauthorized access, prevent bandwidth theft, and avoid financial losses due to weak security.
In a world where everything is connected — from laptops and smartphones to smart fridges and baby monitors — securing your WiFi isn’t just a good idea, it’s essential. Whether you’re configuring a home network from scratch or reinforcing the security of a business system, this guide explains how to secure WiFi with proven methods and modern practices.
Jump to...
Why Wireless Security Matters
WiFi network security, or sometimes wireless network security, deals with the prevention of unauthorized access to data transmitted across WiFi networks and other wireless network security risks.
WiFi security has never been more important than it is today because the networks it aims to protect play a critical role in virtually all aspects of our lives. Without them, we wouldn’t be able to communicate with our loved ones, collaborate with work colleagues, browse the web, stream music and movies, and so on.
An unsecured network is an open door. Anyone within range could potentially monitor your online activity, hijack your bandwidth, or even access sensitive files. For businesses, the risks are even more serious: a compromised WiFi network can expose customer data, confidential communications, or intellectual property.

At the core of wireless security are encryption protocols — the technologies that protect your data as it travels through the air. Over time, these protocols have evolved significantly:
- Wired Equivalent Privacy (WEP): WEP is the original wireless security protocol. It was in use from the late 90s until 2004, when it was declared and declared unsafe.
- Wi-Fi Protected Access (WPA): WEP was superseded by Wi-Fi Protected Access (WPA) in 2003. WPA introduced the Temporal Key Integrity Protocol (TKIP) security protocol to prevent many known attacks.
- Wi-Fi Protected Access 2 (WPA2): Became the standard in 2004, and this standard is still widely used to this day even though multiple vulnerabilities have been discovered since its introduction.
- Wi-Fi Protected Access 3 (WPA3): It was announced in 2018, and all newly certified WiFi devices are required to support it since 2020. This protocol implements 192-bit and stronger WiFi encryption, and it also uses Simultaneous Authentication of Equals (SAE) instead of the pre-shared key (PSK) exchange.
💡 Security Tip: For the strongest protection, always use the most recent Wi-Fi security protocol supported by your router — preferably WPA3. Many modern routers already default to it, but it’s still worth checking your settings to make sure you’re not using an outdated and vulnerable standard.

How To Secure WiFi Network: Quick Steps
Getting a new router from your internet provider might make you want to quickly plug it in and start browsing immediately. But properly securing your WiFi network is just as important as installing new locks after you move into a new house — it’s crucial to protecting your online safety.
Use these simple guidelines to strengthen your WiFi security:
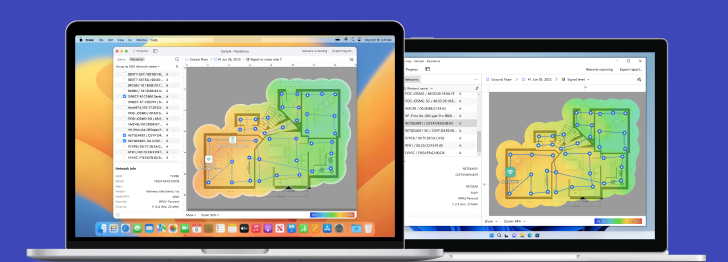
Start with a WiFi Site Survey
Firstly conduct a site survey with NetSpot WiFi Site Survey tool. It will immediately help you detect and eliminate rogue APs — the ones that were deployed without permission.
Site survey also helps expose unauthorized workstations. Organize an inventory of laptops and PDAs with wireless adapters, with user, MAC address and operating system information. This data is used for WLAN access controls. In case WLAN adapters are misplaced or stolen an up-to-date list is crucial.
💡Expert Tip: Conduct surveys regularly to spot security threats early, especially after adding new devices or moving your router.
Step 1. Change the Default Router Login
Connect to the router via an Ethernet connection. Do not use a WiFi connection to get to the administrative access. Usually, the Admin interface for a router is at http://192.168.0.1 or http://192.168.1.1.
Once in, log in with the default admin username and password. Even though you want to change it, you still have to get in the first time.
Depending on your router, the steps to change the administrative username and password will be different. For Arris, this is listed under Login settings:
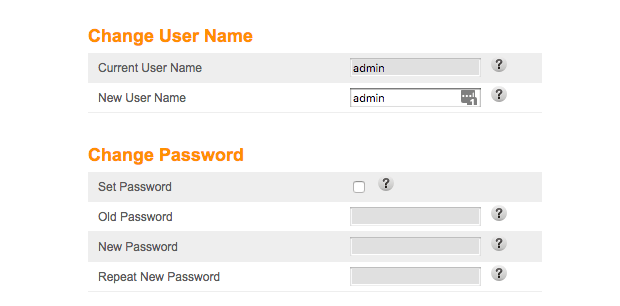
Change both the username and the password. Use a long, random password and store it somewhere safe — not on a sticky note on your desk.
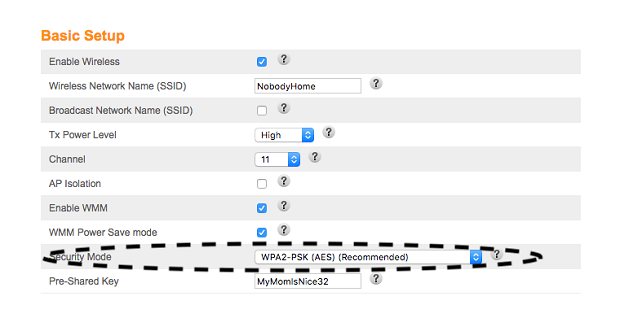
Step 2. Change and Hide your SSID
The SSID is the identity for your secure WiFi network. It’s the name people use to find it and connect to the network, and how to set it apart. Leaving it as “Netgear001” or “Linksys123” makes you a target — it tells potential attackers what hardware you use.
Some routers even let you specify multiple networks (more on that in a moment). Check your manual, but the typical steps are:
Log into your router (you did set up a new username and password from Step 1, right?). Select your WiFi network and change the SSID, and turn off “Broadcast Network Name.”
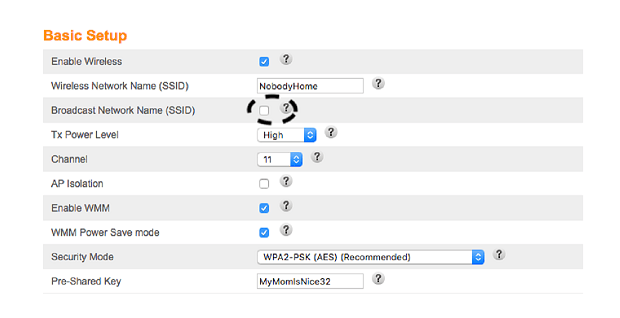
Save those settings. The WiFi network will still work, it just won’t tell everyone about it. While you’re at it, make sure that the Pre-Shared Key is something unique.
💡Expert Tip Use memorable phrases rather than simple words or numbers.
Now we’re hidden. This won’t stop a determined attacker using tools like NetSpot — but it adds a layer of obscurity.
Step 3. Use Strong Wi-Fi Encryption
Most modern routers automatically enable Wi-Fi encryption by default. But — are you sure your router’s encryption is enabled and properly configured? Don’t assume it is — you should always verify your router’s security settings.
Choose WPA3-Personal if available, or WPA2-AES as the fallback. Avoid WEP, WPA, and WPA2-TKIP — they are outdated and vulnerable.
How to check your encryption: Use NetSpot’s Inspector Mode to view the security settings of nearby networks, including your own.
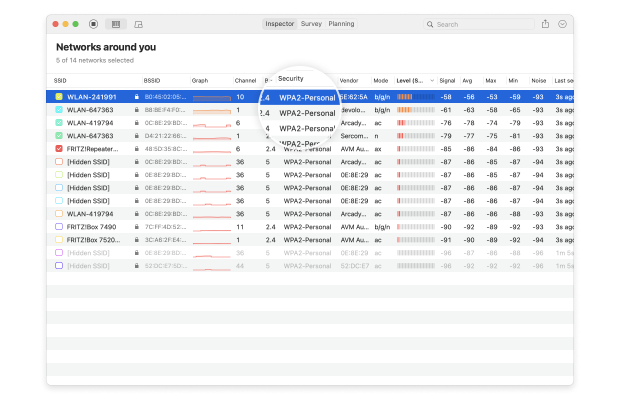
The steps for configuring your WiFi network encryption differ slightly between router models, but generally, follow these instructions:
Log into your router and set Security Mode or Encryption Level to WPA3-Personal. If WPA3 is not supported by your router, use WPA2-PSK (AES) instead.
💡Expert Tip: Regularly update your router’s firmware to ensure support for the latest security protocols like WPA3.
Check your Encryption using NetSpot
Powerful advanced tool for multiple Wi-Fi networks Surveys, Analysis and Troubleshooting.
-
Get NetSpot
macOS 11+, Windows 7/8/10/11
Step 4. Use a Strong, Unique Wi-Fi Password
While the WPA3 security protocol does minimize the risk posed by weak passwords, you should still use a strong, unique password to secure your WiFi network and router.
Ideally, your password should meet the following requirements:
- Be at least 12 characters long.
- Use uppercase letters, lowercase letters, numbers, and symbols.
- Not be a word that can be found in a dictionary.
💡Expert Tip: Don’t reuse passwords between your WiFi and router admin panel.
Step 5. Keep Your Router’s Firmware Updated
As unfortunate as it is, critical router vulnerabilities are discovered on a regular basis. Reputable router manufacturers regularly release updates to address them, but not all users install them — at least not in a timely manner. Unpatched routers represent a huge security issue because they are exposed to the internet and are routinely targeted by hackers.
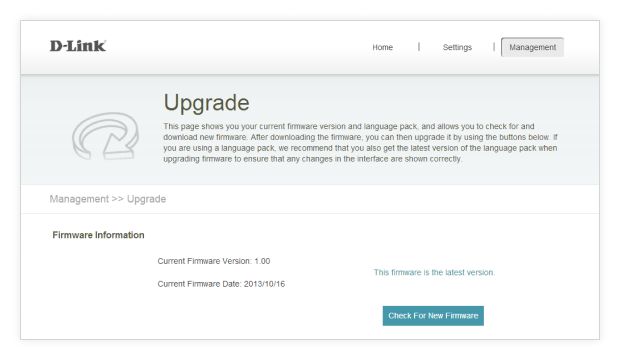
Log into your router regularly and check for updates. Enable automatic updates if possible and register your router with the manufacturer to receive notifications.
Step 6. Disable Risky Features: WPS, UPnP, and Remote Access
To secure your router, log in through your browser using your admin credentials. First, disable Remote Management so the router can’t be controlled from outside your network. Then turn off UPnP, which automatically opens ports and can be exploited by malware. Finally, switch off WPS to prevent attackers from connecting through its weak PIN system. Save the settings, then reboot the router if prompted.
💡Expert Tips: Confirm feature is genuinely disabled. Some routers visually turn off WPS but remain vulnerable — firmware updates may be required to fully inactivate it.
Step 7. Set Up A Guest Network
Sometimes you’ll have friends or family over. And when they’re with you, they’ll ask one of two dreaded questions “What’s your WiFi password?”.
Instead of sharing your main WiFi network credentials — which could expose sensitive information — there’s a safer solution: set up a separate guest WiFi network. Many modern routers support multiple networks, making this easy to implement.
A guest WiFi network lets visitors access the internet without giving them direct access to your home devices, personal files, or smart home gadgets. Think of it as offering guests their own safe, digital room — isolated but convenient.
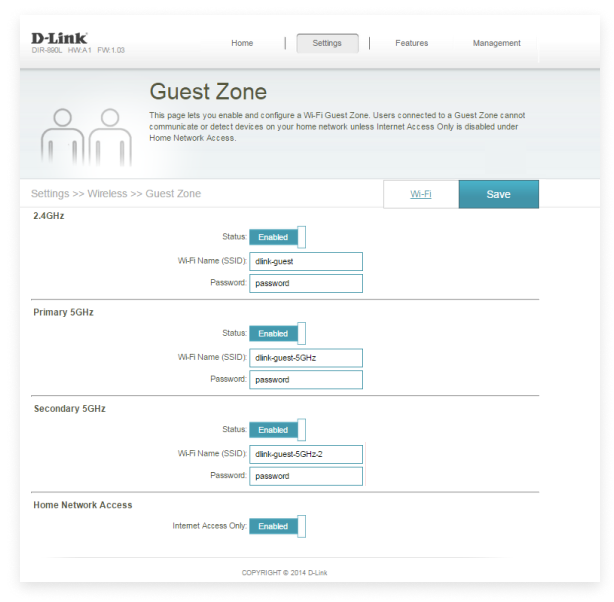
Best practices to secure your guest network:
- Activate your guest network only when needed. Turn it off when your guests leave to minimize security risks.
- Regularly update your guest network credentials. Change the guest SSID and password periodically — ideally each time you activate the network.
- Limit permissions on the guest network. Enable internet-only access and disable file sharing or network device visibility.
💡Expert Tip: Many routers from popular brands like Netgear, TP-Link, or ASUS have easy-to-use apps or web interfaces for setting up secure guest networks in minutes. Check your router’s instructions or app for quick setup guides.
Check your Encryption using NetSpot
Powerful advanced tool for multiple Wi-Fi networks Surveys, Analysis and Troubleshooting.
-
Get NetSpot
macOS 11+, Windows 7/8/10/11
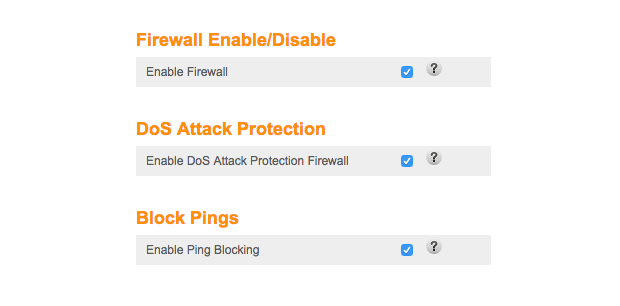
Step 8. Turn On Your Router’s Firewall
A firewall functions as a defensive mechanism that regulates network traffic coming into and going out of a system based on established security rules.
- Rule 1: Reject all inbound connections that were not explicitly requested (Any: DENY).
- Rule 2: Permit inbound connections solely when they are responses to outgoing requests initiated by devices within the network (stateful firewall).
- Rule 3: Enable “Ping Blocking” to prevent your router from responding to external ping requests (ICMP Echo requests). Hackers often ping networks to identify active systems. By blocking ping responses, you make your network less visible.
Another setting is to block “fragmented packets.” A packet is a bit of network, containing a header saying where the packet is going and what information it carries. It’s like a letter that computers send each other on the network. The envelope shows where the letter came from and where it’s going to, and inside the letter is the actual information.
But sometimes a hacker will send a fragmented packet. This is a packet that is formed badly on purpose to confuse the router or computers into accepting bad information that they usually would deny. It can trick the computer into granting access because the computer will do it’s best to guess what the fragmented traffic is trying to get to. By denying these, it prevents those issues in the first place:
💡Expert Tip: Regularly review firewall logs to rapidly identify and address possible security risks by monitoring suspicious behavior.
Step 9. Limit Your WiFi Range
When it comes to wireless networks, most users want to achieve the widest signal coverage possible. In some cases, that’s really the correct approach, but not always. Because that’s the easiest way to prevent hackers and curious strangers from trying to obtain access to it.
More advanced routers let you limit your network range by changing transmission power in settings, but you can also influence it by changing the placement of your router. We recommend you use NetSpot’s Survey mode to create a visual map of your WiFi coverage.
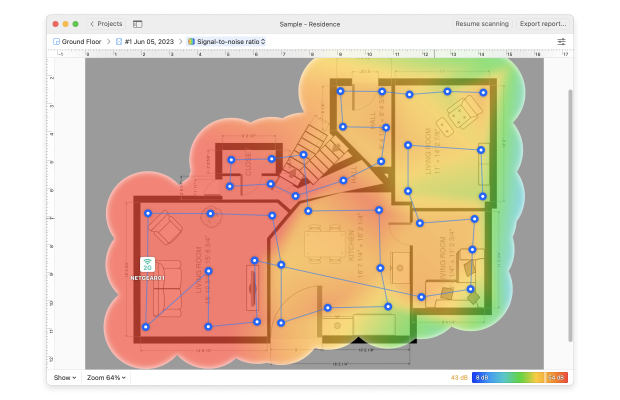
The map will make it easy to see exactly how far your signal can reach and where it is the strongest.
Step 10. Physically Secure Your Router
Physical security is often overlooked, but that doesn’t make it any less important. Unless your router is located someplace where strangers can’t easily go and protected by a strong admin password, an opportunistic attacker could replace it with their own router, connect their laptop to it and change its settings, or even infect it with malware.
Check Devices on Your Network with NetSpot for iOS
Even the strongest password is pointless if strangers are already piggy-backing on your bandwidth. A ten-second audit with NetSpot’s free Device Discovery tool shows every client on your Wi-Fi, right from your iPhone.

- Open NetSpot and tap Device Discovery.
- Wait a few seconds while the scan completes; a live roster appears with IP, MAC, vendor name, and device class.
- Spot anomalies. Anything you don’t recognise — a phone that isn’t yours, a smart cam you never bought — could be an intruder.
- Copy the MAC address of each suspicious device, then paste it into your router’s Access-Control or MAC-filter list to block it.
- Re-run Device Discovery to confirm the rogue client is gone.


💡Expert Tip: Upgrading to WPA2/WPA3 secures future logins, but devices that authenticated under the old settings can stay online until they disconnect. Run NetSpot’s Device Discovery immediately after the switch to spot and evict any legacy freeloaders before they get comfortable.
Conclusion
Securing your WiFi network doesn’t have to be complicated. With a few smart changes — strong encryption, unique passwords, firmware updates, and tools like NetSpot — you can protect your digital life and your devices from cyber threats.
Stay proactive, stay private. And don’t forget to scan your network regularly — WiFi security isn’t a one-time setup, it’s an ongoing habit.
Check your Encryption using NetSpot
Powerful advanced tool for multiple Wi-Fi networks Surveys, Analysis and Troubleshooting.
-
Get NetSpot
macOS 11+, Windows 7/8/10/11
FAQ: Frequently Asked Questions on Wi-Fi Security
To maximize Wi-Fi security, it’s best practice to change your Wi-Fi password every three to six months, especially if you frequently share network access with guests or experience suspicious activity.
How can I quickly see every device on my Wi-Fi?
NetSpot for iOS offers a free Device Discovery tool — open the app, run a scan, and you’ll instantly see a list of all connected clients. Copy any unfamiliar MAC address into your router’s block list and re-scan to confirm it’s gone.
Does Hiding My SSID Fully Secure My Wi-Fi Network from Hackers?
No. Although hiding your SSID can help prevent casual discovery, hackers can still detect hidden networks with specialized tools. Always combine SSID hiding with robust WPA3 encryption and a strong, unique password to enhance your Wi-Fi security.
What do you need to do to secure your wireless network?
Secure your wireless network with unique passwords and proper network encryption. Protecting assets and properly organizing network topology is important. Make sure your wireless signal range extends where needed and try using VPN for more advanced features for your network.
Is a router a network security device?
Modern routers are amazingly powerful and capable devices whose performance rivals those of older personal computers. Thanks to their power, they can act as network security devices by providing firewalls, VPN, and other functions.
Get NetSpot for Free
Wi-Fi Site Surveys, Analysis, Troubleshooting runs on a MacBook (macOS 11+) or any laptop (Windows 7/8/10/11) with a standard 802.11be/ax/ac/n/g/a/b wireless network adapter. Read more about the 802.11be support here.