WiFi Coverage: How to Run Your Own WiFi Site Survey
Improve your WiFi coverage without expensive consultants. Learn how to run your own WiFi site survey, detect weak spots, and keep your business network reliable with the right tools
If you run any kind of modern business, your day pretty much lives and dies on the internet. Orders, warehouse scanners, cloud apps, VoIP calls, guest WiFi for visitors — none of that works if your wireless network keeps dropping or stuttering.
And here’s the tricky part: it’s not enough to just “have WiFi”.
What really matters is WiFi coverage — how evenly and reliably your wireless signal reaches every corner where people and devices actually work. That’s a lot more complex than just checking if you see two or three bars on a phone.
The good news: you don’t have to hire an expensive external team every time you want to check or improve your WiFi. Yes, there are specialized service providers, and they’re great for big projects — but with the right tool, you can run your own WiFi site survey and understand your WiFi coverage yourself.
In this guide, we’ll walk through what WiFi coverage really is, when you need a WiFi site survey, which types of surveys exist, and how you can do a proper WiFi coverage survey with NetSpot without being a full-time wireless engineer.
Jump to...
What is WiFi Coverage and a WiFi Site Survey?
When we talk about wifi coverage, we’re talking about much more than “can my laptop see the SSID”. WiFi coverage is the process of measuring and planning how your wireless network actually behaves in a real building: how far the signal reaches, how strong it is, how much background noise and interference is present, and whether users can work reliably in every area that matters.
In practice, WiFi coverage is shaped by several core factors: signal strength (RSSI), signal-to-noise ratio (SNR), interference from neighboring networks and devices, and the overall capacity of your access points to serve all connected clients. Because RF signals are invisible to the naked eye, coverage issues often stay hidden until people start seeing slow speeds, frozen video calls, or random disconnects.
A WiFi site survey is the structured way you collect and analyze all of that. You take a floor plan, walk the site with a survey tool, and build a detailed picture of your wireless environment. The result is not just a yes/no answer about connectivity, but a map that shows where your network is healthy, where it’s weak, and where it’s completely broken.
A good WiFi site survey turns that invisible coverage into clear visualizations — heatmaps of signal, noise, interference, and dead zones — so you can evaluate WiFi coverage based on real data instead of guesswork.
Surveys can be done using professional software and, in some cases, additional hardware. Tools range from simple mobile apps for checking signal strength, to full-featured desktop solutions with floor plan modeling, spectrum analysis, and performance testing. Modern survey tools don’t just confirm that “WiFi is present” — they help you understand whether your WiFi coverage in each area meets your targets for signal level, SNR, interference tolerance, and real-world performance.
Some solutions pair the software with dedicated hardware — for example, survey “sidekick” devices and special WiFi/spectrum radios. These are fantastic for large stadiums, airports, or super complex RF environments, but they also drive up cost and complexity.
NetSpot has a clear advantage here: it runs on your existing laptop with no extra hardware, yet still gives you powerful, professional-grade survey and planning features. This lets you visualize, audit, and fine-tune your WiFi coverage without investing in additional survey gadgets or proprietary hardware.
Step by Step: Using NetSpot to Improve WiFi Coverage
Let’s take a step-by-step example of how to perform a WiFi site survey.
You don’t need to be an experienced wireless network engineer to implement a basic WiFi coverage expansion project with NetSpot. Let’s walk through a simple step-by-step example so you can see how approachable this is.
Step 1
Define Your WiFi Coverage Goals
Before you even open the app, get clear on what you’re trying to fix or build:
This means considering how many users and devices are expected in each zone, which applications are sensitive to latency or packet loss, and what minimum signal or throughput level you consider acceptable in your primary work areas.
Step 2
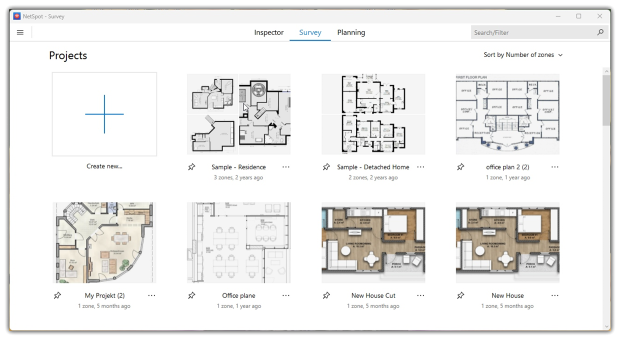
Launch NetSpot and Choose Your Mode
Select “Survey” if you’re measuring actual coverage.
If you want to run a simulation before deployment, select “Planning”.
Step 3

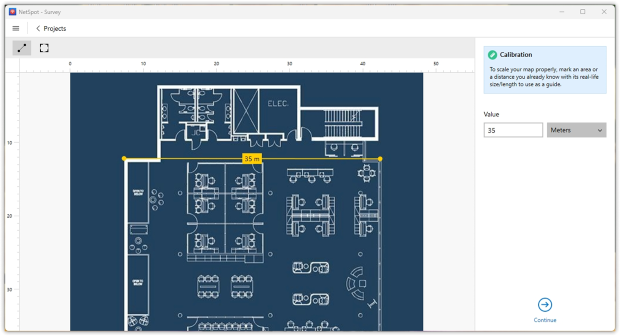
Prepare or create a floor plan
Import an existing floor plan (PDF, image, or drawing) or a draw map from scratch into the app. Be sure to calibrate the map to accurately display distances.
Accurate scale is crucial; it transforms your WiFi coverage plan into a true engineering tool, not just a “pretty picture”.
Step 4
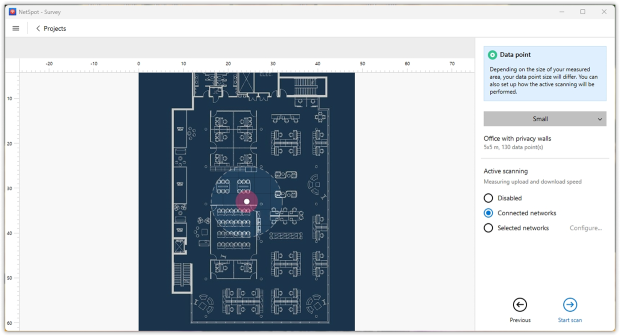
Choose data point size and active scanning
Before you start walking, tell NetSpot how detailed your WiFi coverage survey should be.
Pick the data point size (smaller for more detail, larger if you want to move faster) and decide whether to turn on active scanning: you can keep it passive, measure speed on the network you’re connected to, or target specific SSIDs. Once that’s set, you’re ready to start the scan.
Step 5
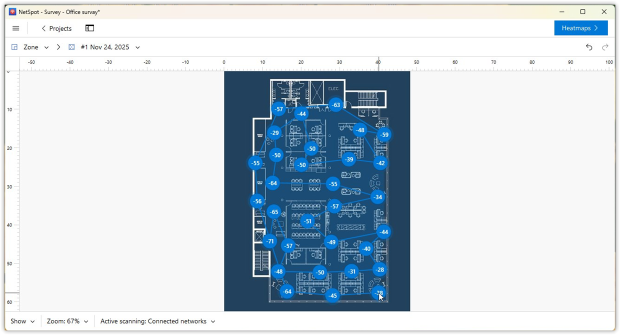
Walk and Measure
Stand at a known point on the map, tap that location in NetSpot. Move to the next spot and repeat, walking a grid through all key areas.
NetSpot uses these points to build detailed heatmaps of signal strength, SNR, interference, and more.
The more complete your walk, the more accurate your picture of wifi coverage will be.
Step 6

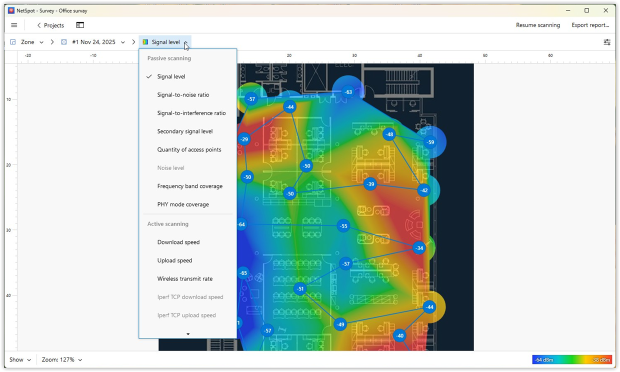
Analyze the Heatmaps
Now the interesting part: оnce done, look at the heatmaps:
- Where is the signal weak?
- Where is noise or interference high?
- Where do channels obviously overlap too much?
- Compare passive results (RSSI, SNR, interference) with active throughput tests if you ran them.
Step 7
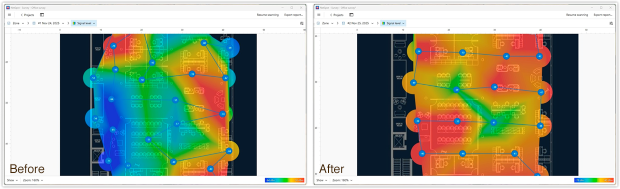
Optimize
Use the data to decide where to move or add access points, change channels, or upgrade hardware. You can even run a before/after comparison to validate improvements.
Why Good WiFi Coverage Matters
After you walk through a site survey step by step, it’s tempting to think, “Great, we did it once, we’re done”. In reality, WiFi coverage is not a one-time project — it’s part of how your business infrastructure behaves every single day. Buildings change. Furniture moves, new shelves and machines appear, extra people and devices show up, neighbors install their own wireless gear.
All of that slowly reshapes your RF environment. A network that worked “perfectly” on day one can feel unreliable a year later, even though you never touched the access points.
That’s why coverage matters so much from a business point of view. When it quietly degrades, it doesn’t show up as a dramatic outage. It shows up as:
- slower workflows because cloud apps hesitate in certain rooms,
- staff avoiding specific corners of the warehouse or office because “WiFi is bad there”,
- calls that are fine at someone’s desk but start breaking up as soon as they walk and talk,
- devices that randomly drop off the network in areas nobody ever measured properly.
Individually, these moments look like minor annoyances. Over weeks and months, they add up to lost time, frustrated teams, and a steady trickle of low-level support noise.
The point of running a survey — and revisiting it from time to time — is to turn WiFi coverage into something you can see and manage, not something you only hear about when it fails. With a decent WiFi analyzer or site survey tool, you can:
- use a WiFi analyzer to see what your coverage looks like after you move things around or expand the space,
- spot weak or noisy areas early instead of letting them turn into daily headaches,
- make sure new loads — extra scanners, more VoIP calls, additional guests — don’t overwhelm the WLAN you already have.
In other words, good WiFi coverage isn’t just “nice signal everywhere”. It’s a way to keep your operations predictable. The survey you just ran is not an end in itself — it’s your baseline. Using a WiFi analyzer to keep an eye on that baseline, and updating it when your environment changes, is what keeps the wireless side of your business from turning into a constant surprise.
SO, WE RECOMMEND

NetSpot
Wi-Fi Site Surveys, Analysis, Troubleshooting runs on a MacBook (macOS 11+) or any laptop (Windows 7/8/10/11) with a standard 802.11be/ax/ac/n/g/a/b wireless network adapter. Read more about the 802.11be support here.
FAQ
What is WiFi coverage?
WiFi coverage describes how well your wireless network reaches all the areas where people and devices actually work. It’s not just about seeing an SSID — it’s about having enough signal strength, low noise, and enough capacity so cloud apps, calls, and scanners stay reliable across your entire floor plan.
How do I know if my WiFi coverage is good enough?
You have good WiFi coverage when users can move around the building without seeing slowdowns, frozen video calls, or random disconnects. The practical way to check this is to run a WiFi site survey with a WiFi analyzer, map signal strength and SNR on a floor plan, and look for weak, noisy, or overloaded zones.
What is a WiFi site survey?
A WiFi site survey is a structured walk-through of your building with a WiFi analyzer. You load a floor plan, collect measurements at different points, and generate heatmaps that show signal, noise, interference, and dead zones. This lets you evaluate WiFi coverage based on real data instead of guesswork.
Do I need a consultant to measure WiFi coverage, or can I do it myself?
For many offices, warehouses, schools, and clinics you can absolutely do it yourself. A tool like NetSpot or another professional wireless analyzer can guide you through a basic WiFi site survey: import the map, walk the site, review heatmaps, and then decide where to move or add access points.
How often should I check WiFi coverage in my building?
It’s smart to review WiFi coverage whenever something significant changes: new furniture or racking, remodeled areas, new APs, or major growth in users and devices. Even if nothing big changes, running a quick survey once or twice a year helps you catch weak or noisy zones early, before they turn into everyday pain points.
Get NetSpot for Free
Wi-Fi Site Surveys, Analysis, Troubleshooting runs on a MacBook (macOS 11+) or any laptop (Windows 7/8/10/11) with a standard 802.11be/ax/ac/n/g/a/b wireless network adapter. Read more about the 802.11be support here.