Wi-Fi Site Surveys, Analysis, Troubleshooting runs on a MacBook (macOS 11+) or any laptop (Windows 7/8/10/11) with a standard 802.11be/ax/ac/n/g/a/b wireless network adapter. Read more about the 802.11be support here.
WiFi Capacity Planning: Build a Network That Keeps Up
Learn how to plan Wi-Fi capacity for high-density environments with accurate calculations and predictive modeling.
Many users confuse signal coverage with Wi-Fi capacity.The problem is not always in the coverage. Often, the problem is that the Wi-Fi network cannot cope with the number of connected devices. This is called Wi-Fi capacity — the ability of your network to provide a reliable and stable connection to many devices at the same time.
Let's figure out how to properly plan the performance of a Wi-Fi network to forget about frozen video calls and endless buffering.
What is Wi-Fi Capacity and why is it important?
Wi‑Fi capacity describes how many simultaneous connections a wireless network can maintain at acceptable speed and latency. It is separate from coverage, which is only about signal reach. When capacity is too low for the actual device load, users experience high retry counts, packet drops, and jitter even when the signal bars look full.
Designing for capacity therefore means measuring three variables:
- Airtime: refers to the percentage of each channel’s time slice already in use;
- Throughput: is the effective payload delivered per second;
- Contention: is the probability that two devices attempt to transmit at once and must back off.
Good wifi capacity planning balances those variables so that airtime stays below about 70 percent during peaks, average throughput per user matches application needs, and contention rates remain in single digits.
Key Drivers of Wireless Network Capacity
With the core variables defined, let’s look at the real‑world levers you can pull — device mix, traffic patterns, channel choices, AP placement, and the Wi‑Fi standard itself — that shape those numbers on a live network.
- Device count and type: Every phone, tablet or IoT probe consumes airtime; legacy 802.11n radios burn it fastest. 25 active clients per Wi‑Fi 5/6 5 GHz radio is a typical ceiling; on 6 GHz with Wi‑Fi 6E/7 you may support more, so always verify against live statistics.
- Application demands: Email is light; 4 K streams or AR headsets are heavy. A simple Zoom call needs about 3 Mbit/s; 4 K Netflix can gulp 25 Mbit/s or more.
- Channel width and spectrum: The 6 GHz band offers up to 59 clean 20 MHz channels. Narrow 20 MHz channels create more parallel lanes and often outperform a single 80 MHz channel in dense environments. In low‑density areas, widening to 40 MHz or 80 MHz can boost peak speeds — validate with a spectrum sweep first.
- Access-point placement: Too much overlap increases contention; too little leaves dead zones. The goal is uniform −67 dBm signal with staggered channels and equal client load.
- Wi‑Fi generation and features: New specs lift the ceiling dramatically: Wi‑Fi 6’s OFDMA and MU‑MIMO let multiple devices talk in parallel, while Wi‑Fi 7 doubles channel width to 320 MHz and boosts modulation to 4096‑QAM. In practice, aggregate throughput per AP jumps from ≈1.3 Gb/s on Wi‑Fi 5 to ≈2.4 Gb/s on Wi‑Fi 6 and about 6 Gb/s on Wi‑Fi 7 — nearly tripling usable capacity.
Theoretical Wi‑Fi Capacity Planning: Step‑by‑Step
Before any predictive Wi‑Fi heatmap or access‑point shopping list, WiFi capacity planning starts on paper. The goal is to translate human activity (“fifty kids stream video”) into hard numbers (“two tri‑band APs, 20 MHz channels”). Here is a practical workflow that works for classrooms, warehouses, cafés, and stadium concourses alike.
1. Set the performance target.
Start with the application that hurts the most when the network stalls. Real‑time voice works at about 0.5 Mbit/s per user and less than 150 ms round‑trip delay; full‑HD video needs roughly 3 Mbit/s; a 4 K stream pushes 25 Mbit/s. Write the worst‑case throughput and latency requirements down first, because every later choice in your wifi capacity planning must serve that baseline.
| Typical activityt | Rounded bandwidth per user |
| Voice / VoIP call | 0.5 Mbit/s |
| Music or podcast streaming | 0.5 Mbit/s |
| General web surfing & email | 1 Mbit/s |
| Document or photo printing | 1 Mbit/s |
| Two‑way video meeting (720p–1080p) | 2-4 Mbit/s |
| HD video on‑demand (1080p) | 3-5 Mbit/s |
| Ultra‑HD / 4 K streaming | 25 Mbit/s |
2. Profile the client fleet and concurrency.
Count every device class that may transmit at the same time: laptops, phones, tablets, IoT sensors, point‑of‑sale terminals, cameras. For each class note its radio generation (Wi‑Fi 5, Wi‑Fi 6, Wi‑Fi 7) and maximum expected simultaneous use. Concurrency, not total inventory, drives WiFi capacity.
3. Multiply demand by heads to find aggregate load.
Use the per‑user numbers from Step 1, multiply by concurrent clients from Step 2, and sum across all application types. The result is the payload throughput the WLAN must deliver during peaks.
4. Translate payload into airtime.
Divide aggregate payload by realistic physical throughput of the chosen standard and channel width. A single Wi‑Fi 6 5 GHz radio on a 20 MHz channel moves about 150‑200 Mbit/s of TCP traffic after overhead. Keep airtime below 70 % at peak.
5. Derive the radio count.
Split the total client load so no radio serves more than about 25 active devices or exceeds that 70 percent airtime ceiling (adjust upward on clean 6 GHz, downward on noisy 2.4 GHz). If one radio would sit at 50 clients or 90 percent airtime, add another radio and re‑run the math. This step converts calculated wireless network capacity into a clear number of access points or radios.
6. Choose channel width and reuse pattern.
Narrow 20 MHz channels create more independent lanes and reduce co‑channel contention in dense areas. Wider 40 MHz or 80 MHz channels make sense only where the spectrum is quiet and client density is low. Match the channel plan to the radio count so neighbouring cells overlap on different channels.
7. Validate with predictive modelling or a live site survey.
Once your design is complete on paper, it’s time to test it against the real world. Drop walls, materials, and the planned access points into WiFi planner software, such as NetSpot, or walk the site using survey tools. Make sure every zone meets the target throughput, airtime remains below 70 percent, and collision rates stay within single digits. If the heatmap reveals dead zones or overloaded cells, adjust AP power levels or placement accordingly.
8. Build in growth headroom.
Add at least twenty per cent spare airtime or an extra channel pair for future devices and heavier applications. Document the plan, then schedule periodic checks — traffic patterns and client counts drift, so wifi capacity must be a living design, not a one‑time calculation.
Follow these eight steps in order and you move from guesswork to a reproducible methodology. Instead of “add more APs and hope,” your wifi capacity planning produces a network that keeps speed and latency consistent even when usage spikes.
Notice how the calculated AP counts match what experienced installers deploy in offices, classrooms, lecture halls, and arena sectors. If your numbers stray far from these baselines, revisit the earlier assumptions — something in the client count, workload, or channel plan probably needs tweaking.
Table 1 — Typical Sizing Scenarios
(conservative Wi-Fi 6E throughput at 20 MHz; add 20–30 % headroom for growth)
| Environment | Small office |
| Concurrent Devices | 25 |
| Dominant Workload | HD video calls |
| Per-Device Load | 3 Mbit/s |
| Aggregate Demand | 75 Mbit/s |
| Practical AP Throughput | 250 Mbit/s |
| APs Required | 1 |
| Environment | Classroom, 50 seats |
| Concurrent Devices | 50 |
| Dominant Workload | Mixed web + 720p |
| Per-Device Load | 2 Mbit/s |
| Aggregate Demand | 100 Mbit/s |
| Practical AP Throughput | 250 Mbit/s |
| APs Required | 1 (+ 1 spare) |
| Environment | Lecture hall, 300 seats |
| Concurrent Devices | 300 |
| Dominant Workload | 1080p streaming |
| Per-Device Load | 4 Mbit/s |
| Aggregate Demand | 1200 Mbit/s |
| Practical AP Throughput | 350 Mbit/s |
| APs Required | 4 |
| Environment | Arena sector, 1 000 seats |
| Concurrent Devices | 1000 |
| Dominant Workload | Social + 4 K uploads |
| Per-Device Load | 6 Mbit/s |
| Aggregate Demand | 6000 Mbit/s |
| Practical AP Throughput | 450 Mbit/s |
| APs Required | 14 |
The table bridges planning math to field reality, giving you a quick gut-check before hardware orders go out.
Practical Design Validation with NetSpot Planning Mode
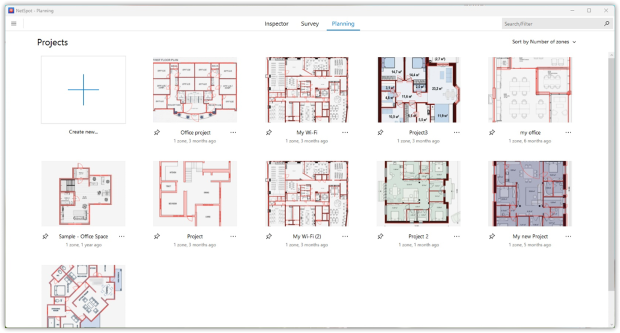
Once the paper math says your design should work, you need proof. NetSpot’s Planning Mode is purpose‑built for that job.

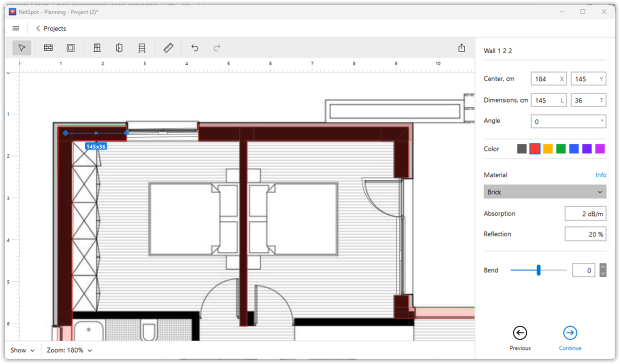
Load and calibrate your floor plan in NetSpot Planning Mode, then trace the walls and assign the correct materials (drywall, glass, brick) for the most accurate simulation results.

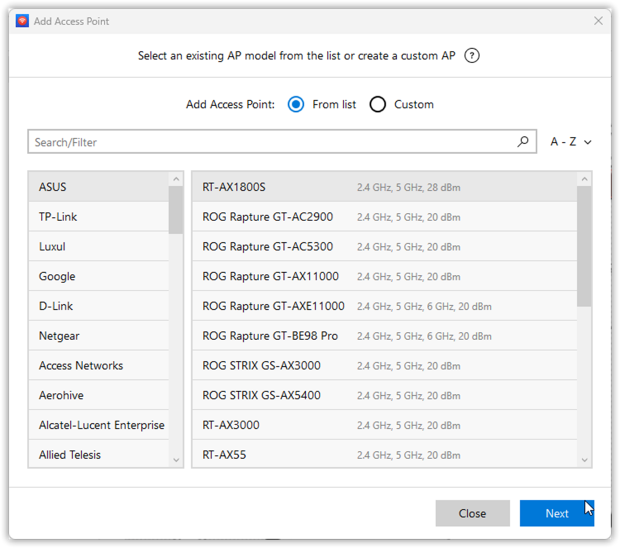
NetSpot factors each surface’s attenuation into its predictive engine, giving you a living model of signal propagation. Next, drop your candidate access points onto the drawing. The built‑in hardware library already knows each access point’s key parameters — from legacy 802.11n/ac units to the latest Wi‑Fi 6/6E/7 models — and you can still plug in custom specs if needed.

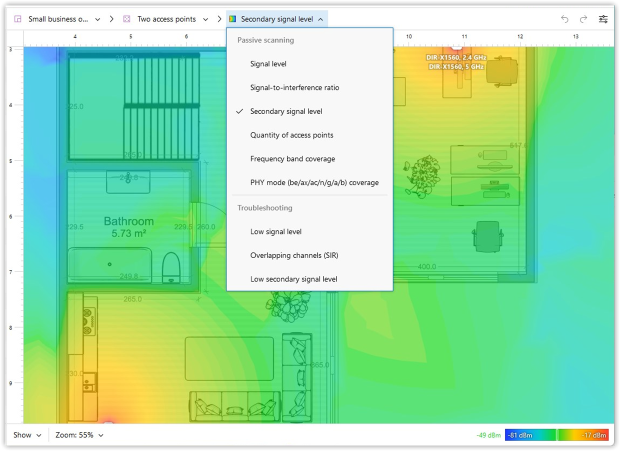
Once your access points are placed on the floor plan, NetSpot recalculates several key heatmaps in real time:
- Signal Level — shows primary coverage.
- Signal‑to‑Interference Ratio (SIR) — highlights areas where overlapping networks or channel reuse are eating airtime.
- Secondary Signal Level — reveals the backup coverage each client will have if its nearest AP fails.

These three views tell you whether the design can handle load and stay resilient even if one access point drops offline. When the key parameters meet their targets, export the report as a PDF or PNG heatmap image to share with installers and stakeholders.
After simulation, walk the site in Survey Mode to confirm that live measurements match the model.
Conclusion
Wi‑Fi capacity is a maths problem — one you can solve before users ever log on. By combining accurate application budgets, realistic radio counts and a channel plan tuned for airtime, you prevent contention instead of reacting to it. NetSpot’s Planning Mode streamlines the process and validates redundancy with its Secondary Signal Level view, so one AP outage never becomes a help‑desk storm.
Keep the numbers current, revisit utilisation quarterly, and your wireless network capacity will keep up as device counts climb.
FAQ
A noticeable spike in retries, video buffering, or VoIP jitter — despite strong RSSI — usually signals airtime saturation. Count active clients per radio; anything over ~25 is a red flag.
No. If the new AP shares a channel with its neighbors, you lower capacity by increasing collisions. First, re‑plan channels or narrow bandwidth; add hardware only when spectrum analysis shows room.
Run a predictive design in NetSpot’s Planning Mode: drop virtual APs, input your client/application profiles, and read capacity heatmaps — no ladder required.
Match the heaviest critical application. Voice may need 0.5 Mbit/s, HD video about 5 Mbit/s, and 4 K streaming 25 Mbit/s. Multiply by concurrent users, then apply a 20–30 % overhead for bursts.
They help by adding 6 GHz spectrum and OFDMA, but only if clients support them and channels remain clean. You still need solid wifi capacity planning to avoid self‑inflicted interference.
