Wi-Fi Site Surveys, Analysis, Troubleshooting runs on a MacBook (macOS 11+) or any laptop (Windows 7/8/10/11) with a standard 802.11be/ax/ac/n/g/a/b wireless network adapter. Read more about the 802.11be support here.
How to Change WiFi Channel on Your Router
Using the most suitable WiFi channel is a key to unlocking fast internet speeds, and this article explains how to change the default WiFi channel on your router with the help of NetSpot WiFi channel scanner.
Interference from neighboring networks can significantly degrade your Wi-Fi performance, but with the right tools and settings adjustments, you can fix this quickly. NetSpot, a professional WiFi channel scanner, makes it easy to find the best WiFi channel for your specific location so you can make changes based on real data rather than guesswork.
In this guide, we’ll walk you through identifying the optimal channel and changing it on different popular router brands.
Jump to...
How to Change Your Wi-Fi Channel to Improve Signal: Step-by-Step Guide
Changing your Wi-Fi channel is straightforward, but the exact steps depend on your router model and interface. Even the most basic routers allow you to change WiFi channel. The process may vary slightly between brands, so knowing where to find the Wi-Fi channel settings in your admin panel can save time and frustration.
Let’s take a closer look at how to change your Wi-Fi channel on some of the most popular router models to eliminate issues with signal interference and enjoy the best download and upload speed possible.
TP-Link
Step 1
Connect via Wi-Fi or Ethernet.
Step 2
Open your browser and enter 192.168.0.1 or 192.168.1.1 (check your router’s label).
Step 3
Log in with admin credentials (default: admin/admin).
Step 4
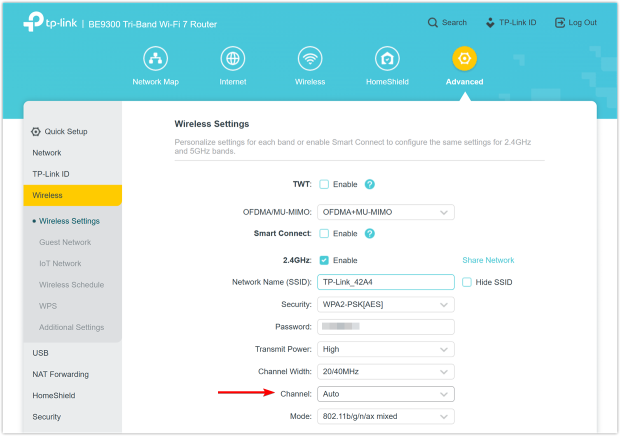
Navigate to Advanced → Wireless → Wireless Settings.
Step 5
In the 2.4 GHz section, set Channel (1, 6, or 11 recommended) and Channel Width (20 MHz recommended).
Step 6
Repeat for 5 GHz if needed.
Step 7
Click Save.
ASUS
Step 1
Connect to your router and open http://router.asus.com or 192.168.1.1.
Step 2
Log in (default: admin/admin).
Step 3
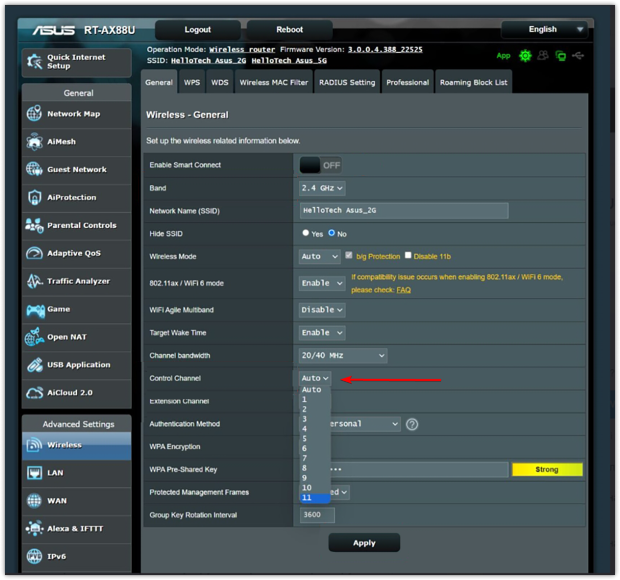
Go to Wireless → General.
Step 4
Uncheck Auto select channel.
Step 5
Choose a Control Channel for 2.4 GHz (1, 6, or 11) and 5 GHz (non-DFS channels recommended — typically 36, 40, 44, 48). Not sure which one to pick? Run a quick WiFi scan with a tool like NetSpot to see which channels around you are least congested.
Step 6
Click Apply.
Netgear
Step 1
Visit http://www.routerlogin.net and log in (default: admin/password).
Step 2
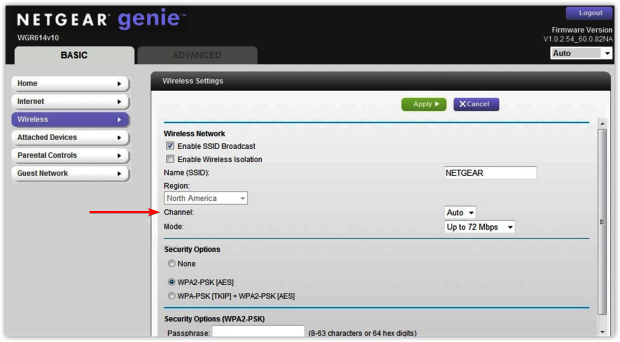
Go to Wireless Settings.
Step 3
Select the desired band (2.4 GHz or 5 GHz).
Step 4
Choose your preferred Channel from the dropdown.
Step 5
Click Apply.
Xfinity (Comcast Gateway)
Via Admin Tool:
Step 1
Enter http://10.0.0.1 in your browser.
Step 2
Log in (default username: admin, password: password).
Step 3
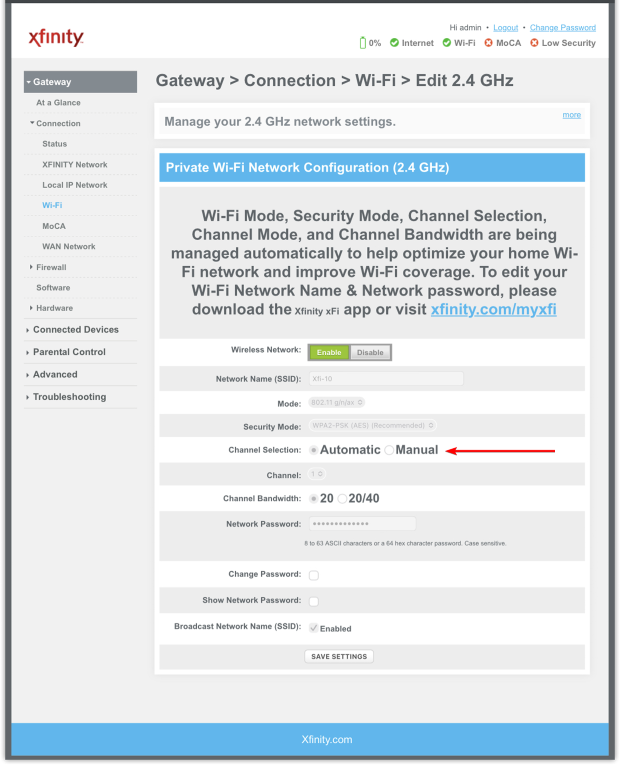
Navigate to Gateway → Connection → Wi-Fi.
Step 4
Select Edit for the band you want.
Step 5
Change Channel Selection to Manual and choose your channel.
Step 6
Save changes.
Via Xfinity App:
Step 1
Go to Connect → View Wi-Fi Equipment → Advanced Settings.
Step 2
Edit the band and select your channel manually.
Ubiquiti (UniFi)
Step 1
Open your UniFi Network Controller (local or hosted).
Step 2
Go to Settings → Wi-Fi and select your SSID.
Step 3
Click Edit → Radio Settings.
Step 4
Choose a channel for 2.4 GHz (1, 6, or 11) and 5 GHz (36–48 or 149–161; avoid DFS unless required).
Step 5
Save changes and allow APs to reload.
After you’ve changed the channel and restarted your router, launch NetSpot and verify that your network is actually broadcasting on the new channel.
")
Run a quick Wi-Fi survey to check channel overlap and your Signal-to-Interference Ratio (SIR). If interference still looks high or speeds haven’t improved, try a different channel or adjust the channel width and retest.
")
Changing your Wi-Fi channel is the easy part; choosing the best Wi-Fi channel for your environment is where the real optimization happens. The good news: a quick read of the scenarios below will help you make a data-driven choice, reduce interference, and boost speed.
Which Wireless Channel to Use
Let's dive into the different Wi-Fi channel placement scenarios you might encounter to optimize your network's performance and avoid interference.
Partially Overlapping Channels
When two or more routers operate on partially overlapping channels, interference reaches its peak. This is the worst-case scenario for your network, as it can drastically reduce speeds and reliability. Avoid these channels whenever possible to minimize disruption.

Practical Advice:
- Find a free channel: Use a Wi-Fi analyzer like NetSpot to scan the airwaves and identify the least crowded or entirely free channels.
- Avoid partial overlap: If no free channels are available, it’s better to select a channel with full overlap rather than partial overlap to minimize interference.
- Switch to 5 GHz or 6 GHz: If your equipment supports these frequencies, consider switching to them. They provide more available channels and are less prone to interference.
Full overlap
This happens when multiple networks operate on the same channel. While it’s not ideal, the CSMA/CA (Carrier Sense Multiple Access with Collision Avoidance) technology allows devices to "negotiate." They take turns using the channel, reducing collisions. Although it won't provide perfect speeds, this can be the best option in crowded environments to maintain a stable connection.

Practical Advice:
- Stay on the current channel: If all channels are occupied and switching isn’t an option, using a fully overlapping channel can be a viable solution.
- Monitor the situation: Regularly check channel usage. If a free or less crowded channel becomes available, switch to it for improved connection quality.
- Optimize router settings: Ensure your router uses the latest technology and firmware for better traffic management.
Non-Overlapping Channels
This is the ideal setup. If your channel doesn’t overlap with others, you’ll enjoy the best possible connection quality. Unfortunately, this scenario is rare. To achieve it, use a Wi-Fi analyzer like NetSpot to identify and choose non-overlapping channels for your router.

Practical Advice:
- Periodic monitoring: Even if your router is set to a non-overlapping channel, regularly use a Wi-Fi analyzer to check the current airwave conditions.
- Be proactive about changes: Neighboring networks may adjust their settings, causing interference. Responding quickly to such changes will help maintain high connection quality.
- Upgrade your equipment: Using modern devices that support newer Wi-Fi standards can improve stability and speed.
How to Use a WiFi Channel Analyzer and Optimize Your Network for Maximum Speed
NetSpot is a versatile WiFi site survey, WiFi analysis, and troubleshooting tool for macOS and Windows that can also be used as a WiFi channel analyzer to show WiFi channel overlap. Here’s what you need to do to discover the best WiFi channel:
Step 1
Visit the official website of NetSpot and download the free version of the application. Open the downloaded installation file and follow the instructions.
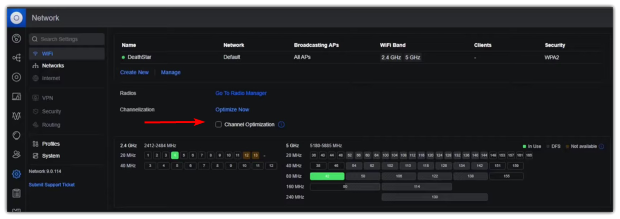
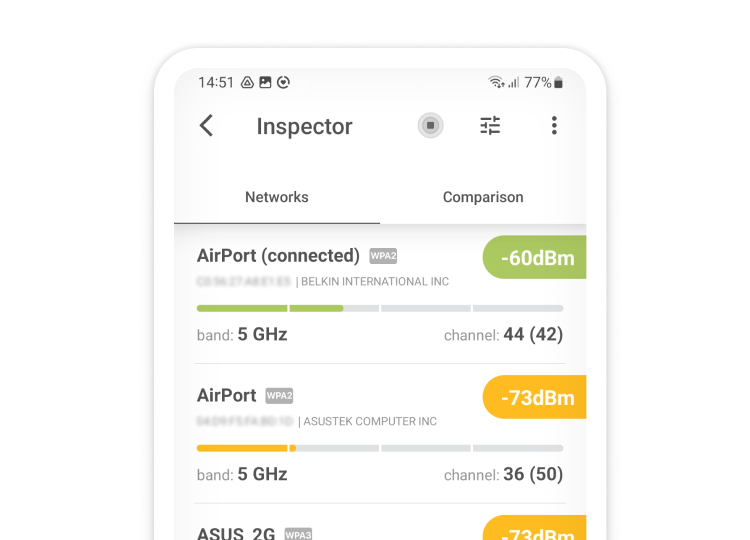
Step 2
Launch NetSpot and click Continue to use the free version of the application. NetSpot launches in Inspector mode by default, and that’s a great starting point for changing your WiFi channel. In this mode, a table displays detailed information about your network and surrounding networks, including the channel, channel width, frequency band, and other vital network characteristics. This overview helps you identify the optimal channel to minimize interference.
Step 3
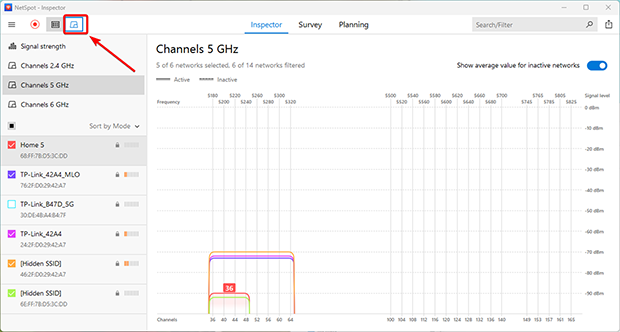
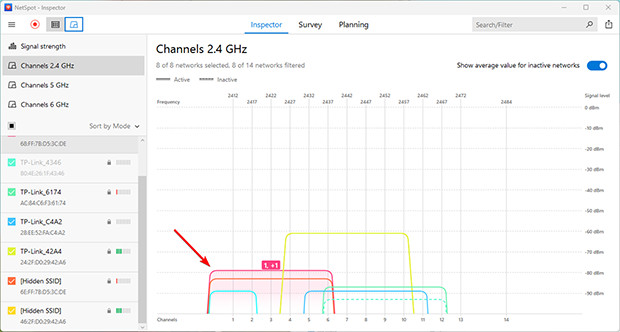
Select your own WiFi network and click “Signal level and noise graphs” button.
Now, switch to the Channels 2.4 GHz tab and look at the channel graph displayed by NetSpot to see which channel your WiFi network broadcasts on and which channels it overlaps with. Remember this information.
Step 4
Analyze the position of your network in relation to surrounding networks. Deselect your network in the table and select all others. The channel graph will immediately show which channels are most congested and which ones are available. Use this information while following the recommendations from the previous points.
Step 5
Now that you know which channels are used the least, the only thing left to do is to actually change your router channel setting, and we describe how to do just that in the next section of this article.
As you can see, NetSpot is incredibly easy to use, which is why many consider it to be the best WiFi channel scanner for Mac and the best WiFi channel scanner for Windows. With its help, avoiding co-channel interference by doing methodical WiFi channel planning prior, during, and post deployment is something anyone can do.
Besides the convenient and informative graphs available in Inspector mode, NetSpot also offers the ability to create detailed Wi-Fi heatmaps in Survey mode. These maps don’t just show where your signal is strong or weak — you get access to around 20 different heatmap types, allowing you to analyze every aspect of your wireless environment in depth.
Among them, the Signal-to-Interference Ratio (SIR) and Channel Overlap heatmaps are especially useful. They provide a clear visual representation of how much interference your network is experiencing and whether it comes from partially overlapping channels (more disruptive) or fully overlapping channels (easier to manage).
This makes it much easier to draw precise conclusions and select the most optimal channel for maximum performance and stability. All the information you gather with NetSpot can be exported in PDF or CSV and used in other applications.

What’s great about NetSpot is that you can download it for free and run it on any macOS or Windows computer with a standard 802.11a/b/g/n/ac/ax/be wireless network adapter. Read more about the 802.11be support here. NetSpot supports 2.4 GHz, 5 GHz and 6 GHz frequency bands at 20/40/80/160/320 MHz channels, making it fully compatible with the latest WiFi standard.
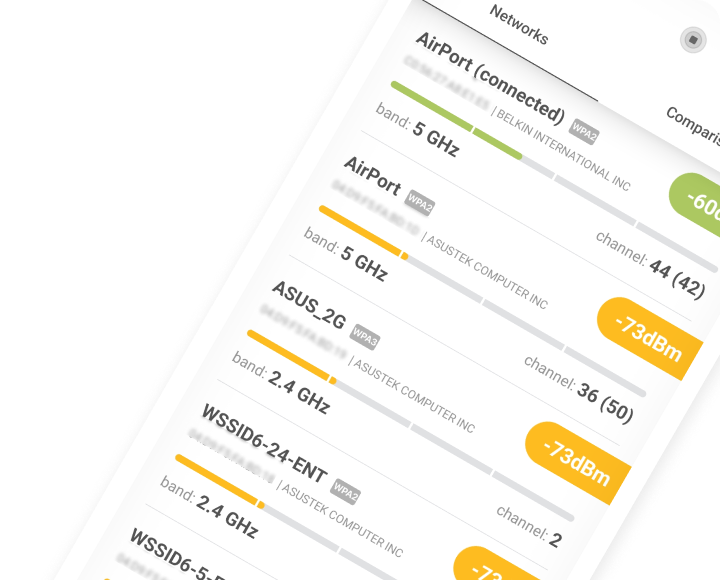
In fact, NetSpot is also one of the best WiFi channel scanners for Android, so make sure to explore the mobile versions of NetSpot as well if you find the idea of using your smartphone to change channels on router interesting.
NetSpot for Android
Analyze WiFi networks around you, perform wireless surveys, and test Internet speed - all with just a phone or tablet in your hands.
Conclusion
Many WiFi issues are caused by the use of a wrong WiFi channel. When multiple networks broadcast on overlapping channels, interference may occur and make what would otherwise be a stable and reliable network unusable. This interference can lead to slow internet speeds, frequent disconnects, and a frustrating online experience.
To prevent this from happening,it's crucial to select the optimal WiFi channel for your network environment. Use a WiFi channel analyzer such as NetSpot to identify the best WiFi channel in your area. NetSpot not only helps you find the least crowded channel but also provides insights into signal strength and potential sources of interference, allowing you to fine-tune your network for maximum performance.
NetSpot can also help you decide whether the time has come to replace your current router with a newer model, one that supports the latest WiFi standard. Upgrading to a modern router can offer enhanced features like dual-band or tri-band support, access to the less congested 5 GHz or 6 GHz frequencies, and improved security protocols — all contributing to a faster and more reliable WiFi connection.
By combining proper channel selection with up-to-date equipment and regular monitoring through tools like NetSpot, you can ensure your WiFi network remains fast, stable, and ready for future demands.
SO, WE RECOMMEND

NetSpot
FAQ
How do I change my WiFi router channel?
To change the WiFi channel on your router, you need to log in to the router’s admin interface and go to wireless settings. Since most routers protect the admin interface with a password, you should attempt to find out what the password is before you start guessing.
If your router has a companion smartphone app, you can use it instead of accessing the admin interface directly via your web browser. Once you’re in the wireless settings section, look for an option called WiFi channel or WiFi band. To achieve optimal performance, use only channels 1, 6, and 11.
Jump into the conversation for more hands-on advice from other users, check out this forum discussion on changing WiFi channels for the first time. Have you noticed a speed boost after switching channels, or are you running into a specific error? Let us know how it went.
Does changing the channel improve WiFi?
Changing the WiFi channel can improve your WiFi performance, but only if you pick a less busy channel. If you don’t, your WiFi performance will likely only get worse. Wondering how to change your WiFi channel to the one that’s used the least? Well, the answer is simple: WiFi network analyzer. With it, you can scan the entire 2.4 GHz or 5 GHz band and quickly see which channels are utilized the most and which are utilized the least.
Which channel is best for a WiFi router?
There’s no such thing as the best WiFi channel since all non-overlapping channels in the 2.4 GHz band (channels 1, 6, and 11) are capable of delivering the same performance and coverage under ideal circumstances.
The problem is that real-world circumstances are typically far from ideal, and some channels are used far more frequently than others. As such, the best channel for your WiFi router is typically the one that’s used the least, and you can find out which channel that is using a WiFi network analyzer app.
Should I leave the router on “Auto” channel?
Auto can work, but it’s hit-or-miss in crowded areas. Scanning first and setting a specific channel usually delivers more consistent results.
What channel width should I use (20/40/80/160 MHz)?
Use 20 MHz on 2.4 GHz almost always. On 5 GHz (and 6 GHz), start with 40 or 80 MHz; go wider only if scans show low interference and your devices support it. Wider isn’t always better in busy environments.
My ISP router won’t let me change channels — what now?
Some gateways lock this setting. Options: enable bridge mode and add your own router, or ask your ISP to unlock/replace the unit.
Get NetSpot for Free
Wi-Fi Site Surveys, Analysis, Troubleshooting runs on a MacBook (macOS 11+) or any laptop (Windows 7/8/10/11) with a standard 802.11be/ax/ac/n/g/a/b wireless network adapter. Read more about the 802.11be support here.