Available for MacBook (macOS 11+) or any laptop (Windows 7/8/10/11) with a standard 802.11a/b/g/n/ac/ax wireless network adapter.
Best WiFi Channel Scanner Apps for macOS
The best Mac Wi-Fi channel scanners, such as NetSpot, make it easy to find the best channel for your Wi-Fi network and troubleshoot signal weakness, slowdowns, connection drops, and other common issues.
This article is intended for people who have never used a Wi-Fi channel scanner before. It explains what Wi-Fi channel apps do and lists top 5 best Wi-Fi channel scanner apps that you can download right now.
Jump to...
Why Do I Need to Use a Wireless Channel Scanner?
When you received your home router from your ISP, the chances are that you weren’t paying much attention to all configuration options available. One available option lets you choose which Wi-Fi channel the router should operate on. It’s paramount that you pick a channel that isn’t already occupied by several other nearby wireless networks.
Why? Because Wi-Fi channels are sort of like the lines on the highway. When too many cars travel in the same line, the speed of traffic can slow down to a crawl and make traveling anything but enjoyable. That’s why busy highways tend to have multiple lines going both ways.
Wi-Fi networks (those that use the 2.4 GHz band) can also take advantage of multiple lines, or channels as they are called, when broadcasting data. In North America, there are 11 channels available, each 20 MHz wide. While that may sound like a lot, only 3 of these channels are non-overlapping (1, 6, and 11), meaning they’re not affected by co-channel interference caused by adjacent channels.
The 5 GHz and 6 GHz frequency bands are also divided into multiple channels — far more than the 2.4 GHz band, actually. The 5 GHz band provides 37 channels that are 20 MHz wide and 18 channels that are 40 MHz wide. The 6 GHz band takes things to the next level with 59 20 MHz channels, 29 40 MHz channels, 14 80 MHz channels, and 7 160 MHz channels.
Because the 5 GHz and 6 GHz frequency bands offer so many channels, wireless interference is much less of an issue. What's more, most Wi-Fi routers that support these bands can configure the most suitable 5 or 6 GHz channel automatically — no need to use a Mac Wi-Fi channel scanner.
That’s why Wi-Fi channel planning is so important, and why it should always precede every deployment of a Wi-Fi network. But without a wireless channel scanner, proper Wi-Fi channel planning is impossible because you have no way of knowing which channels are busy and which are free from traffic.
macOS users have the advantage of a built-in Wi-Fi channel scanner at their disposal. By simply clicking on the Wi-Fi network icon in the menu bar and selecting the “Open Wireless Diagnostics” option, you can access this feature. While this built-in tool provides basic channel scanning capabilities, there are third-party applications that offer more advanced features and user-friendly interfaces. Such applications can provide a more comprehensive analysis of the wireless environment, aiding in better decision-making for channel selection and network optimization.
A WIRELESS CHANNEL SCANNER SUCH AS NETSPOT CAN INSTANTLY SCAN ALL WIRELESS NETWORKS IN YOUR AREA
A wireless channel scanner such as NetSpot can instantly scan all wireless networks in your area, detect which Wi-Fi channels they run on, and provide you with other useful information that you can use to find the best Wi-Fi channel possible.
Some wireless channel scanners can also help you optimize the strength of your wireless network by generating a Wi-Fi strength heatmap of your local area and highlighting areas with insufficient coverage.
Best Wi-Fi Channel Scanner Mac Computer Solutions
- NetSpot — is both an excellent Wi-Fi channel scanner app and a Wi-Fi survey tool.
- Wireless Diagnostics — Item description integrated into macOS is a handy Wi-Fi analyzer tool.
- Wi-Fi Scanner — can scan for surrounding networks and supply vital Wi-Fi information needed for troubleshooting purposes.
- IStumbler — can also find Bluetooth devices and Bonjour services.
- KisMAC — is a free and open source wireless analysis and security auditing tool for macOS.
![]()
Choice #1
NetSpot is both an excellent Wi-Fi channel scanner app and a Wi-Fi survey tool. NetSpot features three distinct modes of operation: Inspector, Survey and Planning.
-

Inspector Mode
Gives you real-time insights into the WiFi networks around you.
-

Survey Mode
Provides a comprehensive, map-based analysis of your WiFi network's performance.
-

Planning Mode
Enables you to simulate and plan your WiFi network's layout and coverage.

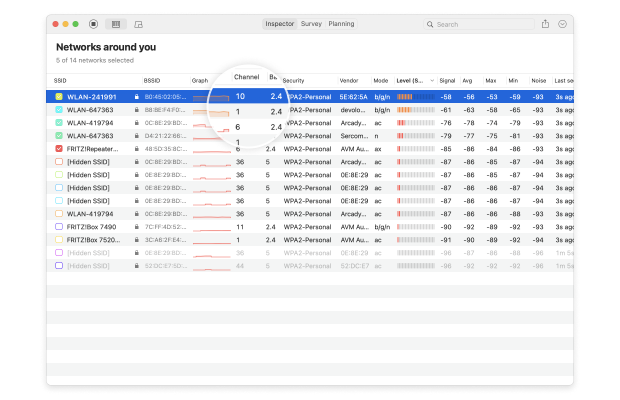
The Inspector mode is what you need when you want to discover Wi-Fi channel overlap. When you activate it, NetSpot immediately analyzes all nearby wireless networks, gathers all available information about them, and presents its findings sorted as an intuitive list.

You can then zoom in on individual wireless networks to learn more about them, or you can switch to Survey mode and conduct a wireless signal strength site survey to discover dead zones.

If you're planning a new network NetSpot’s Planning mode is a tool you'll find indispensable. This mode allows you to visualize the placement of access points, analyze the anticipated performance, and ensure the network is well-optimized right from the get-go.

Besides being packed with useful Wi-Fi analysis features, NetSpot is also one of the easiest Wi-Fi analyzer apps to use. The intuitive user interface of this Wi-Fi channel scanner for Mac makes it easy to take advantage of its features and understand the information presented.
It doesn't cost anything to download the free edition of NetSpot from its official website or from the Mac App Store, and you can use it to get an instant overview of your Wi-Fi network environment. To unlock more features this great wireless channel scanner has to offer, users can upgrade to NetSpot Home, PRO, or Enterprise, with cost-effective lifetime upgrades available.
Pros and Cons
-
Runs on Windows and macOS
-
Capable and easy to use
-
Three distinct modes of operation
-
Can generate many types of heatmaps
-
Offers a truly useful free edition
-
Excellent Wi-Fi planning feature
-
No major downsides
- Summary recommendation: Get NetSpot
Choice #2
Wireless Diagnostics
Available for macOS.
Integrated into macOS is a handy Wi-Fi analyzer tool that has much of the same functionality as many other free Wi-Fi analyzer apps available from the web and App Store. This tool is named Wireless Diagnostics.

Here's how to use macOS Wireless Diagnostics to discover nearby networks:
- Hold the Option key.
- While holding the Option key, press the Wi-Fi icon in the menu bar.
- Click on the Open Wireless Diagnostics option.
- Input your admin password.
- Click on the Windows menu and select Utilities.
- In the bottom right corner, Wireless Diagnostics will display recommended channels.
Now that you know how to run network diagnostics on Mac using the Wireless Diagnostics tool, you should also know that the tool automatically generates a Wi-Fi diagnostics file and saves it in the folder /var/tmp. You can use this file to learn even more information about your wireless network and other networks available in your local area, or you can send it to your network administrator and ask them to take a look at it.
Other wireless diagnostics Mac utilities included with the Wireless Diagnostics tool can be opened from the Window menu in the Wireless Diagnostics menu bar. They include a packet sniffer and a real-time performance monitoring tool, just to give two examples of some of the tools that make this humble wireless channel scanner for Mac so useful.
Pros and Cons
-
Completely free
-
Integrated into macOS
-
Can generate a Wi-Fi diagnostics file
-
Comes with a packet sniffer and other tools
-
Isn't intuitive to use
-
Only available on macOS
Choice #3

Wi-Fi Scanner
Compatibility with OS X 10.9 or later, 64-bit processor.
Wi-Fi Scanner can scan for surrounding networks and supply vital Wi-Fi information needed for troubleshooting purposes. The app allows users to narrow down the results using customizable filter options, it can plot 2.4 GHz and 5 GHz channel graphs to display Wi-Fi channel overlap, and it even includes a handy speed test feature so you can test the performance of your network in various areas.
The information you gather using Wi-Fi scanner can be exported into CSV files, making it easy to share it with others.

In addition to the features mentioned above, Wi-Fi Scanner also includes an IP scanner that can detect unknown devices connected to your Wi-Fi network. This feature can be useful when dealing with network slowdowns caused by the so-called Wi-Fi leeches, who are unauthorized users that connect to your Wi-Fi network to consume your bandwidth.
Overall, Wi-Fi Scanner is a versatile tool for those who want to optimize their Wi-Fi network. We just wish it were cheaper and updated more often.
Pros and Cons
-
Clean, intuitive interface
-
Offers a comprehensive range of features
-
Can generate summary reports in HTML format
-
Support for Wi-Fi speed testing
-
Hasn't been updated in more than a year
-
Costs almost $100
Choice #4

IStumbler
Available for macOS.
Apart from Wi-Fi networks, IStumbler can also find Bluetooth devices and Bonjour services. The app supports both the 2.4 GHz frequency range as well as the increasingly more popular 5 GHz frequency range.
Unlike many other similar products, iStumbler supports Oscium's WiPry 5x Wi-Fi Spectrum Analyzer, which is a professional-grade dual-band spectrum analyzer designed to give you the most detailed and accurate information about your wireless environment.

Unlike many other Wi-Fi analyzer apps, iStumbler isn’t free. The app costs $9.99 for all the computers that you own, and you can purchase your license in the store or right in the app. iStumbler works on all Mac computers running macOS Big Sur and older.
Pros and Cons
-
Can find Bluetooth devices and Bonjour services
-
Inexpensive
-
Supports Oscium's WiPry 5x Wi-Fi Spectrum Analyzer
-
The latest version doesn't launch on macOS Monterey and newer
-
Hasn't been updated since 2017
Choice #5

KisMAC
Available for macOS.
KisMAC is a free and open source wireless analysis and security auditing tool for macOS. It’s built upon the original KisMac, which was developed by Michael Rossberg and Geoffrey Kruse.

This versatile tool can be used for a variety of purposes, from detecting hidden networks to assessing wireless security. One of its most notable features is its ability to accurately log the precise location of access points using GPS data.
Unfortunately, the latest version of KisMAC (version 0.3.3) was released in 2011, and the open-source project is no longer maintained. Despite that, you can still run the Mac Wi-Fi channel scanner without any issues on Mac OS 10.9 - 10.12 (64-bit only).
Pros and Cons
-
Free and open-source
-
Supports GPS mapping
-
Can collect all essential Wi-Fi information
-
No longer maintained
-
Runs only on 64-bit versions of Mac OS 10.9 - 10.12
How to Change the Wi-Fi Channel on Mac
Learning how to change the Wi-Fi channel on your router can help you avoid internet slowdowns and other potential Wi-Fi problems, and it won’t take you more than 10 minutes of your time. Here’s what you need to do:
Step 1
Determine the Most Suitable Wi-Fi Channel
Before you change your router settings, you need to find the best Wi-Fi channel using a Mac channel scanner like NetSpot (click here for the best Wi-Fi channel scanner for Android).
NetSpot makes finding the most suitable Wi-Fi channel a breeze thanks to its Inspector mode.
In this mode, NetSpot collects every detail about surrounding Wi-Fi networks, including their channels. You can use this information to determine which channel is used the least, and that’s the channel you should configure your router to use.
Here’s how it works:
- Install NetSpot on your Mac.
- Launch the wireless channel scanner software from the Applications folder.
- Give NetSpot a few moments to discover and analyze nearby Wi-Fi networks.
- Once the scan is complete, sort the discovered Wi-Fi networks by their channel. This will provide a clearer view of the channel usage around you.
- Focus on the non-overlapping channels (1, 6, and 11) and determine which one is used the least. These channels are preferred as they don’t interfere with each other.
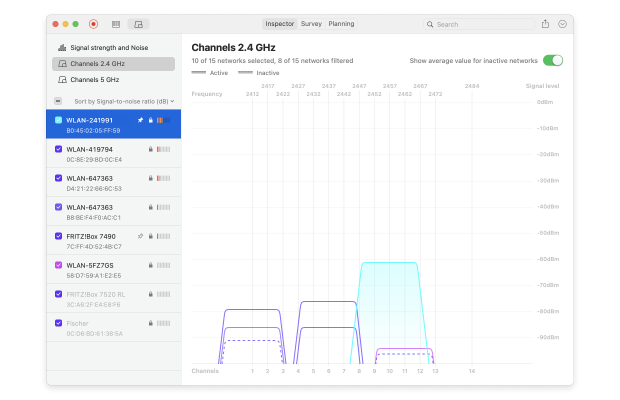
To visualize the strength of detected networks across different channels, you can click the Signal level and noise graphs button in the top-left corner and t hen switch to the Channels 2.4 GHz or the Channels 5 GHz tab, which will provide a graphical representation of channel usage.
Step 2

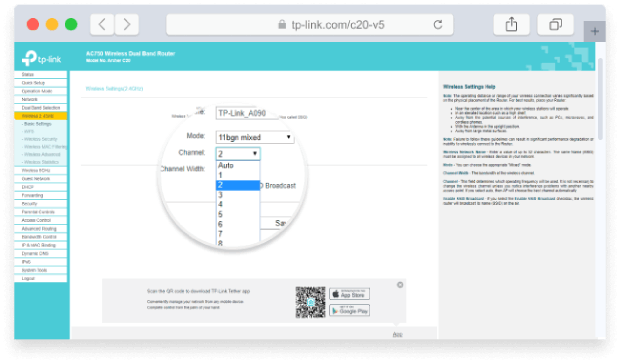
Log in to your router’s admin interface
Once you know what the most suitable Wi-Fi channel in your local area is, it’s time to tell your router to use it. To do that, you need to log in to its admin interface. In most cases, the interface will be accessible by entering one of the following IP addresses in your web browser:
- 192.168.1.1
- 192.168.0.1
- 10.0.1.1
- 10.0.0.1
- 10.0.0.138
If none of these addresses work, then we recommend you consult your router’s manual or ask the manufacturer directly.
It’s very likely that you’ll be asked to enter the admin login information to access the interface. If you haven’t changed it, then using the word “admin” for the login name as well as the password should work fine. Other common router passwords include 12345, root, and default.
Step 3
Change the Wi-Fi Channel and Restart Your Router
Assuming that you’ve been able to log in to your router’s admin interface, you can now navigate to the wireless settings section and change your Wi-Fi channel. Sometimes, the option to change the Wi-Fi channel is hidden under Advanced Settings, so make sure to look there as well if you can’t find it.
After saving the new settings, your router will most likely need to be rebooted. Don’t worry: you won’t have to connect your devices again. You would have to do that only if you also changed the name of your Wi-Fi network or the password used to protect it.
What Is a Channel Overlap and Which Wi-Fi Channel Analyzer Apps Can Detect It?
Wireless networks operate on three main frequency ranges: 2.4 GHz, 5 GHz, and 6 GHz. Each frequency range is divided into several channels to minimize interference and network congestion. In this regard, Wi-Fi channels are like road lanes. Just like multilane roadways can carry greater volumes of traffic than two-lane roads, so do Wi-Fi channels allow more users to enjoy maximum download and upload speeds at the same time.
Some WiFi channel analyzer and WiFi channel scanner apps, however, are far more reliable than others
In most countries, the 2.4 GHz frequency range, which is the most commonly used short-distance frequency range, is divided into 13 channels with 5 MHz of channel separation. In North America, the 2.4 GHz frequency range is divided only into 11 channels, but the WiFi channel width is the same as in the rest of the world.
Because each channel on the 2.4 GHz spectrum is 20 MHz wide and the channel separation is only 5 MHz, only three channels don’t overlap with any other channels: 1, 6, and 11. This is important because WiFi channel overlap is a common cause of interference and performance degradation.

The 5 GHz frequency band is another widely used part of the radio spectrum, offering faster data transfer rates, less interference, and more available channels at the expense of a shorter range compared to 2.4 GHz. Modern Wi-Fi routers can typically take advantage of both 2.4 GHz and 5 GHz at the same time to combine their strengths.
What many Wi-Fi routers still can't do is operate on the 6 GHz frequency band, which is a newer addition to the radio spectrum, introduced by the 802.11ax standard. The main benefits of the 6 GHz frequency range are its speed and capacity. At the moment, routers with support for this newest band are still expensive, but they are guaranteed to become more affordable as time goes on.
Most Wi-Fi channel analyzer and SSID scanner apps can detect which channel a Wi-Fi network operates on and plot all nearby networks on a graph to make it obvious which channels are used the least. Some Wi-Fi channel analyzer and Wi-Fi channel scanner apps, however, are far more reliable than others, and some also come with unique features that make Wi-Fi network optimization much easier.
Conclusion
There are many applications that let you scan Wi-Fi channels on Mac, but NetSpot stands out as the best one (we also consider it to be one of the best Wi-Fi channel scanners for Windows). With its help, you can quickly and effortlessly find the best Wi-Fi channel for your network and troubleshoot various other issues that are negatively affecting your experience.
SO, WE RECOMMEND

NetSpot
Wi-Fi Site Surveys, Analysis, Troubleshooting runs on a MacBook (macOS 11+) or any laptop (Windows 7/8/10/11) with a standard 802.11be/ax/ac/n/g/a/b wireless network adapter. Read more about the 802.11be support here.
Best Wi-Fi Channel Scanner Apps for macOS — FAQs
How to Detect Channel Overlap?
With a reliable Wi-Fi channel analyzer one can figure out which channels are used by the surrounding networks — there should be a possibility to put all nearby networks on a graph where the channel overlap will be obvious.
Why Do I Need to Use a Wireless Channel Scanner?
With a reliable wireless channel scanner such as NetSpot you can easily see which channels the wireless networks in your area run on, and decide which Wi-Fi channel will be the best for your network. This can help you avoid channel overlap and get a more consistent coverage.
What are the Best Wi-Fi Channel Scanners for Mac?
We can recommend the following apps as the best Wi-Fi channel scanners for Mac:
- NetSpot
- Wireless Diagnostics
- Wi-Fi Scanner
- iStumbler
- KisMAC
How do I run a wireless diagnostic on my Mac?
You can use the Wireless Diagnostics tool that is integrated into macOS and has much of the same functionality as some other free Wi-Fi analyzers that you can download from the App Store.
While holding the Option key on the keyboard, click the Wi-Fi icon in the menu bar.
Click the Open Wireless Diagnostics option.
Type your administrator password if asked.
The wireless diagnostics will let you know whether everything is running properly and will offer you the option of saving the report to a file.
How do I know which Wi-Fi channel is best?
You can discover the best Wi-Fi channel using a Wi-Fi channel scanner app like NetSpot. Its discover mode automatically gathers information about surrounding networks, making it simple to see which channels are used the least.
How do I scan for Wi-Fi channels on my Mac?
You can scan for Wi-Fi channels using the built-in Wi-Fi analyzer tool, called Wireless Diagnostics, or you can download a third-party Wi-Fi channel scanner. We recommend the latter option because third-party Wi-Fi channel scanners are packed with useful features and are, at least in some cases, easier to use.
How do I change the Wi-Fi channel on my Mac?
To change the Wi-Fi channel on your Mac, you need to open your web browser of choice, such as Safari, log in to your router’s admin interface, and pack a new channel from the Wireless Settings section of the admin interface.
Get NetSpot for Free
Wi-Fi Site Surveys, Analysis, Troubleshooting runs on a MacBook (macOS 11+) or any laptop (Windows 7/8/10/11) with a standard 802.11be/ax/ac/n/g/a/b wireless network adapter. Read more about the 802.11be support here.