WiFi analyzer app runs on a MacBook (macOS 11+) or any laptop (Windows 7/8/10/11) with a standard 802.11be/ax/ac/n/g/a/b wireless network adapter. Read more about the 802.11be support here.
Understanding the Most Important WiFi Settings
To many people, WiFi networks seem impossibly complex. Reading about them is like navigating a huge maze of unintelligible acronyms, and it’s no wonder that only a few brave, and typically technically inclined, individuals dare to open WiFi settings and play with them.
This article aims to demystify the most important aspects of WiFi networks and help you set up WiFi correctly. By its end, you will have learned everything you need to know about the most important WiFi settings thanks to the articles published on NetSpot blog.
Jump to...
What Wi-Fi Settings Are the Most Important?
The manufacturers of wireless routers know that most users don’t know how to set up WiFi at home. To make things a bit easier, they have created convenient setup applications and management consoles that neatly hide all the technical complexity behind a pretty user interface and plain language.
But there are some WiFi settings that are so important and so easy to understand that it makes sense to make an effort to understand them.
- SSID: An SSID stands for service set identifier, and it’s the primary name of a WiFi network. SSIDs are up to 32 characters long, and the characters must be ASCII-only, which is a character encoding standard for electronic communication. All routers have a certain default SSID, often corresponding to the name of the manufacturer. As a user, you’re free to change the SSID of your WiFi network as many times as you want to, and you can even make it invisible to prevent others from easily connecting to your network.
- Security Mode: To provide data confidentiality comparable to that of a traditional wired network, several security standards for wireless networks have been developed, with Wired Equivalent Privacy (WEP) being the oldest among them, introduced as part of the original 802.11 standard ratified in 1997. Because of its shortcomings, WEP had been superseded by Wi-Fi Protected Access (WPA), later Wi-Fi Protected Access 2 (WPA2) and Wi-Fi Protected Access 3 (WPA3). As a rule of thumb, always use the latest security standard for wireless networks your router supports. If it’s only WEP, strongly consider buying a new router.
- Password: Even the strongest standard for wireless networks can be utterly useless if you use a weak password. A password is weak if it can be easily guessed. The weakest passwords are names, dates, or simple phrases. A step above them are passwords that are random but too short. An ideal password is so long that it can’t be brute-forced in any reasonable amount of time. If you have trouble remembering random strings consisting of letters and numbers, consider using a very long sentence instead, preferably something utterly random and ungrammatical. If you ever find yourself wondering how to set up WiFi password that can withstand the test of time as well as hackers, why not let a random password generator help you out?
- Channel: The 2.4 GHz band is divided into several channels, 11 in North America. These channels are sort of like swimming pool lines. When a swimmer in one line swims, the waves he or she creates impact swimmers in adjacent lines.The same thing happens with WiFi networks. When two networks are on the same channel, interference may occur. For this reason, you should configure your WiFi router to broadcast on the least populated channel.
- NAT: Network address translation (NAT)is a method of remapping one IP address space into another. With NAT, one public IP address can hide a number of private IP addresses. Many WiFi users encounter NAT-related issues when playing online games, and fixing them requires doing either Port Forwarding or Port Triggering, both of which can be accomplished in the NAT section of most WiFi router management consoles.
- QoS: Quality of service (QoS) is a useful feature of many newer WiFi routers. Essentially, QoS provides the ability to prioritize different applications, users, or data flows to guarantee a certain level of performance. Typically, WiFi users prioritize voice communication or online gaming over file downloads and video streaming.
How to Access and Change Wi-Fi Settings
There’s no point in learning how to change WiFi settings like the wireless password or network name unless you also learn how to access WiFi settings, so let’s start with that.
How Do I Get to My Wi-Fi Settings?
There are two ways for you to get to your WiFi settings. You can:
- Log in to your router’s admin interface.
- Use your router’s companion mobile app.
Here’s a brief overview of how to log in to your router’s admin interface:
Step 1
Connect a laptop to your router using an Ethernet cable.
Step 2

Open a web browser and enter the router’s IP address in the address field. Common router IP addresses include 192.168.0.1, 192.168.1.1, and 192.168.2.1. You can also display your address using the “ipconfig” common on Windows or the “netstat -nr | grep default” on macOS.
Step 3
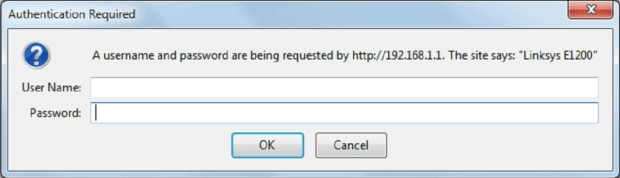
Log in to the router’s admin interface as admin using the correct username/password combination (often admin/admin).
If there’s a companion mobile app available for your router, like the Linksys App, then all you need to do is install it on a mobile device connected to the router. When connecting for the first time, you may be asked to go through a pairing process, but you can expect everything to be clearly explained.
Now that you know how to access your router, you can start changing WiFi settings.
How Do I Change Router Settings?
Learning how to change Wifi settings is easy (the difficult part is knowing which settings to change).
Assuming you’ve successfully logged in to your router’s admin panel, you can now open the settings menu. Most routers separate general router settings from WiFi, LAN, and security settings.
To change WiFi settings, you need to navigate to the WiFi section of the settings menu, make your changes, and (sometimes) restart your router for the new setting to take effect.
How to Change Your Device’s WiFi Settings
To achieve the best WiFi performance possible, both your router and devices need to be configured correctly. In this section, we explain how to change your device’s WiFi settings regardless of if the device is running Windows, macOS, iOS, or Android.
How to Change Windows Wi-Fi settings
To access Windows WiFi settings on Windows 11, you need to:
Step 1
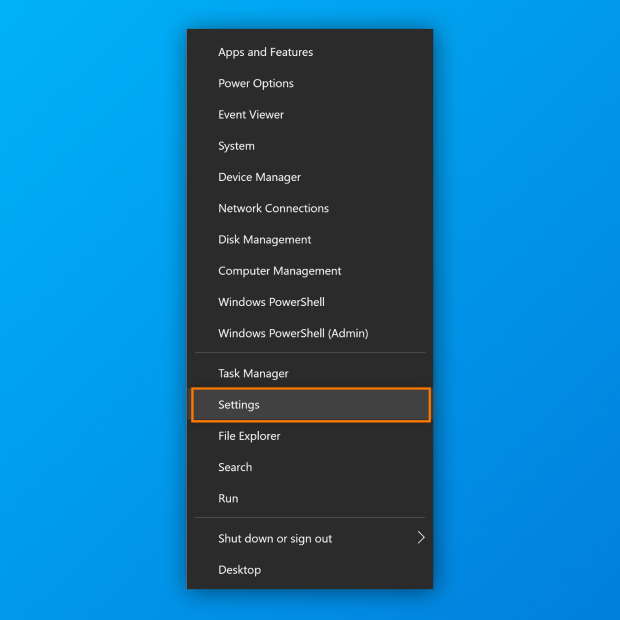
Click the Start button.
Step 2
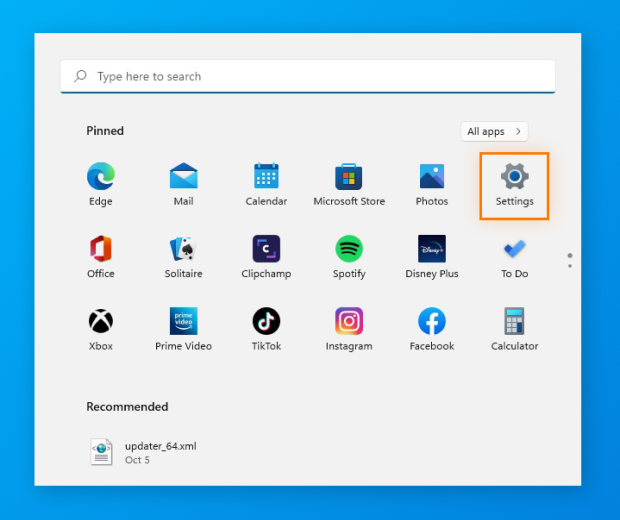
Launch the Settings app.
Step 3
Navigate to Network & internet.
Step 4
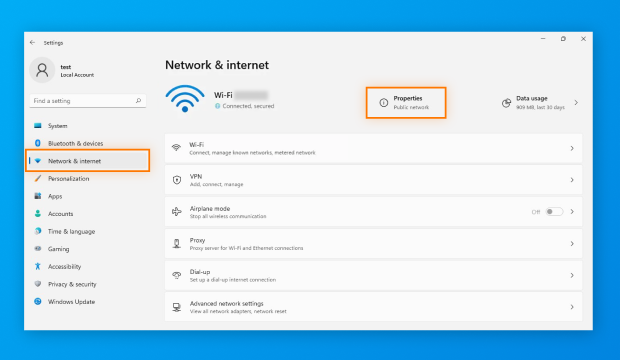
Go to the WiFi section.
Step 5
Make your changes.
How to Change Mac WiFi settings
Mac WiFi settings on macOS 13 can be changed from the System Settings app:
Step 1
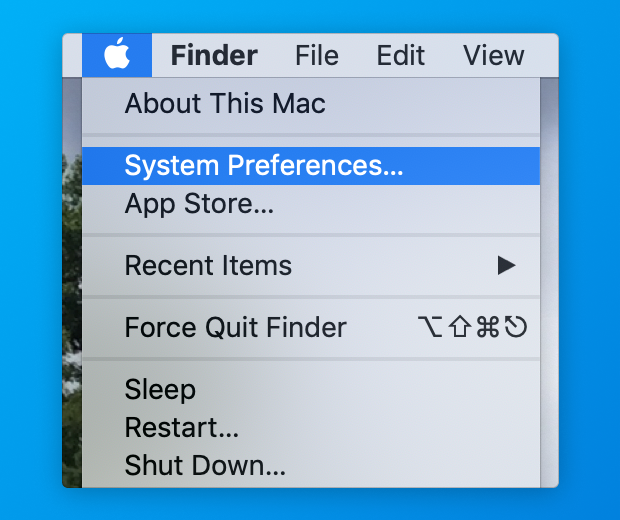
Click the System Settings app icon on the dock.
Step 2
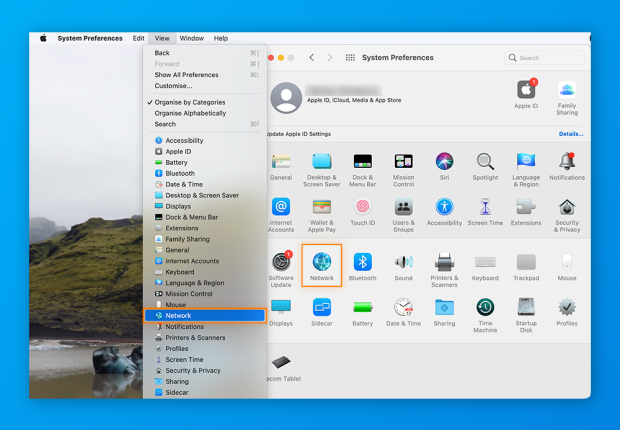
Select the WiFi category in the left pane.
Step 3
Select your WiFi network and click the three horizontal dots next to its name.
Step 4
Choose the Network Settings option.
Step 5
Make your changes.
How to Change iOS (iPhone/iPad) WiFi settings
To change iPhone WiFi settings and iPhone WiFi settings:
Step 1
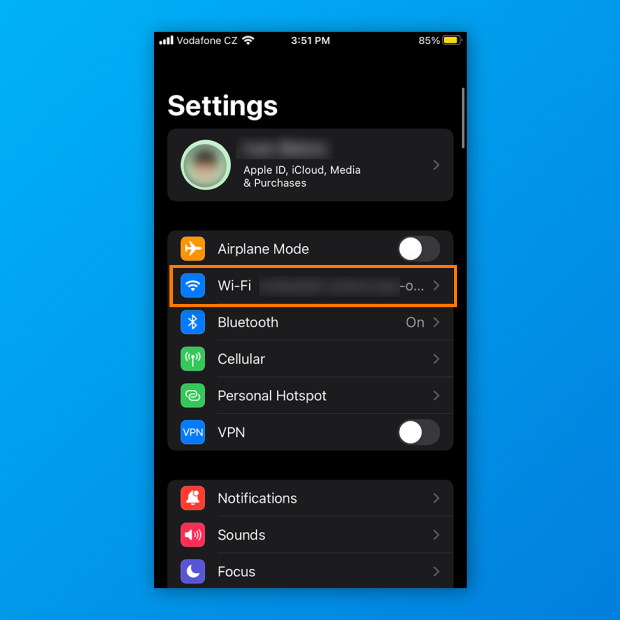
Open the Settings app.
Step 2
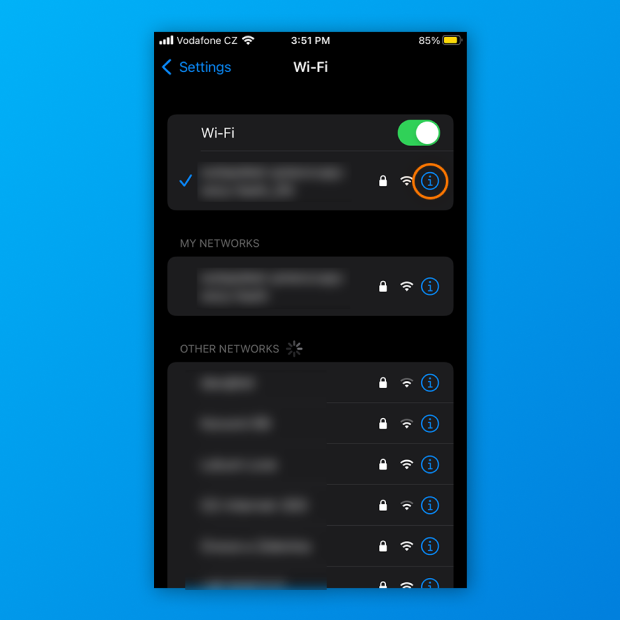
Navigate to the WiFi section.
Step 3
Make sure the WiFi toggle is in the ON position.
Step 4
Make your changes. For example, you can tap an available network to connect to it.
Unfortunately, iPhone WiFi settings and WiFi settings on iPad don’t display much information, so iOS devices are not nearly as useful for WiFi analysis purposes as many other users would like them to be.
That is, unless you download NetSpot for iOS. With NetSpot, your iOS device can become a WiFi analysis tool, which you can use to run ping tests, test Internet speeds of your WiFi network and locate dead spots in your coverage by generating WiFi heatmaps based on the active scan readings.
How to Change Android WiFi settings
To change WiFi settings on Android:
Step 1

Open the Settings app.
Step 2
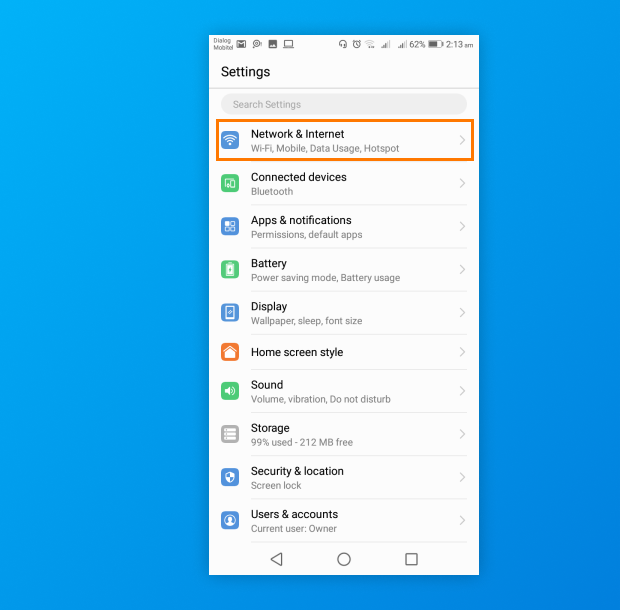
Navigate to the Network & internet section.
Step 3
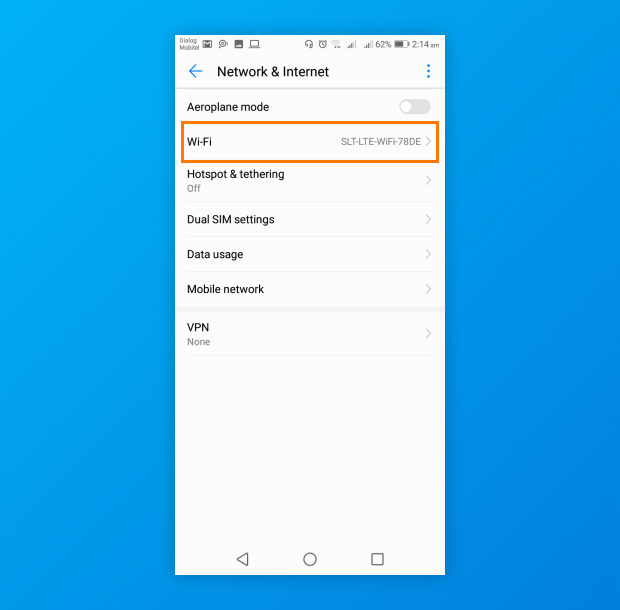
Select the WiFi category.
Step 4
Make sure the WiFi toggle is in the ON position.
Step 5
Make your changes. For example, you can tap an available network to connect to it.
With the right WiFi site survey app for Android, you can do much more than change Android WiFi settings. For example, you can perform WiFi site surveys for a network of any size and capacity, analyze the data you collect with heatmap visualizations, and more.
How to Change the Default WiFi Name (SSID)
Unless you live in the middle of nowhere, there’s a good chance that there are many different WiFi networks in your area. Every network broadcasts a piece of information called SSID (Service Set Identifier) to make itself unique identifiable.
In practice, the SSID of your network is its name, and you can easily change it from your router’s WiFi settings menu:
Step 1

Log in to your router’s admin panel.
Step 2
Go to the WiFi settings section.
Step 3
Look for the SSID field.
Step 4
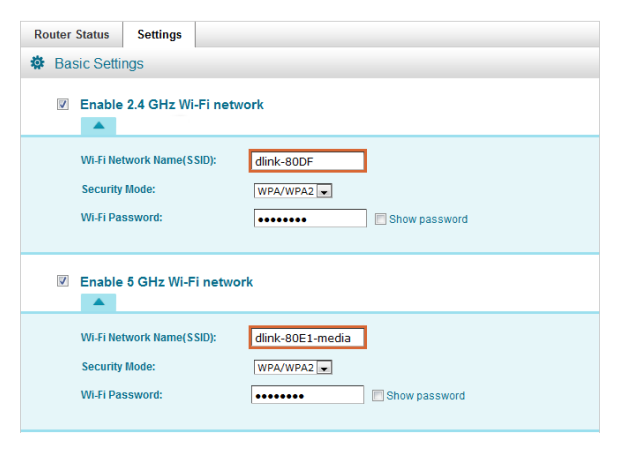
Change the name of your network to something descriptive and appropriate.
Step 5
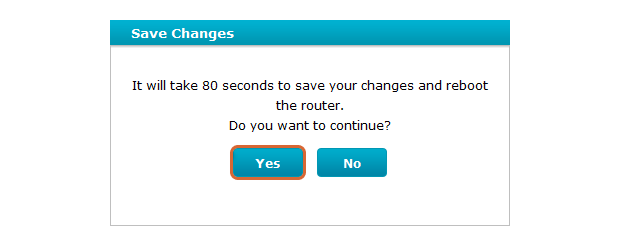
Save your settings.
Because WiFi network names can be seen by anyone, users often give their networks funny WiFi names, such as:
- It Hurts When IP
- Drop it like it's hotspot
- FreeViruses
Just remember to keep things kid friendly because you don’t want to anger your neighbors.
Passwords represent an important pillar of modern WiFi security because they prevent unauthorized users from connecting to private networks secured using technologies like Wi-Fi Protected Access 3 (WPA3).
We strongly recommend you make your WiFi password at least 8 characters long. Make sure to include a mix of uppercase and lowercase letters, numbers, and special characters. Alternatively, you can use a very long passphrase (at least 4 words and 15 characters in length).
If your current WiFi password is weak, then you need to learn how to change WiFi passwords:
Step 1
Log in to your routers admin panel.
Step 2
Go to the WiFi settings section and look for a WiFi security sub-section.
Step 3
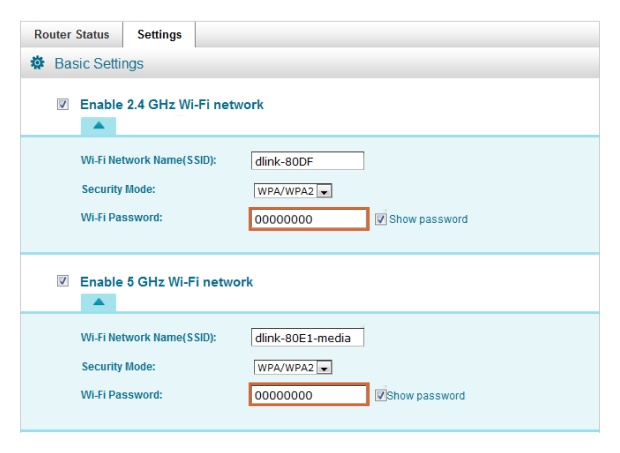
Change the current password to something stronger.
Step 4
Save your settings.
We also recommend you learn how to find WiFi passwords on various devices so that you can recover it should you ever forget it. While you’re at it, learn how to share WiFi passwords as well.
How to Set Up Wi-Fi Correctly?
To set up Wi-Fi the right way, begin by understanding the radio environment around you. A Wi-Fi analyzer helps you see which nearby networks are active, how strong they are, and which channels they occupy, so you can choose a cleaner spectrum and avoid interference. You can install any analyzer app that fits your workflow — for example, NetSpot is a solid choice on Windows, macOS, and Android.
Scan first, then decide
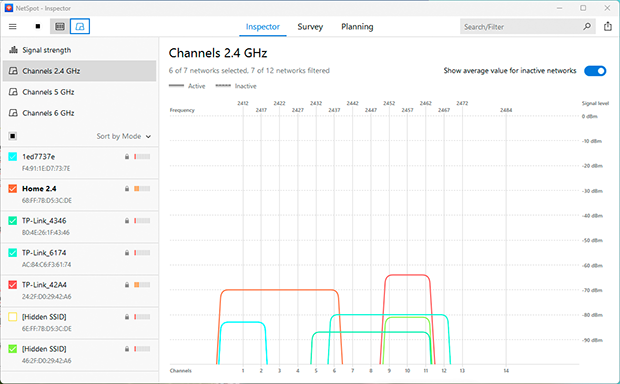
Launch your analyzer and let it collect live data for a few seconds. In NetSpot’s Inspector mode, you’ll see band, channel, signal level (RSSI), security, vendor, and other details in real time.
Inspector also reveals hidden networks that still contribute to noise — useful when you’re picking a channel.
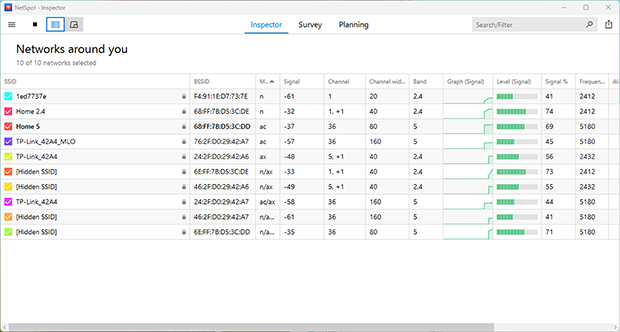
NetSpot’s Inspector works with 6 GHz too, so you can validate whether 6 GHz is actually cleaner at your location.
Pick the right band and channel width
Most importantly, you want to know which WiFi channels are occupied the most so you can select one where interference won’t be such an issue.
If you discover that all channels on the 2.4 GHz band are occupied, you should consider switching to the 5 GHz band which typically offers more channel options and supports wider channels (40/80/160 MHz) for higher throughput. Most modern routers are dual-band, while tri-band models also add 6 GHz for extra performance.
If your router and adapters support Wi-Fi 6E or Wi-Fi 7, consider 6 GHz: it adds a large block of clean spectrum with many additional 20-MHz channels and less legacy traffic. Exact channel availability depends on your country and hardware, so confirm what your devices support before you commit.
Keep in mind:
- 2.4 GHz = longer range but lower speeds
For 2.4 GHz, always stick to 20 MHz — wider channels just increase overlap and interference. - 5 GHz = faster speeds but shorter range
On 5 GHz, go with 40 MHz if it’s crowded, 80 MHz if a clean block is available.
- 6 GHz (Wi-Fi 6E/7) = cleanest spectrum and highest throughput, best for open spaces and short distances
For 6 GHz, start with 80 MHz. Move to 160 MHz or 320 MHz only if your hardware supports it and the spectrum is clean.
Wider isn’t always better — it can mean more noise. Use the narrowest width that still gives you the performance you need.
Finding the Best Place for Your Router
Finally, you should also figure out the best place for your WiFi router. As a rule of thumb, position your router near the center of your home so the signal spreads evenly. Avoid placing it next to thick walls, large metal objects, or appliances like microwaves and TVs.
Again, this is something a capable WiFi analysis application should be able to help you with. NetSpot offers a Survey mode that builds visual Wi-Fi heatmaps. These maps clearly show areas with strong, weak, or unstable signal so you know exactly where coverage drops.
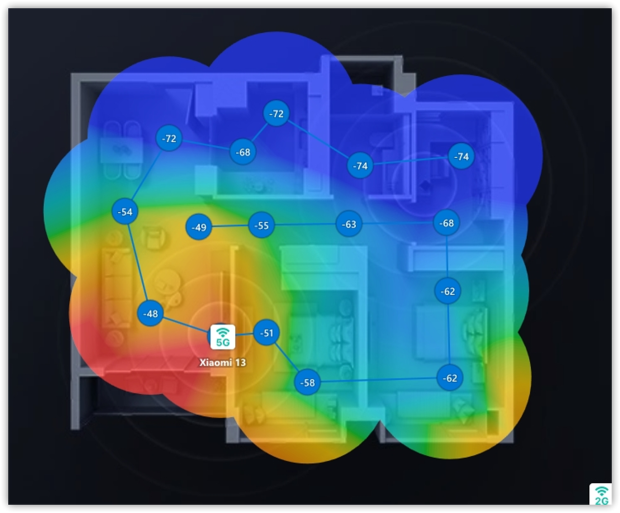
Heatmaps like Signal level, Signal-to-noise ratio, Signal-to-interference ratio, and Quantity of access points make it obvious where the signal drops and where interference or noise is high. Instead of “put it in the center”, you’ll have a measured, room-by-room picture for your exact layout.
Planning Your Network in Advance
If you’re setting up a new Wi-Fi network from scratch, some analyzer apps also include a Planning mode. For example, NetSpot lets you simulate router placement, add walls and materials, and generate predictive heatmaps.
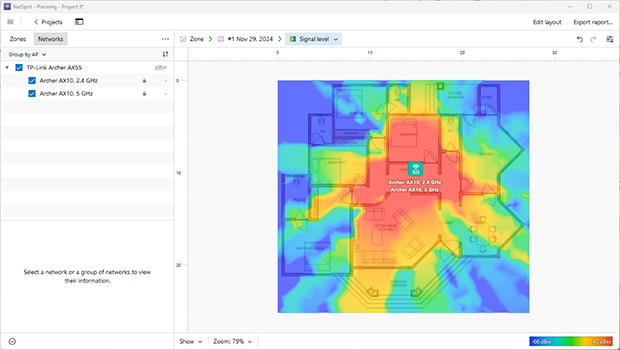
Heatmaps like Signal level, Signal-to-noise ratio, Signal-to-interference ratio, and Quantity of access points make it obvious where the signal drops and where interference or noise is high. Instead of “put it in the center”, you’ll have a measured, room-by-room picture for your exact layout.
In the next section, we introduce popular WiFi analyzer applications, each offering a unique set of capabilities.
Best Software Applications for Setting Up Wi-Fi Networks
- NetSpot — is an easy to use application for wireless site surveys, Wi-Fi analysis, and troubleshooting on macOS and Windows.
- InSSIDer — is a WiFi scanner for Windows and macOS.
- WiFi Analyzer — is a very simply WiFi analyzer for Windows.
Choice #1
NetSpot is an easy to use application for wireless site surveys, Wi-Fi analysis, and troubleshooting on macOS and Windows. NetSpot can quickly gather all important information about nearby wireless networks and conduct in-depth wireless surveys.
-

Inspector Mode
Gives you real-time insights into the WiFi networks around you..
-

Survey Mode
Provides a comprehensive, map-based analysis of your WiFi network's performance.
-

Planning Mode
Enables you to simulate and plan your WiFi network's layout and coverage.

Unlike other similarly capable applications, NetSpot has been designed for regular home users even though it’s fully capable of satisfying the needs of networking professionals who demand utmost accuracy.
When you launch NetSpot in its Inspector mode, you will be automatically presented with a list of all available WiFi networks, complete with detailed information about them. You can, for example, see their signal strength indicators, security settings, channel settings, and so on. It works across all bands — 2.4 GHz, 5 GHz, and 6 GHz — allowing you to detect hidden networks that may interfere with your setup.

You can then sort the list to see which networks have the strongest signal, or you can select several networks and display their WiFi channel distribution on a graph to find the least busy channel, among many other things.
Choice #2

InSSIDer
Available for Windows and macOS.
InSSIDer is a WiFi scanner for Windows and macOS. It’s a replacement for popular Windows WiFi scanner NetStumbler, introducing several new features and an improved user interface.
")
Among the features of inSSIDer are the ability to gather information from wireless devices, the ability to perform a routine spot check to ensure optimal channel selection, and much more.
Choice #3

WiFi Analyzer
Available for Windows 10 Mobile, Windows 10 or later.
WiFi Analyzer is a very simply WiFi analyzer for Windows. Its main advantage is the fact that it can be downloaded directly from the Windows Store.

Compared to the previous two applications, WiFi Analyzer is much simpler, but that’s not necessarily a bad thing unless you want to do something very specific.
Conclusion
WiFi settings can be confusing, but guides like this one and the best software for setting up WiFi networks make them easier to understand and change. Our WiFi tool of choice is NetSpot because it combines simplicity with powerful features into one solution that you can use across all major platforms, including Windows, macOS, iOS, and Android. With its help, you will be able to take advantage of the best WiFi settings in no time.
SO, WE RECOMMEND

NetSpot
Wi-Fi Site Surveys, Analysis, Troubleshooting runs on a MacBook (macOS 11+) or any laptop (Windows 7/8/10/11) with a standard 802.11be/ax/ac/n/g/a/b wireless network adapter. Read more about the 802.11be support here.
WiFi Settings — FAQs
How do I change WiFi name and password?
To change your WiFi name and password, you need to log in to your router’s admin panel or smartphone app. There, look for general WiFi settings (name) and WiFi security settings (password).
How do I get to my WiFi settings?
To reach your WiFi settings, you need to log in to your router’s admin panel by pointing your web browser to the right IP address. Alternatively, you can use a companion smartphone app if the manufacturer of your router provides one.
Where can I find my WiFi password?
You can find your WiFi password by going to your router’s WiFi security settings or by displaying it on your Windows, macOS, Android, or iOS device.
Get NetSpot for Free
Wi-Fi Site Surveys, Analysis, Troubleshooting runs on a MacBook (macOS 11+) or any laptop (Windows 7/8/10/11) with a standard 802.11be/ax/ac/n/g/a/b wireless network adapter. Read more about the 802.11be support here.