WiFi speed test app runs on a MacBook (macOS 11+) or any laptop (Windows 7/8/10/11) with a standard 802.11be/ax/ac/n/g/a/b wireless network adapter. Read more about the 802.11be support here.
How to Increase WiFi Speed
In most cases, it’s only when websites and online videos suddenly take ages to load and buffer when we start to wonder how to increase WiFi speed, and if you’re in that situation right now, this article is for you.
When Wi-Fi starts acting up, it usually manifests itself in the most unpleasant ways: video calls freeze, files don't download, and pages take too long to load. In practice, it's rarely "one big problem" — a slow router here, a poor location there, or a noisy neighbor's channel to top it all off.
In this guide, I'll cover solutions that usually produce proven results: how to check your actual speed, what settings to adjust on your router, and when it makes sense to upgrade your equipment to understand how to increase Wi-Fi speed.
- 1. Verify your baseline first
- 2. Update and reboot (fast wins)
- 3. Place the router where RF actually works
- 4. Use the right band (and device support)
- 5. Balance network utilization with QoS and MU-MIMO
- 6. Modernize hardware when it’s the bottleneck
- 7. Extend coverage the right way
- 8. Verify changes with a walk test
- FAQ — Common Questions About Boosting Your Wi-Fi Speed
1. Verify your baseline first
Before making any changes, you need to see the real picture of your network. Run a wired speed test to confirm your plan’s real throughput.
Get a perfect WiFi speed with NetSpot
Don’t settle for a decent Internet connection, NetSpot ensures a consistent WiFi speed.Then test over Wi-Fi in the same room as the router and again in a problem spot. Repeat after each change so you know what actually helps.
If Ethernet is fine but Wi-Fi is slow, keep going.
Expert tip: latency/jitter moving a lot while throughput stays “ok” usually means interference or congestion, not ISP issues.
2. Update and reboot (fast wins)
Reboot modem + router (or your mesh kit). Then update router firmware and client drivers. Bugs and memory leaks degrade throughput and raise latency over time. Do this before any deeper tuning.
3. Place the router where RF actually works
Router placement matters more than most people realize. WiFi uses radio waves, and they don't like thick walls, metal, or bulky equipment. If your access point is tucked away in a corner to avoid unsightly views, or in a closet full of cables, some of the signal simply won't reach the room.
Try moving the router to an open area, roughly in the center of the area you use — a living room, home office, or a child's room — and slightly above desk level. Often, this change alone will eliminate "mysterious" slow spots without adjusting any additional settings.
To find the perfect place for your WiFi router, we highly recommend NetSpot, a professional app for wireless site surveys, Wi-Fi analysis, and troubleshooting that runs on both macOS and Windows.
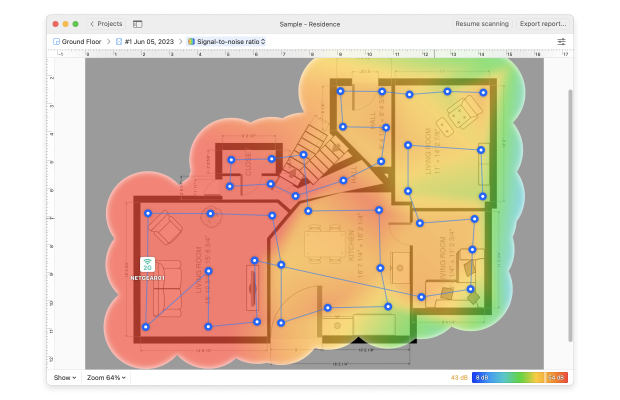
With NetSpot, you can create a heatmap of your local area to visualize where exactly you should place your router to achieve optimal coverage and how to increase WiFi internet speeds. The heatmap highlights all signal weakspots and reveals the sources of interference in a way that doesn’t require any expert knowledge to comprehend.

4. Use the right band (and device support)
Besides the right place, you should also find the right wireless channel.
If you and your neighbors are all on the same WiFi channel, your WiFi router may be interfering with theirs and causing your WiFi speed to decrease.
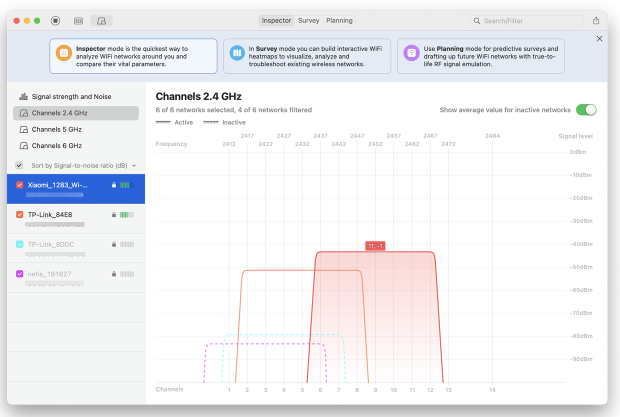
NetSpot’s Inspector Mode takes a quick snapshot of all wireless activity around you, showing you which networks are on the same channel as yours and helping you choose a channel with a little interference as possible. If you want to increase WiFi speed, always use the least occupied WiFi channel.

Set channel width smartly. Don’t blindly go “wider is better.”
- 2.4 GHz: keep 20 MHz almost always (crowded band).
- 5/6 GHz: try 40/80 MHz; go 160/320 MHz (6 GHz) only if scans show it’s clean and your devices support it. Wider channels collide more in busy air.
Expert tip: Use 5 GHz and — if your router and client devices support Wi-Fi 6E/7 — 6 GHz for higher speeds and lower congestion; keep 2.4 GHz for IoT/legacy devices and long-range needs. 6 GHz adds many wide, non-overlapping channels, which cuts co-channel contention and boosts throughput in dense areas. If you don’t see a 6 GHz SSID (or a 6 GHz radio toggle) in your router app, or your devices can’t join a WPA3-secured 6 GHz network, stick with 5 GHz and optimize channel width there.
5. Balance network utilization with QoS and MU-MIMO
Of course, your WiFi speed is also influenced by the current network utilization. If multiple people on the same WiFi network simultaneously play video games, stream movies, and download large files from the internet, the quality of everyone’s experience is likely to suffer.
Routers with MIMO and QoS (Quality of Service), a feature that lets you prioritize internet traffic according to your needs, can help combat the negative impact of traffic spikes, and, in some cases, they are the only option how to achieve decent WiFi speeds.
Expert Tip: Enable QoS/Smart Queue Management in your router’s app or web UI to prioritize time-sensitive traffic (video calls, gaming). Keep high-bandwidth clients on 5/6 GHz and park IoT/legacy gear on 2.4 GHz to reduce airtime contention. If supported, turn on MU-MIMO/OFDMA to serve multiple devices efficiently and lower latency. After each change, scan with NetSpot and re-run speed tests in the rooms that matter to confirm real gains.
6. Modernize hardware when it’s the bottleneck
Upgrading to a modern WiFi router with support for the latest wireless technologies is the most guaranteed way to increase WiFi internet speed. Such upgrade may be costly, but, depending on how old your current router is, the difference may be dramatic.
Expert Tip: Look for Wi-Fi 6/6E (or 7 if supported in your region), multi-gig WAN/LAN, and decent CPU/RAM for SQM. Remember: client radios matter too — an old tablet can be the limiter.
7. Extend coverage the right way
If the signal can’t physically reach a room, extend the network — don’t just crank settings. The gold standard is wired backhaul: run Ethernet (or MoCA over coax) from your main router to a secondary access point or mesh node so all airtime serves devices instead of relaying traffic. If wiring isn’t possible, use a modern mesh with a dedicated backhaul (tri-band or Wi-Fi 7 multi-link).
Avoid single-radio “repeaters” — they typically cut usable throughput about in half. Keep nodes in open space, away from big metal surfaces and microwaves; if you use stand-alone access points, match SSID/password and enable 802.11k/v/r for smoother roaming when available.
Expert Tip: Placement matters more than brand. Don’t drop a node in a dead zone; place it where the backhaul to the main router is still strong — usually halfway to the problem room. As a rule of thumb, aim for backhaul RSSI ≈ −60 dBm or better and SNR ≥ 25–30 dB at the node’s spot. Use NetSpot Inspector to check your main SSID’s RSSI/SNR before you mount the node; after placement, run a quick Survey so the heatmap confirms those rooms turned red/yellow. Finally, do an Active test there to verify not just higher peak speed but steadier latency and fewer retries.
8. Verify changes with a walk test
After every tweak, confirm results. In NetSpot:
- Inspector: check channel overlap and RSSI for your SSID vs nearby.
- Survey: rebuild a heatmap to see if low-signal areas improved and whether noise/interference hotspots moved.
- Active test: run throughput/latency checks in typical locations to see if you actually gained stability, not just peak speed.

NetSpot is also useful for verifying that your new wireless router is performing according to your expectations.
Radio conditions change. Even a perfectly tuned setup today can drift as neighbors add devices or change channels. Re-scan with NetSpot monthly or after you notice slowdowns, and adjust channel/width or node placement accordingly.
FAQ — Common Questions About Boosting Your Wi-Fi Speed
Yes — RF is unforgiving. Every wall, ceiling, or metal surface adds attenuation and reflections that cost you signal and airtime efficiency. Drywall shaves off a few dB; brick or concrete can add 10–20 dB. Put the router high, central, and in the open, not in a closet or behind a TV. If you can, do a quick A/B: move it one room closer to where you work, then re-test latency and throughput.
Use the band that fits the job. 2.4 GHz reaches farther and penetrates walls better, but it’s crowded and slow. 5 GHz delivers higher rates with many more clean channels. 6 GHz (Wi-Fi 6E/7 only) is cleaner still and great for short-to-medium range. A common setup is: keep IoT and legacy devices on 2.4 GHz, and put laptops/phones/TVs on 5 GHz or 6 GHz for speed and lower contention.
Match width to noise and device support. On 2.4 GHz, stick to 20 MHz — wider settings just step on neighbors. On 5 GHz, 40/80 MHz works well; 160 MHz is fine only if your scans show a clean block and clients can use it. In 6 GHz, 80/160 MHz is typical; 320 MHz (Wi-Fi 7) needs very clean spectrum and compatible clients. Wider channels raise peak rates but also raise collision risk in busy air — scan first, then set.
For real throughput, mesh wins — especially with wired backhaul (Ethernet or MoCA) or a dedicated wireless backhaul. Single-radio extenders relay on the same channel and usually cut usable speed about in half. Whatever you choose, placement matters: don’t park a node in a dead zone. Put it where the backhaul signal is still strong (roughly −60 dBm RSSI and SNR ≥ 25 dB is a good target), then verify with a quick walk test.
Take before-and-after measurements with NetSpot. In Inspector Mode, check signal strength (RSSI), channel overlap, and interference. In Survey Mode, build a heatmap of your coverage. In Active Test mode, measure download/upload speeds and latency in your most used areas.
