Wi-Fi Site Surveys, Analysis, Troubleshooting runs on a MacBook (macOS 11+) or any laptop (Windows 7/8/10/11) with a standard 802.11be/ax/ac/n/g/a/b wireless network adapter. Read more about the 802.11be support here.
How to Set Up WiFi Network at Home
Today your home internet should work everywhere you need it — on phones, laptops, TVs, and smart devices — without the hassle of cables. Below is a step-by-step home Wi-Fi deployment guide WITH UP-TO-DATE 2026 SECURITY AND CONFIGURATION BEST PRACTICES.
In this article, we will teach you how to set up Wi-Fi at home so you can say goodbye to cables and enjoy online content from anywhere.
Jump to...
What Do I Need to Set Up Wi-Fi?
To set up WiFi at home, you need two things: a working internet connection (fiber, cable, or DSL) and Wi‑Fi equipment.
Most internet providers give you a modem-router combo, but if it’s just a modem, you’ll need to connect a Wi‑Fi router yourself. For larger homes or spaces with multiple floors, a mesh system is the best way to keep your signal strong in every room.
When buying Wi‑Fi gear in 2026, look for support for modern standards. Wi‑Fi 6 and 6E are great for improving speed and stability. Wi‑Fi 7 (802.11be) is the newest and fastest option — it adds the 6 GHz band for less interference and smoother performance. If you're setting up a new network, Wi‑Fi 6 is the minimum you should aim for, and Wi‑Fi 7 is the most future-proof choice.
Set Up Your Internet and Router
There are many different types of wireless routers, from inexpensive home routers designed for casual use to feature-packed gaming routers with multiple antennas and state-of-the-art technologies. The good news is that the WiFi setup process is virtually always the same.
Step 1
Connect modem ↔ router. Unplug the modem’s power, connect the router’s WAN/Internet port to the modem with an Ethernet cable, then power both back on. Wait for the router’s Internet light to go solid.
Step 2

Log into the router. In a browser, enter the router’s default IP address (commonly 192.168.0.1 / 192.168.1.1 and 192.168.2.1).
Use the admin credentials from the label or manual and create your own strong admin password.
Step 3
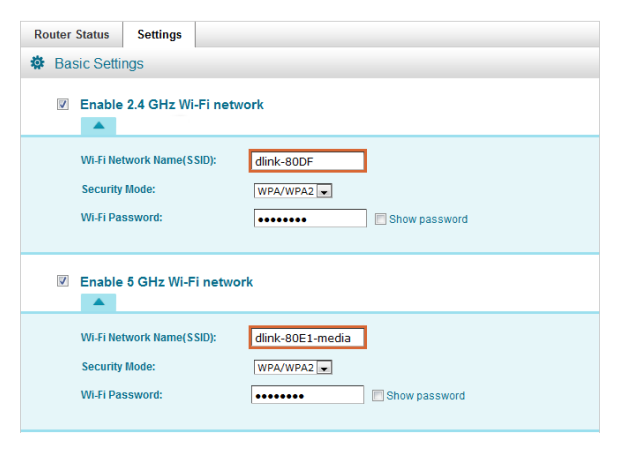
Name and secure the Wi‑Fi. Use WPA3‑Personal if your router and devices support it; if not, use WPA2‑Personal (AES). Avoid WEP and mixed TKIP modes. Pick a unique SSID and a long passphrase.
Many modern routers also allow you to set up a separate guest network — this is a handy feature that gives visitors internet access without letting them see your printers, files or other home devices.
Optional: leave WPS off for better security; use the mobile app or a QR code to join devices instead.
Step 4
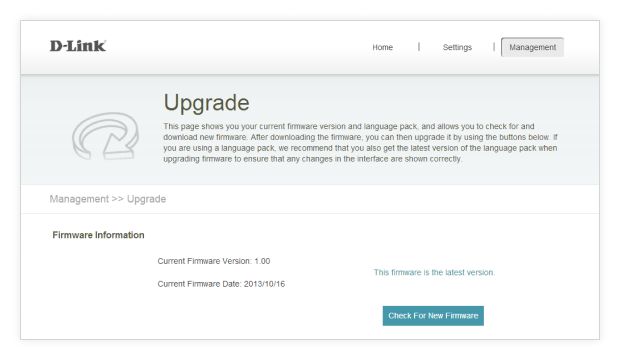
Update firmware. In the router UI or app, install the latest firmware for security fixes and performance improvements.
Where Should I Place My WiFi Router (or Mesh Nodes)?
Besides proper how to set up WiFi, the success of your Wi-Fi network also depends on where you place the equipment. Even the fastest router won’t perform well if it’s hidden in a corner or blocked by obstacles. As a general rule, position your wireless router as close to the center of your home as possible so the signal can spread evenly in all directions.
It’s just as important to keep the router away from thick walls, heavy furniture, or large electronic devices like microwaves and TVs, which can cause interference and weaken your connection.

If you’re using mesh, put nodes one or two rooms apart with line‑of‑sight where possible; avoid stacking them in the same room.
For large homes with dozens of devices (smartphones, tablets, smart home devices, and laptops all at once), it's also important to consider network capacity — that is, its ability to properly serve everyone without slowdowns or overloads. This also needs to be taken into account.
Check and Optimize Wi-Fi Coverage
Now that your router is configured and optimally placed, the next step is to verify how well your Wi-Fi signal actually covers your home — and make any necessary adjustments.
Open NetSpot → switch to Inspector to check real-time data. In this mode, you can see your network’s live parameters in several ways:
- In the table, pay attention to the “Graph” column — this shows your signal strength (RSSI, dBm), which helps you understand how stable your connection is.

- −30 dBm to −50 dBm — Excellent: very strong signal, ideal for any activity including video conferencing and streaming.
- −51 dBm to −65 dBm — Good: stable connection, suitable for most online tasks.
- −66 dBm to −75 dBm — Fair: may work for browsing or messaging, but expect slowdowns.
- −76 dBm to −90 dBm — Poor: connection is weak and unreliable, likely to drop frequently.
Here’s how to interpret the signal levels:
The closer the value is to 0 (in negative dBm), the better your signal.
- On the Signal Strength graph, you can track how the signal fluctuates over time — a steady line means a stable connection, while frequent drops indicate weak spots or interference.

- The Channel graphs display how crowded each channel is. Here you can see if your network overlaps with neighbors and whether switching to another channel could reduce interference.

By combining these views, Inspector mode gives you a coplete picture of your WiFi quality in real time, making it easy to spot problems and optimize your setup.
In Survey mode, you can go further and evaluate your Wi-Fi coverage visually. NetSpot builds detailed Wi-Fi heatmaps that show where your signal is strong, weak, or lost completely. This makes it easy to spot dead zones, areas with noise, or places where interference from neighbors affects performance.

If your signal-to-noise ratio is poor, there are a few things you can do to improve it. You can switch to a different WiFi channel to minimize interference caused by other WiFi networks in your area.
If your router supports it, try moving from the 2.4 GHz band to 5 GHz for faster speeds, or even to 6 GHz (Wi-Fi 6E/7) for the cleanest spectrum and highest throughput. Just keep in mind: 2.4 GHz covers longer distances but is slower, 5 GHz is faster but has shorter range, and 6 GHz works best in open spaces and shorter distances.
At this stage, it’s also important to remember that Wi-Fi performance doesn’t exist in isolation. The wired side of your network — cabling quality, switches, and how access points are connected — directly affects what your wireless setup can deliver in practice. Even a well-tuned Wi-Fi configuration can be limited by weak underlying connections.
In Planning mode, you can take it one step ahead. Here NetSpot lets you create a virtual model of your home or office, test different router or access point placements, and even simulate various hardware options.

With predictive heatmaps, you can see in advance how changes will affect coverage and performance — helping you choose the right equipment and the best spot for it before you spend money.
If you're considering a more comprehensive wireless infrastructure — multiple access points, wired backhaul, or centralized management — that's the next level for truly large or complex spaces.
Deploying Wi-Fi at events (weddings, conferences, festivals) is a whole other topic with its own complexities due to the large number of people involved and the temporary nature of the network.
Conclusion
With a professional app for wireless site surveys, WiFi check, WiFi analysis, and troubleshooting on macOS and Windows such as NetSpot, setting up a WiFi network is effortless. NetSpot can help you optimize your WiFi for best performance to ensure that you can enjoy fast internet access from all your devices regardless of where you are. Visit NetSpot’s official website and download it for free right now.
SO, WE RECOMMEND

NetSpot
Wi-Fi Setup — FAQs
How do I set up a strong and secure Wi-Fi network at home?
The first step is to set your router in a central location, enabling WPA3 encryption, using a strong admin password, and updating firmware regularly. Use a Wireless analyzer like NetSpot to find weak spots and interference.
Optimizing a home network can also vary depending on your specific floor plan and device count. Join the forum discussion on choosing and setting up home WiFi.
Sharing your experience or asking a specific question there can help you fine-tune your setup with tips from fellow users.
What’s the difference between Wi-Fi 5, Wi-Fi 6, and Wi-Fi 6E?
Wi-Fi 5 (802.11ac) is older and supports 5 GHz; Wi-Fi 6 adds faster speeds and efficiency; Wi-Fi 6E introduces 6 GHz for cleaner, high-speed connections. Wi-Fi 7 is the newest, with improved performance and lower latency.
Should I upgrade to a mesh Wi-Fi system or use a Wi-Fi extender?
Mesh systems are better for seamless whole-home coverage and multiple floors. Wi-Fi extenders are cheaper but often reduce speed and don’t support roaming between zones.
What’s the best channel for my Wi-Fi router?
For 2.4 GHz, use channels 1, 6, or 11 to avoid overlap. For 5 GHz and 6 GHz, use NetSpot to scan your area and pick the least congested channel.
Join the discussion on our forum about how to pick a Wi-Fi channel to get personalized tips and connect with other users if you are unsure which channel is right for your network setup.
Get NetSpot for Free
Wi-Fi Site Surveys, Analysis, Troubleshooting runs on a MacBook (macOS 11+) or any laptop (Windows 7/8/10/11) with a standard 802.11be/ax/ac/n/g/a/b wireless network adapter. Read more about the 802.11be support here.