Wi-Fi Site Surveys, Analysis, Troubleshooting runs on a MacBook (macOS 11+) or any laptop (Windows 7/8/10/11) with a standard 802.11be/ax/ac/n/g/a/b wireless network adapter. Read more about the 802.11be support here.
How to Get Wi‑Fi at Home — Step‑by‑Step Guide
Want reliable home Wi-Fi fast? Learn how to get WiFi at home — pick the right gear, place it properly, secure and optimize in the easiest and most cost-efficient way.
If you’re wondering how to get Wi-Fi at home, this guide walks you through every step — from choosing the right equipment to optimizing your network — so you can enjoy fast, reliable signal throughout your space.
Jump to...
What Should I Consider Before Deploying a WiFi Network at Home?
Setting up a home WiFi network requires more than just plugging in a WiFi router, but the process is still straightforward enough that you don’t need to be intimidated by it.
That’s why before you purchase a WiFi router, there are a few things you need to consider to design the best WiFi for home:
- ISP availability & installation: Check which providers serve your address and what access type they offer — fiber, cable, 5G Home, or DSL. Fiber delivers the best stability and lowest latency; cable reaches high peak speeds but can slow during neighborhood congestion; 5G Home fits where wiring is limited; DSL is a last-resort option. Confirm whether self-install is allowed or a technician visit is required, and allow time for activation and any new line work (ONT/coax drop).
- Home layout: Make sure you know how much floor space you want to cover with a WiFi signal and what materials your walls are made of. Will it be possible to place the WiFi router right in the middle of your home so that it’s an equal distance away from each device, or will it be tucked away in a corner? Depending on the size of your home and its layout, you may have to purchase a high-end WiFi router or invest in a mesh WiFi system or additional access points with Ethernet backhaul to get good coverage. If you have the ability to run Ethernet between nodes, choose a mesh with a wired backhaul — this will maintain speed and reduce latency compared to a wireless repeater.
- Connected devices: How many devices do you want to connect to the internet via WiFi now and in the near future? If it’s just your laptop and smartphone, you can probably get away with a budget WiFi router with limited bandwidth. But busy households that stream 4K/8K, play online games, and make calls at the same time will benefit from a Wi‑Fi 6E/7 router and an ISP plan that matches demand. For a smart home, it makes sense to allocate a separate guest/IoT network at 2.4 GHz with WPA3 or WPA2/WPA3 mixed and client isolation.
- Special features: Just because you have only one WiFi device for home right now doesn’t mean that you won’t have 10 WiFi devices in just a few years. Homes are constantly becoming smarter and more connected, and it makes sense to select a WiFi router that supports the latest wireless technologies, such as WiFi 6 or WiFi 7.
How to get WiFi at home: a quick start
Deploying WiFi for home typically takes around 30 minutes.
Step 1
Check availability and choose the right internet plan
Start by confirming which internet technologies (fiber, cable, DSL, fixed wireless, 5G home internet) are actually available at your address. If you already have a wired internet connection at home, you can skip this step. If not, you need to select the best ISP in your area. Compare plans by sustained download/upload speeds, monthly data policies, latency, and total monthly cost (including modem/router rental if any).
Pick a plan that matches your household’s real usage: more simultaneous 4K streams, video calls, cloud backups, or gaming sessions require higher throughput and lower latency. If fiber is on the table, it’s typically the most stable and future‑proof.
If the provider imposes a gateway rental, clarify the monthly fee and the possibility of transferring the device to bridge/passthrough to use your own router. If a technician visits you, clarify in advance where the entry point (ONT/coaxial socket) will be in order to plan a convenient placement of the router and Ethernet wiring.
Step 2
Choose equipment that fits your home
A home connection typically needs a modem/ONT (terminates your ISP link) and a router (creates your local network and Wi‑Fi). Some ISPs supply an all‑in‑one gateway. Note: sometimes you won’t be able to select your modem/ONT because it’s provided by your ISP; you can still use your own router behind it (bridge or passthrough mode, where supported).
If your home is larger or has concrete/brick walls, plan for mesh Wi‑Fi or wired access points from the start.
Not sure how to get Wi‑Fi at home in an old building or with a tricky ISP gateway? Use bridge/passthrough where possible and plan mesh nodes with wired backhaul to cover hard-to-reach rooms.
What to look for in 2026:
- Wi‑Fi 6E or Wi‑Fi 7 radios for access to the 6 GHz band (cleaner spectrum, lower latency).
- WPA3 security. Use WPA2/WPA3 mixed mode only for legacy devices.
- EasyMesh or vendor mesh support for seamless expansion.
- 2.5G/10G Ethernet if you have (or expect) multi‑gig internet.
Step 3
Place your router for coverage, not convenience
Wi‑Fi loves open space. Put the router or primary mesh node in a central, elevated, open location — away from metal cabinets, thick masonry, aquariums, and microwaves. Avoid closets and corners. If the ISP drop is in a sub‑optimal spot, use a longer Ethernet run to relocate the router, or position additional mesh nodes in line‑of‑sight between problem rooms.
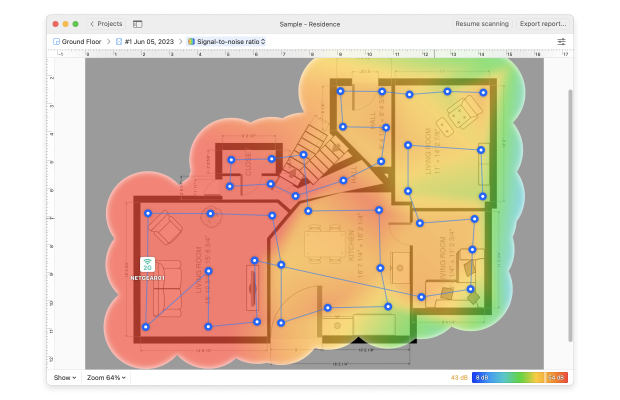
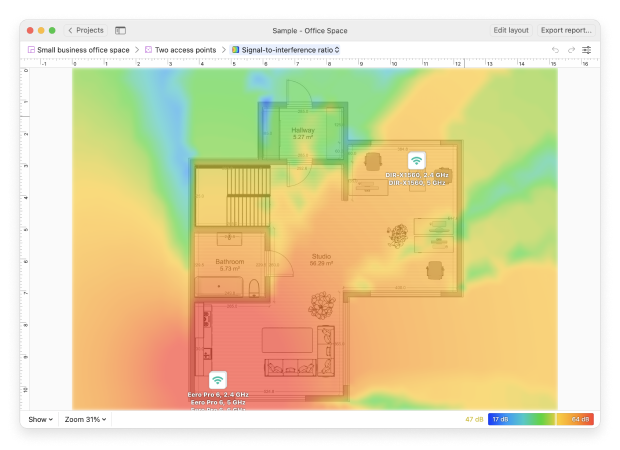
Expert tip: Already have Wi‑Fi? Then Use Survey Mode: walk your space and generate Wi‑Fi heatmaps like Signal Level or Frequency Band Coverage to pinpoint coverage gaps, interference zones, and weak spots. This gives you a visual, data-driven way to optimize placement and eliminate dead zones without guesswork.
Planning your Wi‑Fi from scratch? Use NetSpot WiFi planner to test router and access point placement virtually on your floor plan — before you buy anything.
Step 4
Power up and connect
Assuming you’ve already purchased a suitable WiFi router, it’s time to plug it into your internet modem. If you’re self‑installing, you’ll need an Ethernet cable, and you should be able to find at least one inside the box in which your router came in.
Look for a port labeled WAN or Internet on your modem’s rear side and plug one end of the Ethernet cable into it. Now, look for a corresponding port on your WiFi router’s rear side and plug the other end of the Ethernet cable into it.
Turn on both your modem and your router. Both devices should have LED indicator lights indicating their status.
If your connection requires a technician (new fiber drop, fresh coax run, or line remediation), schedule the visit first, then proceed with your Wi‑Fi setup.
Step 5
Configure Wi‑Fi correctly (once)
Now it’s time to configure your router (your modem is already pre-configured to work with your ISP). Grab another Ethernet cable and connect one end to any empty Ethernet port on your router’s rear side and the other end to your laptop or PC.
Launch a web browser on your laptop or PC and enter 192.168.1.1 or a similar address (look inside your router’s documentation if you’re not sure what the address is) to enter the router’s admin panel.
It’s very likely that you’ll be presented with a login screen asking you for the admin username and password. Often, the defaults are “admin” and “admin.” If that doesn’t work, look for an information sticker on the bottom or back of your router.
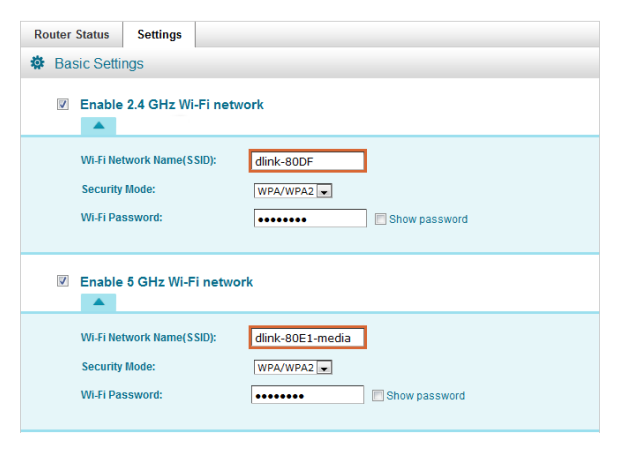
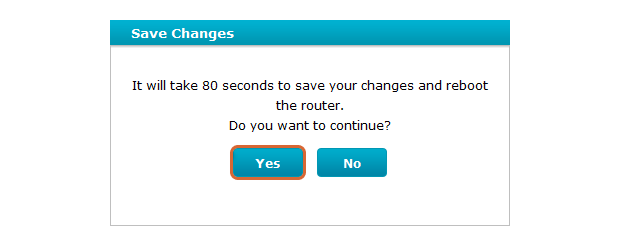
Once you’re in your router’s admin panel, you can modify and change all settings. Look for a section titled “Wireless” or “WiFi.” From this section, you can create a new WiFi network and specify its name in the SSID field. Select a unique name that’s easy to remember and make sure it doesn’t contain any identifiable information.
Most routers support multiple security modes. Use WPA3‑Personal if your router and clients support it; otherwise choose WPA2‑AES. Set a long, strong passphrase. Enable automatic firmware updates where available. When you’re already setting up SSIDs and security, it makes sense to think about a separate guest network as well. If your router supports a Guest network, turn it on for visitors and smart‑home devices that don’t need access to your laptops and NAS.
A dedicated Guest WiFi network is not just about convenience for visitors — it helps isolate unknown devices and prevents them from interfering with your main network.
In practice, guest traffic also affects WiFi capacity. Even a few additional phones, TVs, or smart devices can noticeably change how much airtime is left for your primary devices, especially during peak hours. And once you start adding extra access points or mesh nodes, the role of the underlying wireless infrastructure becomes obvious — weak backhaul links or overloaded switches will limit performance long before any WiFi setting does.
Step 6
Connect All Devices to the New Network
With your new WiFi network up and running, you can connect all devices to it. The process will differ from device to device, but it always boils down to selecting the right network name and typing in your WiFi password.
Join phones, laptops, TVs, consoles, and IoT devices to your new SSID with the passphrase you set. If your router offers both 2.4 and 5/6 GHz bands under one name (band steering), let devices choose automatically at first.
Of course, you may still want to connect some devices via an Ethernet cable simply because they’re close to the router and always stay in one place. You don’t have to enter any password for wired internet connections.
Walk through the home and check the signal and throughput in rooms where you actually use WiFi. If you see dead zones or unstable throughput, jump to optimization.
How to Optimize Wi-Fi at Home with NetSpot?
NetSpot is a software tool for wireless network assessments, and you can use it visualize your WiFi network and discover all areas of signal weakness, also known as dead spots. NetSpot runs on macOS 11+ or any laptop with Windows 7/8/10/11, and it works with any 802.11 network.

The application includes three key modes: Inspector (quickly audit nearby WiFi networks, their SSIDs, security settings, channels, and signal strength in real time), Survey (create detailed coverage and quality heatmaps) and Planning (model access point locations before purchasing).
For home optimization, start with the Signal Level and Frequency Band Coverage heatmaps to see which rooms are actually sagging, then look at Signal-to-Interference Ratio (SIR) and Signal-to-Noise Ratio to see if the problem is channel congestion or noise.

After spending several weeks with NetSpot, we find that it’s definitely worth the cost for the network performance gains you’ll see. Patrick Hearn • help desk gee
To achieve the best WiFi performance, you should configure your router to broadcast on the least used channel (preferably one that doesn’t overlap with any adjacent channels).
NetSpot is a professional tool designed with beginners in mind. Its modern user interface makes it easy to figure out all of its features and use them to visualize, manage, troubleshoot, audit, plan, and deploy wireless networks.
Conclusion
Getting Wi‑Fi at home is a sequence, not a gamble. Confirm what you can buy, select capable hardware, place it where the radio works in your favor, and lock it down with modern security.
From there, optimize instead of guessing. Small changes in placement and channel width can stabilize a flaky room without spending extra. If coverage still isn’t uniform, add mesh nodes strategically rather than stacking repeaters.
Measure as you go. Use NetSpot WiFi checker to visualize signal, noise, and overlap, and you’ll know exactly when you’ve turned a frustrating network into a stable one that keeps up with how you live today — and tomorrow.
SO, WE RECOMMEND

NetSpot
FAQs
Do I need a separate modem and router, or is a gateway fine?
A single gateway is simpler; a dedicated router usually delivers stronger radios, richer features, and easier upgrades. If coverage is challenging, a router with mesh support gives you more headroom.
Where should I place the router for the best results?
Open, central, elevated, and away from obstructions and interference sources. If the ISP hand‑off is in a poor location, run Ethernet so the router can sit where it helps the most.
How to get Wi‑Fi at home without a technician?
Most ISPs support self-install kits; confirm your access type (fiber/cable/5G Home/DSL), then follow the steps in this guide — activation, router setup, and a quick NetSpot walk test — to finish in under an hour.
Is Wi‑Fi 6E/7 worth it right now?
If you own devices that support 6 GHz — or you plan to keep your router for several years — yes. 6 GHz is clean today and enables high, consistent throughput at short to medium range. Otherwise, a strong Wi‑Fi 6 router is still a big upgrade over older gear.
How long does a self‑install typically take?
With the equipment on hand, basic activation, cabling, and Wi‑Fi setup can be completed in under an hour. New drops or line work require a technician.
Should I use an extender or a mesh system?
Extenders repeat on the same band and often slash throughput. A mesh kit uses multiple nodes to move traffic more efficiently and hand off clients cleanly, which generally translates to higher speeds and fewer drops across the home.
Get NetSpot for Free
Wi-Fi Site Surveys, Analysis, Troubleshooting runs on a MacBook (macOS 11+) or any laptop (Windows 7/8/10/11) with a standard 802.11be/ax/ac/n/g/a/b wireless network adapter. Read more about the 802.11be support here.