Wi-Fi Site Surveys, Analysis, Troubleshooting runs on a MacBook (macOS 11+) or any laptop (Windows 7/8/10/11) with a standard 802.11be/ax/ac/n/g/a/b wireless network adapter. Read more about the 802.11be support here.
Best Apps to Measure WiFi Signal Strength for Mac
Being equipped with the right tools to check WiFi signal strength on Mac empowers you to easily troubleshoot common wireless issues to improve your online experience, and this article describes the best tools currently available, including the NetSpot WiFi signal strength app for Mac.
A stable and strong WiFi connection is essential for productivity, entertainment, and communication. However, wireless networks can be unpredictable, and WiFi signal strength often varies across different locations. Fortunately, there are many apps that Mac users can use to measure WiFi signal strength before using the gathered information to optimize their network setup and improve their overall online experience.
Jump to...
In What Cases Do You Need to Measure Wi-Fi Signal Strength?
The good news is that there are now tools for both Mac and Windows computers that can help you do something about it.
Here are some of the most important influencers of WiFi strength and introduces NetSpot, along with a couple of alternatives, as the best WiFi signal strength app for Mac users.
There are three main reasons to measure WiFi signal strength:
- You want to optimize the performance of your WiFi network.
- You want to purchase a new WiFi router and want to confirm that it’s really time to replace your current router.
- You’ve recently purchased a new WiFi router and want to check WiFi signal strength to see whether it was a good purchase.
In all three cases, you want to not only know how fast your maximum download and upload speed is but also see where the WiFi signal is the strongest and where it is the weakest. Instead of spending a lot of money on a high-end wireless router, you may find out that you just need to move your existing router elsewhere to fix all your connectivity issues.
You may also find out that the expensive router you’ve purchased, expecting it to perform far better than your previous router, is actually not much better.
What Influences Wi-Fi Strength?
Before you measure your WiFi signal strength using a WiFi signal strength app, you should understand what influences WiFi signal strength so you know how to interpret the data generated by the app.
- Distance: The most obvious influencer of WiFi strength is distance. The farther away you are from a wireless router, the weaker the signal becomes. Wireless routers with an internal antenna tend to have a weak signal compared to routers with an external antenna. Some routers even support multiple antennas, which can sometimes be independently positioned for optimal coverage or removed and replaced with stronger antennas.

- Physical obstacles: Physical obstacles such as walls and furniture are the enemies of a strong WiFi signal. The thicker and less penetrable the obstacle, the greater the impact on the strength of your signal. While some obstacles can be easily avoided with some planning and preparation, other obstacles are immovable.

- Other wireless networks: Imagine that your wireless router is a teenager who loudly and perhaps slightly obnoxiously talks with another teenager, the WiFi module in your laptop or smartphone. When there’s just the two of them, they can hear each other loud and clear. But when you have a whole room full of loud teenagers, pandemonium breaks out. If you live in the city, the chances are that there are dozens and dozens of wireless networks in your vicinity, all broadcasting with all their might and negatively affecting everyone else’s download and upload speeds.
- Network load: Even the best WiFi router won’t help you overcome the limits of your Internet connection. If your ISP offers poor speeds and horrible latency, you can optimize your wireless network as much as you want, but it will never be perfect. That said, a well-optimized wireless network can make even a subpar Internet connection more bearable, sometimes even satisfactory.
Top 6 Best WiFi Signal Strength Meter Apps for Mac
When looking for the best WiFi signal strength meter app for Mac, it's important to consider factors such as ease of use, features, and accuracy. Some apps offer basic functionality for checking WiFi strength, while others provide more advanced tools for in-depth network analysis and troubleshooting.
To help you find the right tool for your needs, we've compiled a list of the top 6 best WiFi signal strength meter apps for Mac. Whether you want to simply check WiFi signal strength on your Mac or perform a detailed WiFi strength test , one of these apps is sure to meet your requirements.
- NetSpot — a popular WiFi analysis, site survey, and visualization app for macOS and Windows. It offers comprehensive features including Inspector, Survey, and Planning mode
- WiFi Explorer — a polished app designed to help both professionals and regular home users test WiFi signal strength.
- AirRadar — offers detailed WiFi network information and GPS-aided access point location estimates. It's known for its customizable alerts and ability to save favorite networks.
- WiFi Scanner — provides comprehensive information about nearby wireless networks and includes additional features like an IP scanner for detecting unknown devices.
- Apple's Wireless Diagnostic Tool — a built-in utility for Mac users that offers basic WiFi analysis and troubleshooting capabilities. It's free and pre-installed on all recent versions of macOS.
- KisMac2 — this free and open source tool for macOS is a continuation of the original KisMac.
Choice #1
NetSpot is a popular WiFi analysis, site survey, and visualization app for macOS and Windows. With the recent release of NetSpot 3.0, it has become an even more powerful tool for measuring WiFi signal strength on Mac thanks to the newly introduced ability to plan wireless networks.
-

Inspector Mode
Gives you real-time insights into the WiFi networks around you.
-

Survey Mode
Provides a comprehensive, map-based analysis of your WiFi network's performance.
-

Planning Mode
Enables you to simulate and plan your WiFi network's layout and coverage.

NetSpot is the best app to check WiFi signal strength on Mac with because it offers an entire collection of powerful features in a very user-friendly package that even regular Mac users can master in no time.
With the Inspector mode, you can quickly get an overview of all detectable wireless networks, including hidden ones. This feature is excellent for those looking to check WiFi signal strength on Mac or find the best channel for their network.

The Survey mode creates visual wireless coverage maps, highlighting areas of weak signal. This is particularly useful for measuring WiFi signal strength across your entire space and identifying dead zones.

Finally, with the Planning mode you can run accurate WiFi network simulations directly from NetSpot's user-friendly interface. The WiFi signal strength Mac app contains a comprehensive database of popular access points, so you can simply pick your equipment from a list and place them on your virtual floor plan to see how everything will likely perform once deployed.

By combining the power of its Inspector, Survey, and Planning modes, NetSpot offers a comprehensive solution for anyone looking to check WiFi signal strength on Mac, measure WiFi performance, or design optimal wireless networks.
For those interested in measuring WiFi signal strength on Android devices, NetSpot also offers an Android version, which is one of the best apps to measure WiFi signal strength on Android.
Pros and Cons
-
Modern, intuitive user interface
-
Three comprehensive analysis modes
-
Basic features offered for free
-
Additional features unlocked with a one-time purchase
-
Cross-platform compatibility (Mac, Windows, and Android)
-
None
- Summary recommendation: Get NetSpot
Choice #2

WiFi Explorer
Available for macOS 10.14.6 or later
Pricing: $19.99 (free trial available)
WiFi Explorer is a polished app whose purpose is to help professionals and regular home users alike test WiFi signal strength. Measuring WiFi signal strength with WiFi explorer is easy because the app does all the heavy lifting and provides full insight into WiFi networks with its intuitive user interface.
Besides simple WiFi signal tests, WiFi explorer can also find best channels, determine a more suitable router placement, identify conflicts with overlapping networks, and more.

Even though the basic version of WiFi explorer can do a lot, it offers nowhere near as many features as WiFi Explorer Pro. For example, the basic version doesn’t support passive scanning, and it also can’t organize networks by name or access point.
Pros and Cons
-
Intuitive user interface
-
Extensive filtering options
-
Ability to decode network information
-
Doesn’t support passive scanning
Choice #3
AirRadar
Available for macOS 10.15 (Catalina) or later
Pricing: from $1.33 (free trial available)
AirRadar provides detailed information about nearby WiFi networks, including signal strength, channel allocation, encryption type, and more. The feature this WiFi measuring app is probably the most known for is its ability to create GPS-aided access point location estimates — useful for mapping out WiFi coverage in larger areas.

The app also offers customizable alerts to notify you when new hotspots appear, and it allows you to save and personalize your favorite networks with colors and notes. Just like NetSpot, AirRadar has an intuitive user interface that makes it easy to visualize signal graphs and perform channel analysis.
Pros and Cons
-
GPS integration for mapping network locations
-
Customizable alerts for new networks
-
Detailed signal graphs and channel analysis
-
Support for all modern WiFi standards (802.11a/b/g/n/ac)
-
Subscription-based pricing model may not appeal to all users
Choice #4

WiFi Scanner
Available for macOS 10.9 or later
Pricing: $94.99
WiFi Scanner can provide just about any information about nearby wireless networks, including network name (SSID), signal strength (RSSI), MAC address (BSSID), channel, maximum data rate, and encryption settings. Unfortunately, the app certainly doesn't provide this information for cheap because it costs $94.99 and there's no free trial version that you can download before making a purchase.

Still, we think the WiFi scanner app is one of the best options available because it comes with several extra features that makes its steep price a bit easier to swallow. For example, WiFi Scanner also includes an IP scanner function, allowing users to detect unknown devices connected to their network, which is handy for identifying potential security risks.
Pros and Cons
-
Built-in speed testing functionality
-
IP scanner for detecting unknown devices on the network
-
Ability to export results and generate reports
-
Customizable filters for detected network
-
Very expensive compared to other WiFi analysis tools
-
May have a steeper learning curve for casual users
Choice #5
Apple's Wireless Diagnostic Tool
Included in all recent versions of macOS
Pricing: Completely free
Apple's Wireless Diagnostic Tool is a built-in utility for Mac users that provides basic WiFi analysis and troubleshooting capabilities. This free tool, included in all recent versions of macOS, can be accessed by holding the Option key and clicking on the WiFi icon in the menu bar, then selecting "Open Wireless Diagnostics".

The biggest downside of the built-in WiFi signal strength app in macOS is the fact that it's not nearly as feature-rich as the above-recommended options. That said, it can still perform a variety of tasks, including scanning for WiFi networks, monitoring your wireless connection, and generating diagnostic reports, so you should definitely consider it — it's just a few clicks away, after all.
Pros and Cons
-
Completely free and pre-installed on Mac systems
-
Easy to access and use
-
Provides basic WiFi network information and diagnostics
-
Can generate detailed logs for advanced troubleshooting
-
No need to download or install additional software
-
Limited features compared to third-party WiFi analysis tools
-
User interface is not as intuitive as some dedicated WiFi apps
-
Lacks advanced visualization tools like heatmaps
Choice #6

KisMac2
Available for macOS
This free and open source tool for macOS is a continuation of the original KisMac, which was a highly capable wireless network discovery tool for Mac with a wide range of features, most of which were appealing primarily to advanced users and professional networking experts.

KisMac2 features a new and polished user interface that makes it accessible to more types of users than ever before, yet it supports all the features that made the original KisMac so popular, such as the ability to reveal hidden SSIDs, area maps of network coverage, and the support for AppleScript. Of course, KisMac2 also has an accurate WiFi strength test functionality and many other features that home users and networking professionals alike can appreciate.
Pros and Cons
-
Open-source
-
Supports several third-party PCMCIA cards
-
Redesigned user interface
-
Lives up to the original
-
Lacks more advanced features
Best Methods to Check WiFi Signal Strength on Mac
There’s more than one method for measuring WiFi signal strength on Mac, and each method has its own advantages and disadvantages. Knowing multiple methods can help you address different situations in the best way possible. Let’s discuss the ones you should definitely know about.
Method 1: WiFi Menu Bar Icon
You probably already know that you can check which WiFi network you’re connected to by clicking the WiFi icon in the menu bar. What you may not know is that the humble WiFi icon can display a lot more information than it may seem at first, including detailed WiFi strength data. Here’s what you need to do:
- Hold the Option key on your keyboard.
- Click the WiFi icon in the menu bar.
- Look at the RSSI value (what is RSSI level?).

An RSSI value of -55 should be good enough for most users and online activities, and the higher this value is (closer to zero), the better. For example, my router is located right next to my Mac, and my RSSI value currently sits at -27, which is excellent.
Method 2: Test WiFi Strength Using Mac Terminal
In some situations, it’s useful to know how to test WiFi straight using Mac Terminal. Why? Because then you troubleshoot WiFi performance issues even without a graphical user interface, such as when connected to a remote machine over SSH. To measure WiFi signal strength in Mac Terminal, you need a command-line tool like AirPort.
- Install Homebrew on your Mac.
- Add the repository where AirPort is available by entering the following command in Terminal: brew tap xwmx/taps.
- Install AirPort using Homebrew: brew install airport.
- Use AirPort to check WiFi signal strength Mac: airport info -l .
Method 3: WiFi Signal Strength Test Mac Apps
In addition to fairly featureless native system features and clunky command-line tools, there are also third-party WiFi signal strength test Mac apps like NetSpot, which enables even regular home users to gain a deep understanding of their WiFi environment.
To check Mac WiFi signal strength using NetSpot’s Inspector mode:
Step 1
Download and install NetSpot on your Mac from the official website.
Step 2
Give NetSpot a moment to scan and collect information about available WiFi networks.
Step 3
Once the scan is complete, you’ll see a list of nearby networks with detailed information.
Step 4
Look at the “Level” column to check the WiFi signal strength for each network. The closer to 0 dBm, the stronger the signal.
Step 5
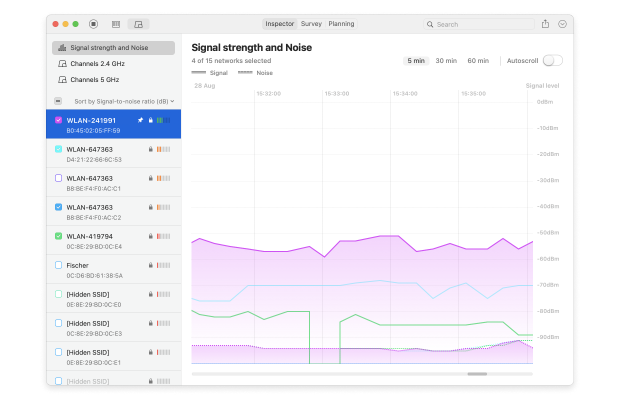
For a more visual representation, you can click the “Signal level and noise graphs” button in the top-left corner to see real-time signal strength an noise graphs.
As effective as the Inspector mode is at providing a quick overview of your WiFi environment, it's not nearly as powerful at uncovering dead zones or areas of weak coverage as NetSpot's Survey mode, which allows for a comprehensive analysis of your entire space, revealing detailed insights about your WiFi signal strength across different locations.
To use NetSpot’s Survey mode for measuring WiFi signal strength on your Mac:
Step 1
Switch to the “Survey” mode in NetSpot.
Step 2
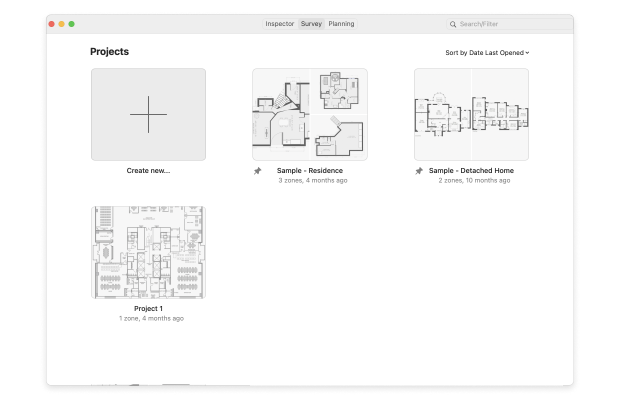
Create a new survey project by clicking “Start a new survey”.
Step 3
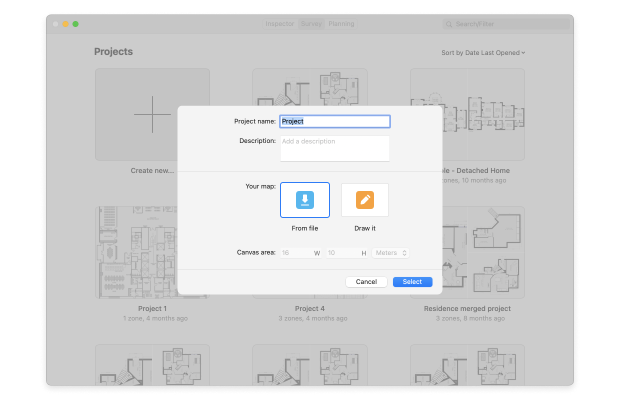
Upload a map of your area or draw one using NetSpot’s built-in tools.
Step 4

Calibrate the map by setting a known distance between two points.
Step 5
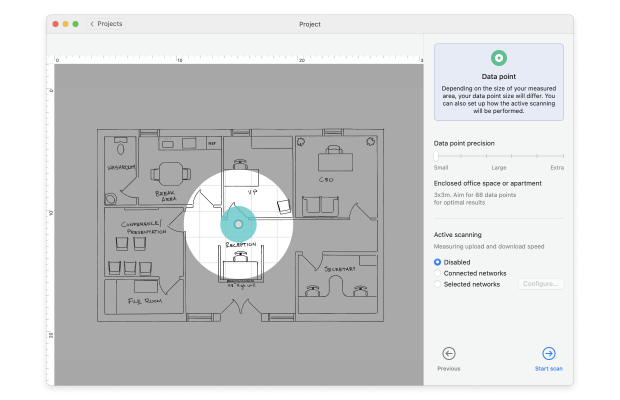
Begin the survey by clicking “Start Scan” and moving to different locations in your space.
Step 6
At each location, click on the corresponding spot on your map to take a measurement.
Step 7
Repeat this process until you’ve covered your entire area.
Step 8
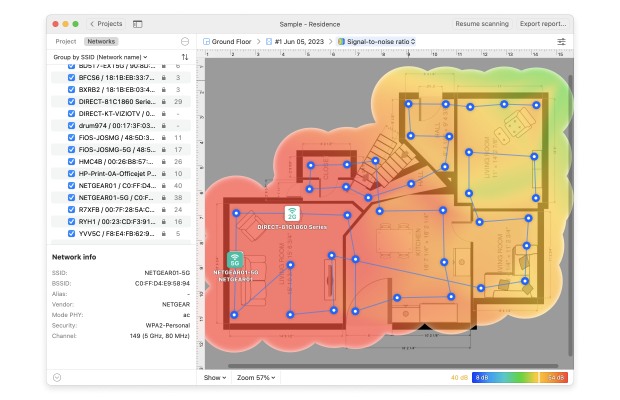
Once finished, NetSpot will generate detailed heatmaps showing WiFi signal strength throughout your space.
If you discover, for example, that you have good WiFi signal strength in all areas except for one room farthest away from your router, then you can move your router to a more central location or add a WiFi extender or another mesh network node.
With NetSpot, you can also check Windows WiFi signal strength and create interactive heat maps (learn how to check WiFi signal strength Windows 10).
What do Mac Wi-Fi Signal Strength Numbers Mean?
WiFi signal strength is commonly expressed using a value referred to as RSSI, which stands for received signal strength indicator.
This value is a measurement of the power present in a received radio signal, and it basically tells you how much signal strength has been lost from the time the signal left your WiFi router and until the signal reached your Mac.
Since you want to lose as much signal strength as possible, you also want to see small RSSI values (closer to zero, the better). Here are basic RSSI guidelines:
- -20 dBm: This is as good as it gets in the real world. Achieving a better signal strength would require laboratory conditions.
- -50 dBm: This is a good WiFi signal strength for most users, and achieving it should be difficult even in less than ideal conditions.
- -70 dBm: This is the lowest acceptable signal strength value. Anything lower than -70 dBm, and your online experience is guaranteed to be miserable.
Of course, knowing what is a good WiFi signal strength is only one half of the battle. You also need to know how to improve WiFi signal, and we explain just that in the next chapter of this article.
How to Increase Wi-Fi Signal Strength
Now that you know how to check WiFi signal strength with the best WiFi signal strength apps, it’s time we explain how you can use the information provided by them to make your wireless network perform better.
Step 1
Optimize the placement of your router
You want to place your router away from sources of radio frequency interference, which include other wireless transmitters, toaster ovens, baby monitors, and even wireless doorbells. Try to find a place that provides an even coverage of your entire living or office space.
Step 2

Switch to a more suitable channel
When driving your car, you naturally move to an empty lane when you approach a slow vehicle to prevent it from slowing you down. Likewise, you need to configure your router to use the least busy WiFi channel available otherwise other people’s traffic might slow you down.
Step 3

Set up a WiFi range extender
You can achieve a lot by optimizing the placement of your router, but sometimes it’s easier to leave the router where it is and set up a WiFi range extender to eliminate an annoying signal dead zone. When setting it up, you want to check WiFi signal strength and place the extender well within the range of your router so it has a good signal to retransmit.
Step 4

Update your router or get a new one
You might be surprised just how much WiFi routers have evolved in the last few years alone. Sometimes, manufacturers introduce support for new wireless standards via updates, but there’s only so much a software update can do. If your budget allows it, don’t hesitate to buy a new router.
Step 5

Create a mesh network
A mesh network consists of multiple WiFi routers working together to cover a large area with a single network. While somewhat expensive to set up, a mesh network offers not only a fantastic WiFi signal strength but also great capacity and connection stability, making it a great choice for businesses and demanding home users alike.
Conclusion
With the best apps to measure WiFi strength on your Mac, you can quickly get to the bottom of your wireless woes even if you're just a regular user. For most, NetSpot is the best option to start with, but many alternatives exist, including Apple's built-in Wireless Diagnostic tool or third-party WiFi software like WiFi Explorer and AirRadar. Regardless of which tool you choose, regularly monitoring and optimizing your WiFi signal strength will help you maintain a reliable and fast wireless connection on your Mac.
SO, WE RECOMMEND

NetSpot
Wi-Fi Site Surveys, Analysis, Troubleshooting runs on a MacBook (macOS 11+) or any laptop (Windows 7/8/10/11) with a standard 802.11be/ax/ac/n/g/a/b wireless network adapter. Read more about the 802.11be support here.
FAQ
In What Cases Do I Need to Measure WiFi Signal Strength?
We can think of three main reasons to measure WiFi signal strength right away:
- This will allow you to optimize the WiFi network performance;
- It can help you make a decision to upgrade your old router;
- It will give you some insight on whether you chose a proper placement for your new router.
What Affect the WiFi Strength?
There are several factors that can affect the WiFi signal strength:
- Distance from the router plays a role of course. The farther away you are from it, the weaker the signal is.
- Physical obstacles like thick walls and furniture impact the strength of your signal.
- Surrounding wireless networks might be using the same channel as your WiFi.
- Network load can have a significant effect on your current WiFi strength and speed.
What Are the Best WiFi Signal Strength Meter Apps for Mac?
There are several excellent WiFi analysis solutions macOS users can choose from. Here are the top choices based on features, user ratings, and overall performance:
- NetSpot — a popular and comprehensive WiFi analysis, site survey, and visualization tool for desktop and mobile platforms. It offers three powerful modes: Inspector, Survey, and Planning.
- WiFi Explorer — a polished app designed to help both professionals and regular home users test WiFi signal strength. It provides detailed information about nearby networks.
- AirRadar — known for its GPS-aided access point location estimates and customizable alerts. It offers detailed WiFi network information and the ability to save favorite networks.
How do I check Wi-Fi signal strength on Mac?
You can easily check Wi-Fi strength on Mac using a WiFi analyzer app like NetSpot, which makes it easy to collect and interpret detailed information about surrounding Wi-Fi networks.
What is an acceptable Wi-Fi signal strength?
Most experts agree that an RSSI value of -55 is the lowest acceptable WiFi signal strength. Of course, the closer your RSSI value is to zero the better.
Is there an app to check WiFi signal strength?
Yes, you can use an app like NetSpot to easily check WiFi signal strength with a few simple clicks and without any expert knowledge required. You can learn how to check WiFi signal strength on Mac using NetSpot in this article.
Get NetSpot for Free
Wi-Fi Site Surveys, Analysis, Troubleshooting runs on a MacBook (macOS 11+) or any laptop (Windows 7/8/10/11) with a standard 802.11be/ax/ac/n/g/a/b wireless network adapter. Read more about the 802.11be support here.
NetSpot — the best WiFi signal strength app for Mac users