How to Recover Deleted Files from SD Card on Mac
Accidentally formatting the wrong SD card or deleting an important file doesn’t have to lead to permanent data loss. In this article, we explain several techniques and solutions that make it possible to recover files from an SD card.
Data loss can happen on any storage device, and SD cards are no exception. The good news is that deleted files can often be recovered if you notice the problem quickly. And in this article, we’ll show you how to recover deleted files from an SD card on a Mac and explain which recovery methods work best in different situations.
But before you do anything else, stop using the SD card. New photos, videos, or other files can overwrite deleted data and make recovery more difficult or even impossible.
Way #1: Recover Deleted Files from an SD Card Trash
Deleting the wrong files by accident on a Mac computer isn’t the end of the world it may seem to be at first. That’s because deleted files are first moved to the Trash folder, and they stay there until the Trash folder is emptied. Before that happens, you can recover them with ease! Here’s how:
- Click the Trash icon at the right-hand end of the Dock.
- Find your files and select them.
- Right-click any of the selected files and choose the Put Back option.

All files that have ever been deleted from the SD card should be located in the Bin folder on the SD card, and you can simply move them to any location you want to recover them.
Note: Files deleted from an SD card will remain available in the Trash until you empty the main system Trash. Once the Trash has been emptied, the files become permanently deleted and can typically be recovered only with SD card recovery software.
Way #2: Use SD Card Recovery Software
If your files are no longer in the Trash folder, they are considered permanently deleted. Fortunately, that does not always mean they are gone forever. In many cases, the files remain on the SD card until new data overwrites them, which is why SD card recovery software can often restore them. The sooner you begin recovery, the better your chances of success because every new file written to the card increases the risk of permanent data loss.
There are many SD card recovery tools available. For this guide, we chose Disk Drill because it consistently delivers some of the strongest recovery results when it comes to photos and videos commonly stored on SD cards. It supports hundreds of file formats, combines multiple recovery techniques in a single scan, and presents the results in a way that makes it easy to locate and preview files before restoring them.
In addition to its recovery capabilities, Disk Drill includes a Byte-to-byte Backup feature, which creates an exact image of the SD card so you can perform recovery on the copy rather than the original device. This is particularly valuable for memory cards because they are relatively fragile storage devices. Even a card that appears healthy can develop read errors or stop responding during a lengthy scan. By creating a backup first, you preserve the current state of the card and can continue recovery without repeatedly accessing the original media.
How to Recover Deleted Files from an SD Card Using Disk Drill
Disk Drill makes it easy to recover deleted files from an SD card in a few simple steps:
Connect the SD card to your Mac
For Disk Drill to do its job, your SD card must be recognized by your Mac computer. Hopefully, it will show up automatically in Disk Utility when you insert it into your memory card reader. If not, then you first need to figure out the cause of the SD card not showing up on Mac and fix it.
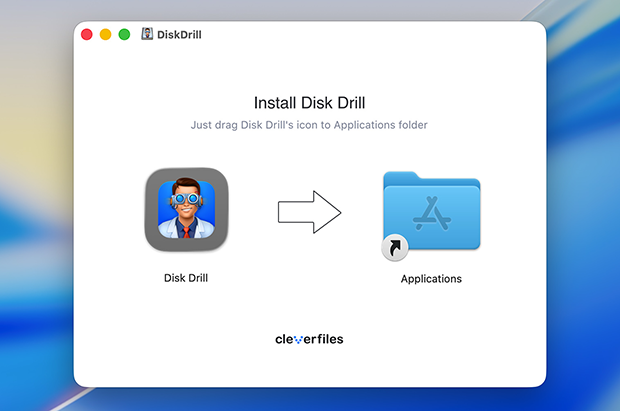
Download, install, and launch Disk Drill
You can download Disk Drill from its official website, and install it just by dragging the application icon into the Applications folder.
When you launch Disk Drill for the first time, macOS will check for malicious software, which is something that happens with all applications that don’t come from the App Store. You will then go through a brief initial setup process whose purpose is to configure basic diagnostics & usage settings and give Disk Drill the permissions it needs to do its job.
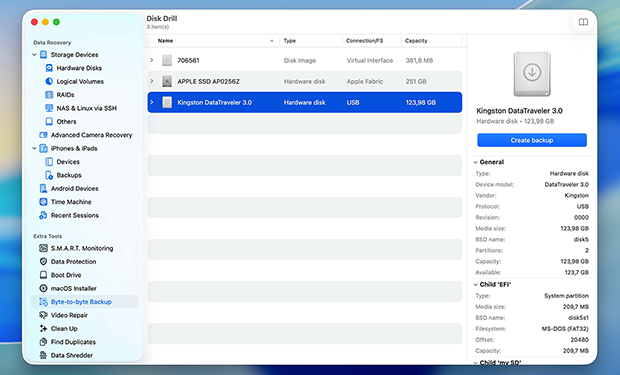
Create a byte-to-byte backup of the SD card
Before you scan the SD card, we strongly recommend creating a byte-to-byte backup. This gives you a complete copy of the card that you can safely scan without repeatedly accessing the original device.
To do this, open the Byte-to-byte Backup section from the left sidebar, select your SD card from the list of available devices, and click Create Backup. Choose a location where you want to save the backup image and wait for the process to finish.
Once the backup has been created, return to the Storage Devices section and click Attach Disk Image at the bottom of the window. Select the backup image you just created. Disk Drill will mount it and display it alongside your other storage devices.
Scan the SD card backup
Select the attached backup image and click Search for Lost Data. Disk Drill will ask you to choose between Universal Scan and Advanced Camera Recovery.

We recommend starting with Universal Scan. It is designed for general file recovery and works well for most deleted files. Advanced Camera Recovery was developed specifically for recovering fragmented videos recorded by cameras, drones, dashcams, and similar devices. If Universal Scan doesn’t find the files you need, you can return to this step later and run an Advanced Camera Recovery scan instead.
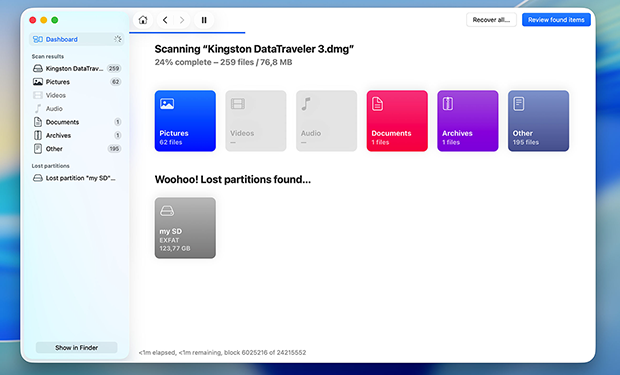
Disk Drill will begin displaying recoverable files as soon as it finds them, and you can start recovery immediately if necessary. However, we recommend waiting for the scan to finish. This gives Disk Drill time to analyze the entire SD card image, locate additional recoverable files, and display the estimated recovery chances for each item.
Review and select files for recovery
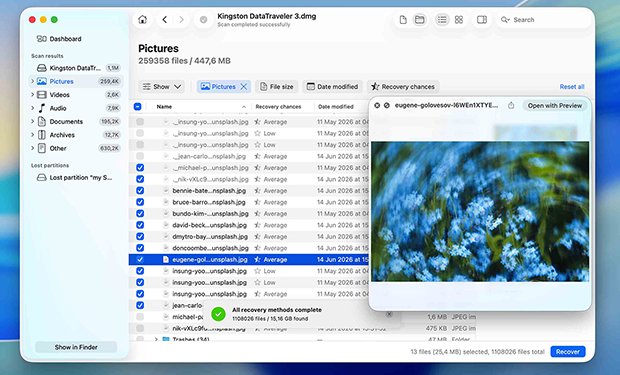
Once the scan is complete, browse the results and use the preview feature to verify that your files are intact. You can filter the results by file type, search by name, and review individual files before recovery.
Select the files and folders you want to restore by checking the boxes next to them, then click the Recover button to add them to the recovery queue.
Save the recovered files
After you click Recover, Disk Drill will ask you to choose a destination for the recovered files. Do not select the same SD card. Instead, choose a different location, such as your Mac’s internal drive or an external storage device connected to your computer.
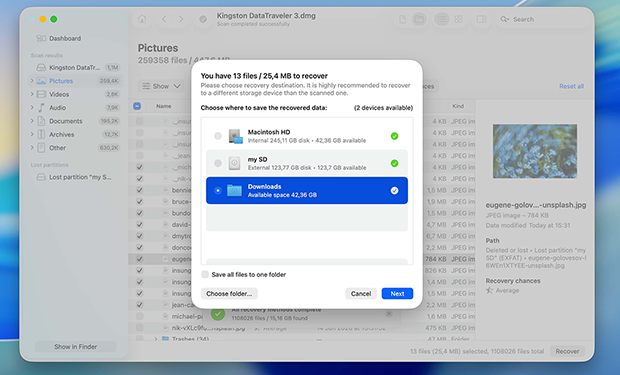
When you’re ready, click Next and let Disk Drill recover the selected files. Once the process is complete, open the destination folder and verify that the recovered files are accessible and working correctly.
What About Corrupted Files and Physically Damaged SD Cards?
Files may become corrupted for a variety of different reasons, including system crashes, power outages, software bugs, and malware. When corruption occurs, the affected files may be impossible to open, or they may disappear completely — it all depends on the type and extent of the corruption.
Mac data recovery software can identify corrupted files that are still physically located on the flash memory chip and recover them. But the recovered files will not be fully functional, and photos may contain visual artifacts, videos may fail to play correctly, and documents may open with missing content.

In some cases, you may be able to repair the recovered files. For example, Disk Drill includes a Video Repair feature that redirects you to an online video repair service. By selecting the camera model that recorded the video and, in some cases, providing a healthy sample file from the same device, you may be able to make a damaged video playable again. Similar repair tools are available for photos and other file types, though the results vary depending on the extent of the damage.

What even the best SD card recovery software can’t do is recover files from SD cards that have been physically damaged. A professional data recovery center may be able to repair the damage or extract data from the flash memory chip directly, but that’s only because professionals have access to sophisticated equipment.
That said, recovery software may still be able to scan a physically damaged SD card as long as it remains detectable by macOS. The problem is that physical damage often makes memory cards unstable. They may disconnect unexpectedly, produce read errors, become slower over time, or stop responding altogether during a scan. Because of this, every recovery attempt carries some risk.
So, if the files are genuinely valuable, we do not recommend experimenting with DIY recovery methods on a physically damaged SD card.
How to Recover Deleted Files from SD Card on Mac — FAQs
CompactFlash (CF) cards are, just like SD cards, flash memory mass storage devices, and they’re used primarily in digital cameras. Because they rely on the same technology, you can recover them using readily available data recovery software solutions.
Yes, it’s possible to recover RAW photos from an SD card, but only if you use a data recovery software application that can recognize them, such as Disk Drill.
As a Mac user, you can choose from multiple SD card recovery software solutions. These are the best tools currently available according to our experience:
- Disk Drill for Mac — best for photo & video recovery
- PhotoRec for Mac — best freeware
- R-Studio for Mac — best customer support
- TestDisk for Mac — best for partition recovery
- UFS Explorer for Mac — best for corporate use
Yes, permanently deleted files can often be recovered from an SD card, but only if the data has not been overwritten. When a file is deleted or an SD card is formatted, the operating system typically removes file system references rather than the actual file data. Until new data occupies the same storage space, recovery software may still be able to locate and restore the deleted files. For the best chance of success, stop using the SD card and start recovery as soon as possible.