How to Recover Deleted Files on Mac: 5 Best Ways in 2024

Almost all Mac users experience data loss at some point. Fortunately, it’s often possible to recover deleted files on Mac using built-in data recovery features and/or third-party data recovery software. In this article, we explain the most effective methods and solutions currently available.

Method 1. Restore Deleted Files on Mac from Trash

When is this method useful?

Trash is a temporary storage area for recently deleted files, which stay there for 30 days before automatically becoming deleted. As such, this method is best for addressing recent data loss, such as when you accidentally delete the wrong file.

What’s great about Trash is that it’s 100% reliable in terms of data recovery results. When a file is moved to Trash, it’s like when a file is moved to a regular folder. In fact, the actual data typically remains in the same exact physical location on your hard drive. That’s why you can move very large files in the blink of an eye.

Recovering deleted files from Trash is then, from the technical point of view, a simple matter of telling the operating system that you don’t want to allow other data to overwrite the deleted file when the 30-day period is over.

When should I try a different method?

Not all deleted files end up in Trash. Here are some situations when this method is useless:

  • You’ve used the Option + Command + Delete keystroke sequence to tell the macOS operating system to permanently delete a file without first moving it to Trash.
  • You’ve formatted the entire storage device instead of manually deleting individual files.
  • You’ve experienced a hardware-related data loss event, such as a broken hard drive platter or a broken connector on a USB flash drive.
  • You’ve lost important data due to corruption or some other form of logical damage, including malware attacks.

In the above-described situations, it’s best to skip this and the following method altogether and move directly to the last three methods described in this article, which can be used to recover permanently deleted files on Mac and, in the case of the last method, repair physical damage.

Follow the steps below to recover deleted files from Trash:

  1. Open the Trash folder by clicking the Trash icon on the right side of the Dock.
  2. Select the file you want to recover. You can hold down the Command key while clicking to select multiple files, or you can click the left mouse button with the mouse cursor hovering over empty space and drag to make your selection.
  3. Finally, right-click any selected file and choose the Put Back option. You can also drag and drop selected files outside the Trash folder, such as to your desktop.
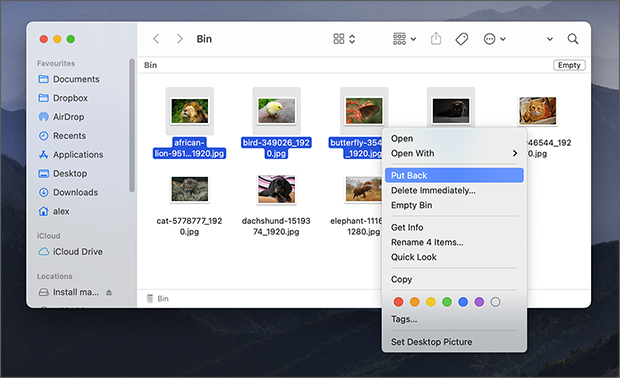
Recover deleted files from Trash

Method 2. Recover Lost Files Using Terminal

When is this method useful?

The Terminal app in macOS provides a command-line interface through which you can do everything from performing basic operations, such as moving files from one folder to another, to controlling entire applications.

Since the Terminal app is accessible even from Recovery Mode, you can use it to recover data in situations when booting into macOS is not readily possible.

When should I try a different method?

If you’ve never used the Terminal app in macOS and are not comfortable with the idea of following our step-by-step instructions to recover lost data with it, then there’s no reason to force yourself to use it. Plenty of other data recovery methods are available, and they can be used to recover lost data from Recovery Mode as well.

Because the method described below is really just a different way of moving deleted files from Trash to a different location, it works only when the files you want to recover are actually present in Trash. If the Trash folder is empty or your files are nowhere to be found because you’ve used the Option + Command + Delete keystroke sequence to permanently delete them, this method won’t help you.

Follow the steps below to recover deleted files using Terminal:

  1. Unless your Mac is running a version of macOS that’s older than macOS Catalina, you need to first boot your Mac into Recovery Mode by shutting it down and holding Command + R while pressing the power button.
  2. Once you’re in Recovery Mode, click the Utilities menu and select Terminal.
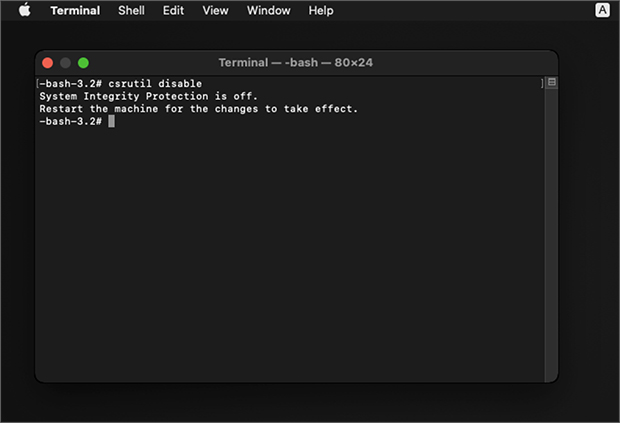
  3. Type the following command and press Enter to disable System Integrity Protection (SIP): csrutil disable.
Disable System Integrity Protection (SIP)
  1. Restart your Mac and open Terminal again (from your desktop or in Recovery Mode).
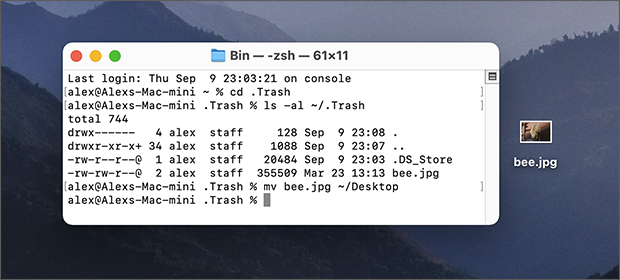
  2. Type cd .Trash and hit Enter to enter the Trash folder.
  3. Type ls -al ~/.Trash and hit Enter to see a list of all files that are present in the Trash folder.
  4. Use the following command to move a deleted file to a safe directory: mv file1 file2 (example: mv document.pdf ~/Documents)
Recover Lost Files Using Terminal

This is just one way to recover deleted files on Mac using the Terminal app. There are several other command-line recovery methods that are worth learning, including text-based data recovery apps like PhotoRec, so don’t hesitate to explore them.

Can Permanently Deleted Files be Recovered on Mac?

Files become permanently deleted when they are no longer physically present on the storage device, which typically happens when new data overwrites them.

Contrary to popular belief, overwriting doesn’t happen when you press Option + Command + Delete or when you empty Trash.

Instead, it can happen in a few seconds, in an hour, or in a month—it all depends on the size of your hard drive, its type, the number of performed write operations, support for performance-enhancing features such as the TRIM command, as well as other factors.

Generally, permanently deleted files can be recovered if:

  • You have an older Mac with a spinning hard drive (HDD) and begin the recovery process in a timely manner.
  • You have a backup of your data stored someplace safe, such as on your Time Machine backup drive.

Permanently deleted files can’t be recovered if:

  • You have a modern Mac with a solid-state hard drive (SSD) that’s formatted using the APFS file system, which enables the TRIM command by default.
  • You are dealing with a physically damaged storage device that’s not recognized properly by your computer.

Method 3. Recover Deleted Files from a Time Machine Backup

When is this method useful?

Time Machine is Apple’s backup utility, and you can find it included with Mac OS X 10.5 Leopard and newer. Because Time Machine backs up data to a secondary storage device and stores multiple versions of the same file, it can be used to address even serious data loss scenarios, such as those that involve permanently deleted files and failing system drives.

When should I try a different method?

Time Machine isn’t enabled by default because not all Mac users have an extra hard drive that they can use solely for backup purposes. What this means is that you won’t be able to use it to recover your files if you’ve never enabled it in the first place, and the same goes for all other data backup solutions.

Follow the steps below to recover deleted files from a Time Machine Backup:

  1. Connect your Time Machine backup drive to your Mac.
  2. Open Launchpad and click on Time Machine.
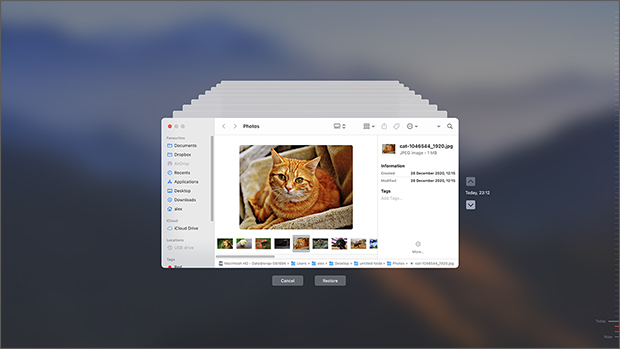
  3. Select the files you want to restore. Use the timeline on the right to go back in time in order to select a backup that contains your data.
  4. Click the Restore button.
Recover Deleted Files from a Time Machine Backup

Method 4. Recover Files Using a Data Recovery Software for Mac

When is this method useful?

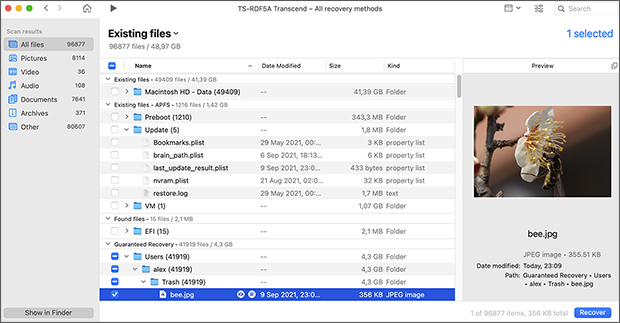
Third-party Mac data recovery software can scan a storage device to analyze its content sector-by-sector, finding files that are marked as deleted and thus inaccessible from macOS. We recommend you use data recovery software whenever you want to recover permanently deleted files but don’t have a backup that contains them.

When should I try a different method?

Even the best data recovery software for Mac can’t recover files that have already been overwritten by new data or wiped by the TRIM command. In fact, no data recovery solution can do that.

Data recovery software for Mac also can’t recover files from storage devices that are not properly recognized by your Mac. This sometimes happens because of physical damage or firmware issues. In such situations, you should always send your Mac to a data recovery lab, as we explain in more detail in the next section of this article.

Follow the steps below to recover deleted files using data recovery software:

  1. Choose and download a capable data recovery software application. There are many Mac data recovery software solutions you can choose from, from simple freeware utilities to feature-packed professional tools. We always use Disk Drill because it’s fully compatible with the latest Macs, very easy to use, and capable of delivering impressive results.
  2. Assuming you’ve also decided to use Disk Drill, you can go ahead and launch it just like you would any other application.
Disk Drill
  1. Go through the initial setup and give Disk Drill all permissions it needs to do its job.
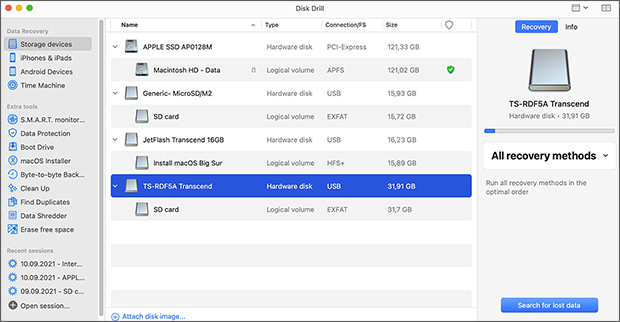
  2. Select the storage device you want to recover and click Search for lost data.
  3. Wait for the scan to complete and go through the results.
  4. Preview and select all files you want to recover. If the file can be successfully previewed, it means that it can be recovered.
  5. Click the Recover button and specify the desired recovery directory.
Recover Lost Files Using Disk Drill

Tip #1: Disk Drill has many features whose purpose is to improve your recovery chances. For example, it can create a full disk image of any storage device and then scan it to retrieve lost files from it, reducing the risk of something going wrong during the data recovery process to zero.

Tip #2: In situations when booting into macOS isn’t possible, you can run Disk Drill in Recovery Mode just by entering a single command in Terminal.

Tip #3: Usually data recovery solutions are able to recover deleted files from external drives, including SD cards.

Method 5. Send Your Mac Device to a Data Recovery Lab

When is this method useful?

Sending your Mac to a data recovery lab and letting professionals recover your data for you is a good idea in three main situations:

  • Your Mac has suffered physical damage and doesn’t work correctly, making it impossible for you to use other data recovery methods.
  • You don’t feel confident enough to recover lost data by yourself.
  • There are legal or compliance reasons that make DIY data recovery not worth the hassle.

When should I try a different method?

There’s a good reason why we haven’t described this method sooner: it can be very expensive. Data recovery labs offer highly specialized services, and they charge accordingly for them. It’s almost always less expensive to purchase DIY data recovery software and recover permanently deleted data at home than it is to send your Mac to a data recovery lab. As such, we recommend you exhaust all other options before choosing this method.

Data Recovery Lab

Follow the steps below to send your Mac to data recovery professionals:

  1. These days, finding a reputable data recovery lab is easy because virtually all labs advertise their services online. Googling something like “data recovery lab in [your city]” should produce plenty of options.
  2. After choosing a data recovery lab, the next step is to initiate a work order and prepare your Mac for shipping. Make sure to pack it with foam or bubble wrap so that it doesn’t get damaged during shipping.
  3. The best data recovery labs offer a free evaluation and charge only for recovered data. For this reason, you’ll first receive a price quote, and the lab will start the recovery only after your approval of the quote.
  4. Receive recovered data on a storage device of your choice. Some data recovery labs also upload recovered files to a private cloud, allowing you to retrieve them immediately.

How to Recover Deleted Files on Mac — FAQs

How to recover permanently deleted photos on Mac?

When photos become permanently deleted, they often lose associated metadata, such as their names and dates of creation. To recover them, we recommend you use a data recovery software application for Mac that lets you preview deleted files before their recovery, such as Disk Drill. That way, you’ll be able to easily select only the photos you want to get back and leave everything else behind. You should also check your iCloud backup if you use the cloud storage services because it provides a fault-proof way to recover permanently deleted photos and other data.

Can I recover permanently deleted files on a MacBook Pro with the M1 chip?

Yes, you can recover permanently deleted files on a MacBook Pro with the M1 chip from a backup. If you’re a Time Machine user, then you’re in luck because you can recover permanently deleted files with a few simple clicks:

  1. Connect your Time Machine backup drive to your Mac.
  2. Open Launchpad and click on Time Machine.
  3. Select the files you want to restore.
  4. Click the Restore button.

Alternatively, you can attempt to recover permanently deleted files from your iCloud storage, which is accessible from the web.

How to find deleted Safari history on Mac?

Safari stores its history data in the History.db file, which is located in ~/Library/Safari/. Should the file ever become deleted, you can restore this file using data recovery software or from an existing backup. What’s more, Safari uses iCloud to keep your browsing history securely stored in the cloud, allowing you to quickly find websites you visited on all Apple devices that are linked to your iCloud account. As such, even if you fail to find deleted Safari history on Mac, you may still be able to recover it from another device.

How to recover deleted iMessages?

You can easily recover deleted iMessages from iCloud by going to Settings > iCloud > Manage Storage > Backups. Verify that you have a suitable backup and don’t proceed any further unless you’re completely sure that you do. Why? Because the next step is to erase your entire device. To do that, go to Settings > General > Reset > Erase All Content and Settings. Confirm your choice by clicking Erase Now. Wait for your device to finish the erase process and click go through the initial setup until you see the Apps & Data page. There, select Restore from iCloud and sign in with your credentials. Choose the most recent backup that contains your iMessages.

NetSpot for iOS
Heat Maps & Speed Test